Urgent printing work can come up anytime and you need to keep your Epson printer always ready for that. Epson printer not printing can be a big problem when you need your device the most. We bring to you 16 promising fixes for your Epson printer failing to print. Along with the solutions, you will also find the correct set of steps to perform these fixes.
- Why is Epson Printer Not Printing Black and Other Colors?
- How to Troubleshoot Epson Printer Not Printing?
- Fix 1: Clean Dirty Printer Heads
- Fix 2: Clean Print Head Manually
- Fix 3: Set Epson Printer as Default
- Fix 4: Get New Ink Cartridge for Epson Printer
- Fix 5: Reinstall Epson Printer on System
- Fix 6: Ensure Correct Port for Epson Printer
- Fix 7: Update Epson Printer Driver
- Fix 8: Remove Long Print Queues
- Fix 9: Speed Up Epson Printer
- How to Troubleshoot Epson Printer Not Printing Black?
- Fix 10: Restore Printer Settings to Default
- Fix 11: Position Ink Cartridge Properly
- Fix 12: Check Black Ink Levels
- How to Troubleshoot Epson Printer Not Printing Properly?
- Fix 13: Ensure Ink Levels in Epson Printer
- Fix 14: Check Settings for Paper
- Fix 15: Use Head Cleaning Utility
- Fix 16: Use Advance Settings for Misalignment
Why is Epson Printer Not Printing Black and Other Colors?
Due to the following 8 reasons, your Epson printing might not be printing:
1. Your Epson printer might not be turned on.
2. The paper tray of your device may be out of paper.
3. Clogged nozzles are another common reason for this problem.
4. In some instances, not using the printer regularly can cause the ink to be dry and thus produce problems in delivering prints.
5. Your device might not be properly connected with your computer via USB.
6. An Epson printer with an unclean print head might not deliver prints.
7. In the case of low ink levels, your device may fail to print black and other colors.
8. The placement of the ink cartridges could be incorrect.
9. The Epson printer driver might not be having the latest updates.
How to Troubleshoot Epson Printer Not Printing?
Now, let us begin fixing the problem of your Epson printing not delivering prints. In the following sections, we have provided solutions to this problem. These solutions include cleaning the dirty printer heads on Windows and Mac, setting Epson printer as default, reinstalling the printer on your system, checking the correct port, etc.
Fix 1: Clean Dirty Printer Heads
The print heads get dirty and soiled with dust when your Epson printer is not used for a long period of time. This leads to issues such as Epson 310 printer not printing properly and Epson L210 not printing colors correctly. Epson printers have built-in head cleaning mechanisms. To start cleaning printer heads, follow the below-mentioned steps:
Clean Print Head for Windows:
1. On your system, go to the “Control Panel” from the “Desktop” and click on “Hardware and Sound”.
2. On top of the page, you will see the option “Devices and Printers”. Select your Epson printer from the list of printers.
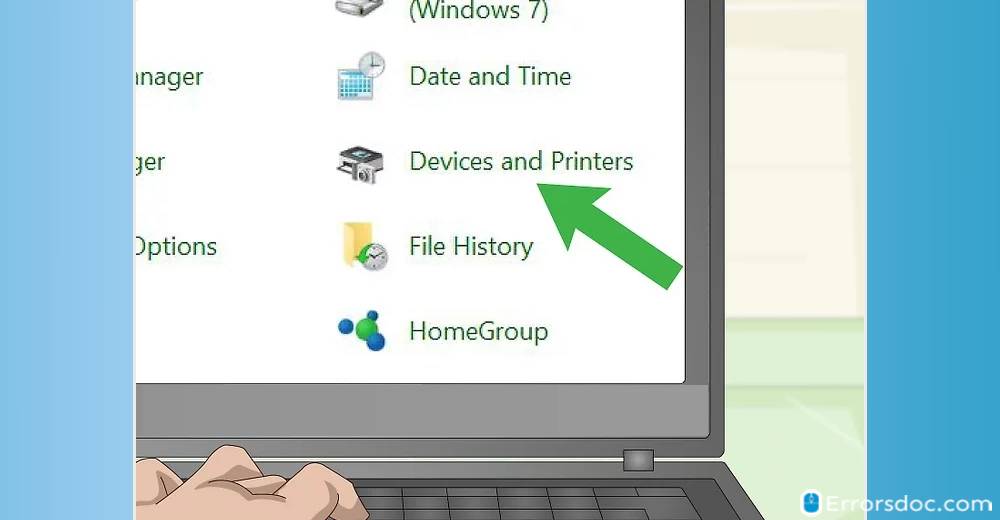
3. Right-click on the “Epson printer” and select “Printing preferences”.
4. A dialogue box will appear with 3 options on the top. Select “Maintenance”.
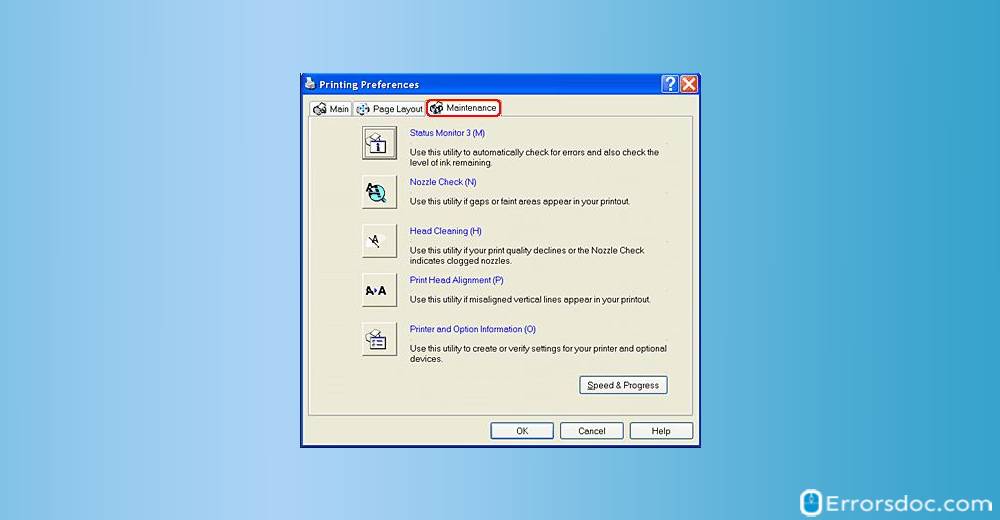
5. A new page will open. Select “Head cleaning”. As soon as you click on “Head cleaning”, your Epson printer will start cleaning the print heads. Make sure you don’t disturb the printer when the head cleaning is in process. The head cleaning process can take up to 5 minutes.
6. After the head cleaning is complete, a dialogue box will appear with 2 options “Print nozzle check pattern” and “Finish”. Click on the former option to print a test page and with this, you will be able to check if your Epson printer is reproducing colors accurately or not. If the print quality is not good, do the head cleaning again. You may have to run the process 2 to 3 times until you see the accurate reproduction of colors from your Epson printer.
Clean Print Head for Mac:
1. Place paper in the paper tray of your Epson printer.
2. Open “Mac OS Desktop”.
3. Tap “Apple Menu”.
4. Tap “System Preferences”.
5. Tap “Printer and Scanner”.
6. Find your Epson printer and click on it.
7. Tap “Options & Supplies”.
8. Go to the “Utility” tab.
9. Tap “Open Printer Utility”.
10. Next, tap “Head Cleaning”.
11. Wait for the process to complete and then check whether the problem has been fixed.
Fix 2: Clean Print Head Manually
If nothing seems to work, you have to take out the print heads carefully and manually clean them. For manual cleaning, follow the below-mentioned steps:
Clean Using Distilled Water:
1. Use an eyedropper to pour distilled water over the nozzles. This will cause the dried ink or dust to loosen up and fall.
2. Allow the nozzles to soak in distilled water overnight.
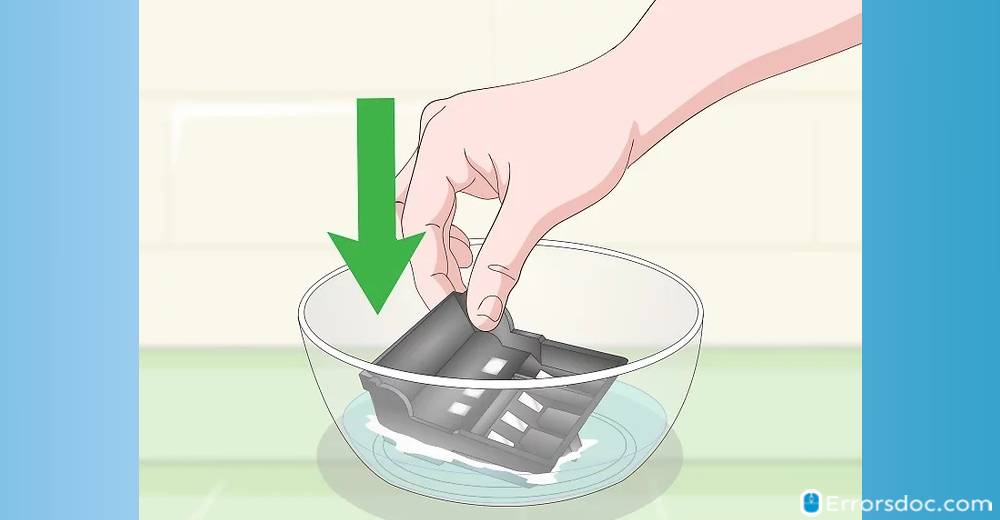
3. Afterward, clean the nozzles and print 4 to 6 pages.
Clean Using Paper Towel:
1. Soak a paper towel in distilled water or cleaner.
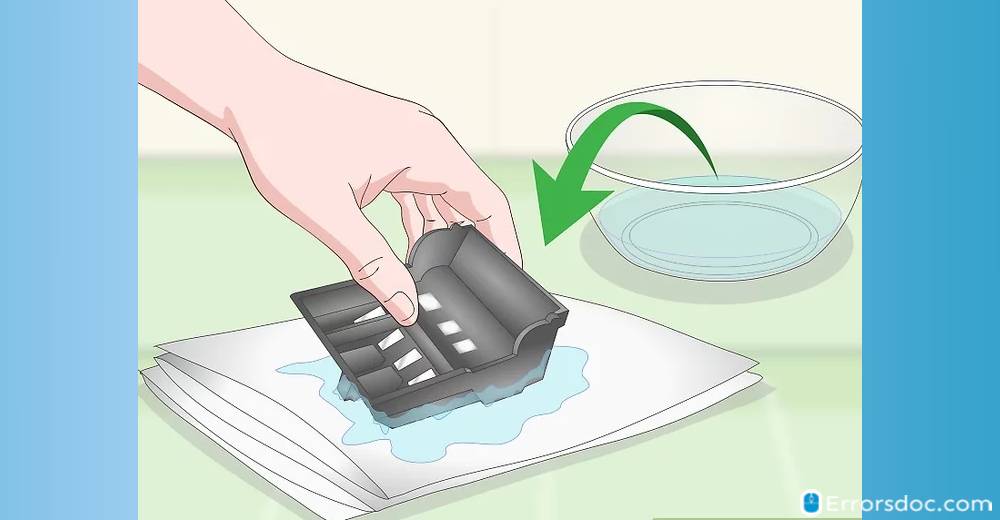
2. Rub the print head with it for 10 to 15 minutes. This will help to scrape off any dust or dried out ink.
3. Now, print 4 to 5 test pages to check the color reproduction.
Fix 3: Set Epson Printer as Default
If you are finding an answer to “Why my Epson printer is not printing?”, it could be that your device has not been set as the default printer. To set your Epson printer as default, you can try the 9 steps given here.
1. On your system, open the “Start” menu.
2. Tap “Settings”.
3. Click on the “Printer & Scanners” menu.
4. Visit “Devices”.
5. Click on “Printer and Scanners”.
6. You will see a list of printers. Choose your Epson printer.
7. Tap on the option of “Manage”.
8. Press the “Set as Default” button.
9. Now, try to print. The printing error will have been troubleshot.
Please Note: If you cannot see the option of “Set as default”, then untick the box “Let Windows manage my default printer”.
Fix 4: Get New Ink Cartridge for Epson Printer
Your Epson printer may not be printing due to the ink cartridge being old and out of service. As a suggestion, you can use a new ink cartridge for your device. Make sure that you install it correctly. Then try to take a print. If the old cartridge was faulty, the new one will troubleshoot the problem easily.
Fix 5: Reinstall Epson Printer on System
Is your Epson printer not printing anything? Reinstalling it on your computer can work. Here we have described the procedures for reinstalling Epson printer on Windows as well as Mac. Read the procedures carefully before you perform them.
Reinstall Epson Printer on Windows:
1. Open the “Control Panel” on your Windows system.
2. Go to “Programs”.
3. Tap “Programs and Features”.
4. Right-click on your Epson printer and hit “Uninstall”.
5. Next, turn off your Windows system and Epson printer.
6. Detach your printer from your system.
7. Wait for a few minutes and then restart your Windows system and Epson printer.
8. Connect your Epson printer with your system.
9. Now, to reinstall the Epson printer on Windows, open the “Start” menu.
10. Go to “Settings”.
11. Click on “Devices”.
12. Tap “Printers and Scanners”.
13. Tap “Add a printer or scanner”.
14. Perform the instructions on your screen to complete the reinstallation procedure.
Reinstall Epson Printer on Mac:
1. Go to the “Apple Menu” on your Mac.
2. Click on “System Preferences”.
3. Tap “Print & Fax”.
4. Highlight the Epson printer and press the minus-sign button to uninstall it.
5. Click on “Ok” to confirm.
6. Then access the “Hard drive”.
7. Go to “Library” and select “Printers”.
8. Click on the “EPSON” folder. Now, drag it to trash. All the Epson printer drivers installed on your Mac will be removed. You will be required to reinstall these later.
9. Now, clear the trash.
10. Restart Mac.
11. Visit the “Support Printer model page”.
12. Download the printer driver.
13. Run the downloaded file and follow the instructions to install it.
14. Press “Quit” when the installation is complete.
15. Open the “Apple Menu”.
16. Select “System Preferences”.
17. Click on “Print & Fax”.
18. If your Epson is connected to Mac via USB, it will be visible in the list automatically. If it is connected to Mac via a network connection, press the plus-sign button to add it.
19. Tap “More printers”, choose Epson TCP/IP, and select your printer.
Please Note: Enter your Epson Printer’s “IP address” in the “internet address”/”DNS name field” if it does not get displayed. Tap “Verify” and it will be displayed on the list. Select it and then press “Add”.
Fix 6: Ensure Correct Port for Epson Printer
During the installation, an improper port can very well be the reason for your Epson printer to not print. To change the printer port without reinstalling your device, you can follow these 8 steps.
1. Open the “Control Panel” on your system.
2. Tap “Devices and Printers”.
3. Choose your printer. Right-click on it to open “Printer properties”.
4. Click on the “Ports” tab and press “Add port”.
5. Choose “Standard TCP/IP Port” and tap “New port”.
6. On the next page, click “Next”.
7. Press the “Apply” button.
8. Now, restart your computer and printer.
Fix 7: Update Epson Printer Driver
If you are thinking “Why my Epson printer will not print?”, updating its driver can be a way out of the situation. Learn how to update the Epson printer driver in just 5 steps.
1. In the “Start” menu, type “Device Manager” and press “Enter”.
2. Click on your printer.
3. Now, right-click on your Epson printer and select “Update Driver”.
4. Select “Search automatically for updated driver software”.
5. Follow the instructions on your screen to complete the procedure.
Fix 8: Remove Long Print Queues
For those of you who have been using the Epson printer for a considerable time period, you should know that a long print queue gets formed. This long queue can halt your device from printing. Cleaning this queue will be a great idea. You can do this in 10 steps.
1. On your system, press the “Windows” and “R” keys together.
2. When the Run box opens, type “Services.Msc” and press “Enter”.
3. Look for “Printer Spooler” and right-click on it.
4. Then click on “Stop”.
5. Open “Desktop” and access “File Explorer”.
6. Type “%Windir%\System32\Spool\PRINTERS” in the “Address Bar”.
7. Remove all the files in this folder.
8. Go to “Print Spooler Properties” again.
9. Right-click on “Printer Spooler” and press “Start”.
10. After the process finishes, your problem will be solved.
Fix 9: Speed Up Epson Printer
Your Epson printer may face difficulties in printing in case it is very slow. We know how to speed up your Epson printer. The steps to do so can be found here.
1. Go to “Desktop” on your system.
2. Click twice on the icon of your Epson printer.
3. Open the “Print Settings”.
4. Click on the “Advance” tab.
5. Now, set the speed to high.
6. Perform a test print to check the problem now.
How to Troubleshoot Epson Printer Not Printing Black?
At the beginning of this post, we discussed with you why your Epson printer might not be printing black. Here, you will find the fixes to correct this problem. These fixes involve restoring the print settings to default, installing the ink cartridges correctly, and checking the levels of black ink.
Fix 10: Restore Printer Settings to Default
There may be a situation when the users start reporting Epson printer not printing after changing ink because the settings could have been changed. To restore the printer to default settings and fix the problem, follow the below-mentioned steps:
1. Press the switch next to the “Power” switch of your Epson printer for 5 seconds. The power LED will start blinking. Wait for the green blinking light to stop.
2. When the green light stops blinking on the “Power” button, it means that the color system has been fixed. Take a print to check the color reproduction. This will most likely fix the issue of the Epson printer not printing correctly the black color.
Fix 11: Position Ink Cartridge Properly
If your Epson printer does not print black, then you should ensure that the ink cartridge has been positioned properly. To place it in the right way, read the 4 short steps given.
1. Access the cabinet of your printer.
2. Take out the black ink cartridge.
3. Place it back correctly.
4. Then close the cabinet of the device.
Fix 12: Check Black Ink Levels
Low levels of black ink in your Epson printer could be another reason that the device is unable to print black. We will recommend checking the black ink status. The following 4 steps will help you to do so.
1. On your system, go to “Desktop” and double-click the Epson printer icon.
2. Select the tool “Epson Status Monitor 3”.
3. Run this tool and check the level of the black ink.
4. In case the black ink levels are not up, then get the cartridge filled.
How to Troubleshoot Epson Printer Not Printing Properly?
At times, your Epson printer may not print properly. It may deliver blurry prints, prints with gaps, or prints with misalignment. In the following sections, you can learn to fix these issues by ensuring the ink levels, checking paper settings, using Head Cleaning Utility, and accessing the Advance Settings.
Fix 13: Ensure Ink Levels in Epson Printer
When the ink levels are low, you may find that your Epson printer is not printing properly. We will teach you how to check the ink levels of your device using the Epson Status Monitor 3 tool. The procedure has been shown here.
1. Open the “Control Panel” on your system.
2. Tap on “Devices and Printers”.
3. Right-click on your Epson printing device in the Window.
4. Choose the option of “Printing Preferences”.
5. Go to the “Maintenance” tab.
6. Tap the “Epson Status Monitor 3” tool.
7. The ink levels in the cartridge will be visible in the new window.
8. In case the ink levels are low, refill the cartridge to resume printing.
Fix 14: Check Settings for Paper
In certain instances, your Epson printer may not print properly and deliver blurry prints. There may be an error with the settings for paper. In just 4 small steps, you can check these settings.
1. Open the “Epson Menu” on your device.
2. Go to “Main Menu”.
3. Choose “Media Type”.
4. Ensure the settings for paper.
Fix 15: Use Head Cleaning Utility
Due to several reasons, your Epson printing device may print with too many gaps. To fix this issue, try the following steps.
1. In the “Main Menu” of the device, Open “Media Type”.
2. Now, check for papers.
3. Ensure the date of the expiration of the cartridge.
4. Then launch “Head Cleaning Utility”.
Fix 16: Use Advance Settings for Misalignment
The problem of Epson printer not printing straight can emerge when your device is too quick. This can cause misalignment. To fix this problem, we will advise you to use the Advance Settings. Below we have shown how to use these settings.
1. Access the Epson Printer window.
2. Open the “Print Settings”.
3. Tap the “Advance Settings” tab.
4. Set the printing speed to low.
5. Now, take a print.
Models Compatible with Fixes
You can try the above-mentioned fixes for the following Epson printer models:
| Epson 200 Printer | Epson M200 printer | Epson L210 Printer |
| Epson XP 310 Printer | Epson L360 Printer | Epson 420 Printer |
Let’s Sum Up
This post has been filled with many fixes to correct the issue of your Epson device not printing. We hope these solutions help you resolve the trouble and make printing possible once again. While this problem has been taken care of, you can read our posts on Epson printer offline and how to troubleshoot an Epson printer to resolve other troubles too.
After doing a lot of research and reading articles found this great piece of content which solves my issue. I have Epson XP 352 and facing issues with printing. Love how you explain each point in detail. Thank you
A little addition to my last comment for Mac user found another helpful guideline from https://epson.com/faq/SPT_C11CG01204~faq-0000491-wf3720_4730 hope it will help.
I bought an Epson L3156 printer. I set up the printer according to the manuel and filled up the cartridges with correct ink. If I want to print something the is no ink on the paper. A blank paper comes out.