
Google Docs provides a number of tools to format your documents. If you want to learn how to create a hanging indent in Google Docs then you can go through this article which covers several ideas of using hanging Indent feature in Google Docs. But before we proceed, let us understand what is hanging Indent Google Docs.
Hanging Indent Google Docs
Hanging indent is a kind of style for text formatting. It is generally used in bibliographies or academic citations that involve Chicago style and MLA. A few of the users try this hanging indent in Google Docs just to get cool text formatting for their projects or documents.
It is named hanging indent because, in the formatted text, the first line has normal indentation whereas other lines indent farther than the 1st line. As a result, it converts the first line and hangs over the second line.
If you are curious to know how to get a hanging indent on Google Docs then look for the following guidance. It includes different methods to create hanging indents such as menu options, keyboard commands, and with the help of a ruler tool. You can also add a hanging indent in Google Docs using an iPad. Let jump to the tutorial without further delay.
How to Make a Hanging Indent On Google Docs with Menu Options?
To make a hanging indent with the help of the menu option, you can look for the following steps listed below.
Step 1: First of all, prepare a new document in your Google Docs account.
Step 2: Next to this, you can enter the text in which you wish to add a hanging indent.
Step 3: Now, you need to select the text area in which you desire to add a hanging indent. It could be a paragraph, or a sentence, or the whole textual content.
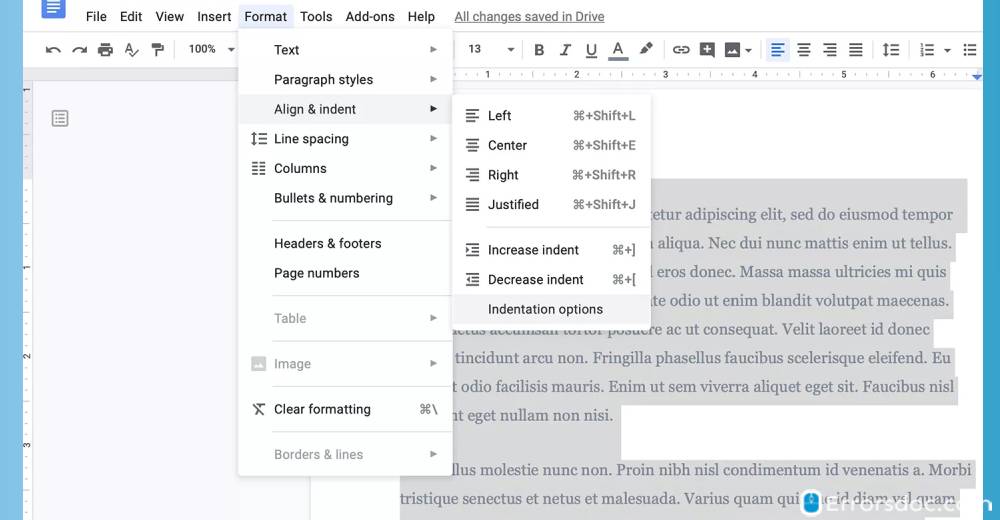
Step 4: Once you are done selecting the text, go to the menu option, and select the Format menu on the top.
Step 5: Then, you are required to select the Align & Indent option.
Step 6: Once done, select the indentation Options.
Step 7: At this point, you will see the Special Indent box. You can select the drop-down menu and pick the Hanging option.
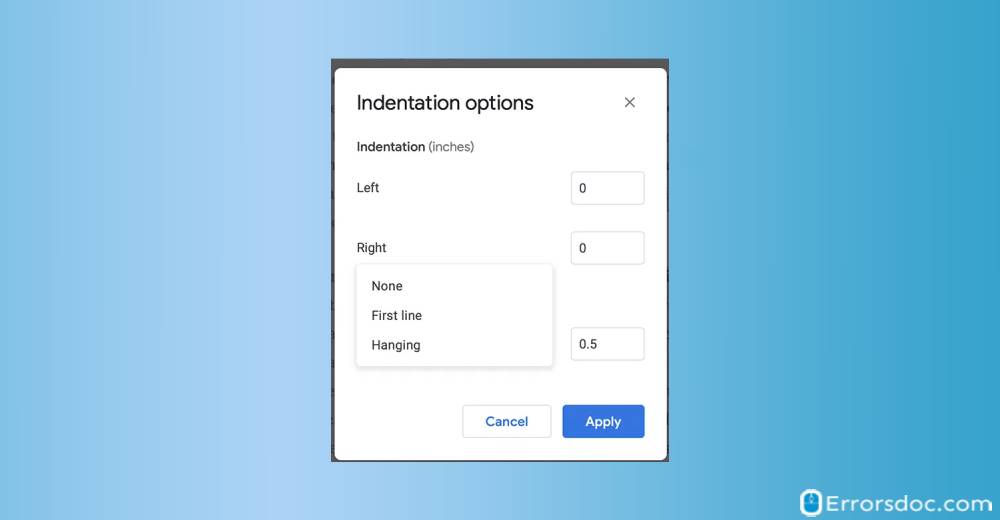
Step 8: Now, you can use this box in order to define the volume of this indent in inches.
Step 9: When you are done deciding, hit the Apply button. This will immediately add the hanging indent with the settings you have preferred.
How to Add Hanging Indent In Google Docs using Keyboard Keys?
This can be the most interesting thing to know how do you make hanging indent on Google Docs with the help of the Keyboard combination. If you are wondering how to get this done, look for the following steps mentioned below.
Step 1: As the first step, you can open the new document in your Google Docs.
Step 2: Then, you can place the cursor from where you wish to add the hanging indent.
Step 3: At this point, you can use the Return key with the Shift button and use it at the same time. This will automatically generate a line break, however, it would be invisible.
Step 4: Now, you can press the Tab key on your Keyboard. This key is to indent the line.
This method is pretty helpful, especially if you are trying to indent the second line of two. If you are not satisfied with the result then move to the next solution.
How Do You Make a Hanging Indent On Google Docs using a Ruler Tool?
The next method is to use the ruler to add hanging indent on Google Docs. If you want to know how to get hanging indent in Google Docs, go through the following steps that will enlighten you.
Step 1: As usual, you need to open the new document in Google Docs.
Step 2: Then, you can add or type the text content in which you want to add a hanging indent.
Step 3: After that, you can use the ruler. If it does not show, you can go to the menu options available at the top.
Step 4: Here, you can select the View option and choose the Show Ruler option.

Step 5: Before you use the ruler, first, you need to highlight the text content that you desire to add with a hanging indent. This could be a line, paragraph, or the whole textual content.
Step 6: In the ruler, you need to click and move the left indent control. The ruler should be like a blue triangle on the top left of your document.
Step 7: You can move smoothly and drop it where you find it right.
Note: While using the ruler in your document, make sure that you do not move the margin control instead of ruler control.
Step 8: Thereafter, you can click and move the right-indent control just as you did with the left one. All you need to move the Blue triangle located on the top right of your document.
Step 9: When you are done adjusting both the left and the right indent control, you will find your text content or document with well-indented paragraphs.
How Do You Make Hanging Indent On Google Docs iPad?
In case you use an iPad instead of a PC or Laptop then you should be aware of the steps that need to be performed on the iPad to create a hanging indent in Google Docs. If you want to learn how to insert a hanging indent in Google Docs then go through the following steps mentioned below.
Step 1: To begin, log in to your Google Docs and open a new document to add text.
Step 2: Next to this, you can add the citation and then highlight it.
Step 3: After that, you need to tap A from the top right corner of your app.
Step 4: Then, you will see the Text options on your screen automatically. Here, you need to tap Paragraph only.
Step 5: Now, you can hit on the Up arrow by default settings (1.5). This option should be under the Line Spacing option.
Step 6: Once done, tap A from the top right corner of your app.
Step 7: Thereafter, you can choose the right indent option.
Step 8: When you are done with the previous step, you will get the citation which would be double spaced and hanging indent.
Step 9: As the last step, you can tap anywhere on the center of your screen in order to close the paragraph options.
Conclusion
If you were wondering how to use a hanging indent in Google Docs then the above-mentioned guide is all you need. In this guide, you have learned how to make a hanging indent on Google Docs using the Ruler option, menu options, and the keyboard keys. It is easy to indent your documents in Google Docs and make your text content impactful.
Besides, if you are a regular user of Google Docs and curious to know How to Strikethrough on Google Docs then read this article to know more.