Is your iTunes computer not authorized? When you wish to use iTunes, you may be required to authorize your computer on it. Based on our research, we can help you learn how to authorize a computer on iTunes for Mac, MacBook Air, and Windows.
In any situation, if you are required to remove the authorization of your computer, then you can find help for that too.
In this post on how to authorize computer with iTunes, you will come across the methods for the following.
- What does Authorize this Computer Mean in iTunes?
What does Authorize this Computer Mean in iTunes?
Do you see the message that your computer is not authorized on iTunes while you are trying to use this app? If you do, then you may be required to authorize your computer on it. It means that you need to provide permission for accessing your content like movies and music.
What is the iTunes Authorize Computer Limit?
As many as 5 computers can be authorized on iTunes. So, you can access your content on these many computers. However, it may not be possible to authorize a computer on iTunes by using another computer. Also, you cannot authorize a computer via your iPod touch, iPhone, or iPad.
Now that you know the meaning of authorizing your computer on iTunes and the number of authorizations available, we should go ahead and learn how this is done and know how to Update iTunes on Mac and Windows.
How Do I Authorize My Computer for iTunes?
“How to authorize my computer on iTunes in the simplest way?” It will be pleasing to know that our way is simpler than you can think. Using our way, you can authorize your computer on iTunes in only 6 steps. Read ahead to know these steps.
1. On your computer, open “iTunes”.
2. Type in your “Apple ID”.
3. Type in the “Password” for your “Apple ID”. Then sign in.
4. Check the menu bar. Next, click on “Account”.
5. Then click on “Authorizations”.
6. Select the option of “Authorize This Computer”.
Quick Note: You may be prompted to authorize your computer in iTunes again. In this case, you will not be asked for any new authorization. When you are authorizing the same computer, the same authorization will be used by the Apple ID.
How to Authorize Computer for iTunes on Mac?
We will uncover the method to do so in this section. You can open the Apple Books or Apple TV app. Then you can do some steps to authorize it. To get more help, you can check out the following 6 steps.
1. On your Mac, launch the “Music” app. Alternatively, you can open the “Apple Books” app or the “Apple TV” app.
2. Enter your “Apple ID”.
3. Enter your “Apple password.
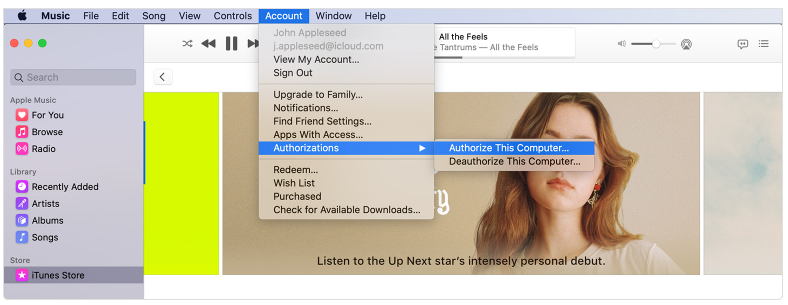
4. Now, look at the menu bar on your computer. Click on “Account”.
5. Then you have to choose “Authorizations”.
6. Now, click on “Authorize This Computer”.
That is it. The procedure to authorize computer to iTunes on Mac will be over.
Quick Note: In case you are requested to initiate the authorization again, the same authorization can be used for your Apple ID for the same computer.
How to Authorize Computer for iTunes on MacBook Air?
Just like all our other methods, this one is also effortless. Within a short while, you will be able to authorize your computer with the help of this 8-step method.
1. When your MacBook Air is turned on, launch “iTunes”.
2. You will be asked to log in using your “Apple ID’s” credentials.
3. Access the “iTunes Menu” bar.
4. Navigate to the “Account” option.
5. From the dropdown menu, tap on “Authorizations”.
6. Choose “Authorize This Computer”.
7. You will be asked to provide your account’s password one more time.
8. Then press the “Authorize” button or hit the “Return”/”Enter” key.
How to Authorize a Computer on iTunes for Windows 10?
Learn how to authorize your computer for iTunes on Windows. For this, a method has been provided below. This method will be the most suitable for the users of Windows 10. Without any delay, let’s go through the steps of this method.
1. On your Windows 10 system, go to “iTunes”.
2. Ensure that you are signed in with your “Apple ID”. If you are not, then please enter the correct credentials to sign in with your “Apple ID”.
3. Click on “Account”. This will be located on the menu bar at the top.
Quick Note: In case the desktop edition does not carry the menu bar, then, on your keyboard, you can press the “Control” key along with the “B” key. Thereafter, you can select “Account”.
4. In the fourth step, you have to tap “Authorizations”.
5. Now, tap “Authorize This Computer”.
6. You will be required to write your password again.
7. Press “Enter” or the “Return” key. Alternatively, you can press the button for “Authorize”. Now, the procedure will come to an end. You will have successfully learnt to authorize computer to play iTunes.
How to Authorize a Computer on iTunes 11?
“How do I authorize a computer for iTunes 11?” If you are using iTunes 11 on your computer, then you may be struggling to know the authorization procedure. Our experts have researched it out for you. To do this, you will have to read the set of instructions presented below.
1. Launch “iTunes 11” on your computer.
2.. When “iTunes 11” is open, on the top-left corner of your screen, you will find a little icon. Click on this icon.
3. Click on “iTunes Store”.
4. From the available options, you have to click on “Authorize This Computer”.
5. A pop-up will be displayed. In the required fields, provide your “Apple ID” as well as its “Password”.
6. Now, tap the button for “Authorise”.
We hope this method helped you to authorize a new computer on iTunes 11.
Important: Are you selling your computer or giving it to someone else? Or are you planning to get it serviced? If you are, then you should consider removing the authorization from iTunes. Gain more insights about doing this in the following sections.
How to Remove Computers from iTunes Authorized List on Mac?
“Can I remove authorized computers on iTunes?” Many of you might be wondering about this. Fortunately, iTunes presents you with an easy option to enable you to remove a certain computer from iTunes. This can be done by deauthorizing that computer.
To be familiar with the steps for doing so, you can glance through the following.
1. Start your Mac computer.
2. Launch the “Apple Books” app, “Music” app, or the “Apple TV” app.
3. You will find a menu bar at the top of the screen. From this, select “Account”.
4. In the fourth step, tap on “Authorization”.
5. Then click on “Deauthorize This Computer”.
6. For taking this action, it will be necessary to log in to your “Apple ID”.
7. After you have signed in with your “Apple ID”, you can click on “Deauthorize”.
Quick Note: If you wish to remove only one computer from the authorized list of iTunes on your Mac, then you should select “Deauthorize”. On the other hand, if no more authorizations are available and you would like to remove all the computers from the list, you should click on “Deauthorize All”.
In case you want to authorize a computer to iTunes again, or you want to authorize a new computer to it, then you can look at the sections above. The methods in those sections will work for you.
How to Remove Computers from iTunes Authorized List on Windows?
You may want to remove your Windows computer from the authorized list of iTunes. Your authorizations may be full. Or you may want to remove it for any reason. If you do not want to authorize a computer on iTunes any longer, then you can reauthorize it. It will get removed from the authorization list.
Follow this method for this purpose.
1. See to it that your Windows computer is on.
2. Now, launch “iTunes”.
3. On the visible menu bar, you have to tap “Account”.
4. The next step is to tap “Authorizations”.
5. Then click on “Deauthorize This Computer”.
6. For continuing ahead, please enter your credentials. Ensure that you correctly enter them.
7. Lastly, click on “Deauthorize”.
To Sum up the Above
Your all-time favorite iTunes can require your computer to be authorized for accessing its contents. The users of both Mac and Windows may be required to do so. Here, you got to learn various methods for authorizing your computer. The methods were accompanied by simple steps. In case any step was not clear to you, you can ask us for help through our comment section.
More helpful posts for you are available here. Get to know the best way for how to delete apps on Mac. And, also, browse through our time-savings methods to fix error code 43 Mac.