While some users find it a bit tough to factory reset their MacBook, other users look for less complicated methods to do so. For users of all kinds, we have gathered simple-to-follow methods. Find out how to factory reset MacBook Pro, MacBook Pro 2010, and MacBook Air by following these methods.
We will educate you about the following in the sections of this blog.
- How to Reset MacBook to Factory Settings?
- Method 1: How to Factory Reset MacBook via Disk Utility?
- Method 2: How to Reset MacBook to Factory Settings to Sell?
- How Do I Reset My MacBook Air to Factory Settings?
- Method 1: How to Factory Reset MacBook Air via Disk Utility?
- Method 2: How to Reset MacBook Air to Factory Settings with macOS Mojave?
- How to Reset MacBook Pro to Factory Settings?
Note: Prior to performing the procedures to factory reset MacBook, you can do the following things.
1. Prepare a backup of the hard drive of your MacBook. Resetting it to the factory settings will erase all your data from it.
2. Log out of your “iTunes” account.
3. Log out of your “iCloud” account.
4. It will be advisable to disable the “FileVault”.
How to Reset MacBook to Factory Settings?
To reset MacBook to factory settings, you can use 2 methods. In the first method, we will show you how to access Disk Utility for resetting your device to the factory settings. In the next method, you will learn to factory reset it to prepare it for selling.
Method 1: How to Factory Reset MacBook via Disk Utility?
“How to factory reset my MacBook using Disk Utility?” Get quick assistance to execute Disk Utility for this purpose. We have explained the method for resetting your MacBook to factory settings in 9 steps.
1. Begin this method by restarting your Mac. For this, press the “Power” button. Then click on “Restart”.
2. When your Mac is restarting, press the following combination of keys.
“Command” key + “R” key
3. The “Recovery Mode” menu will be seen. Choose “Disk Utility” from the menu.

4. Highlight the startup disk for “Macintosh HD” in the “Disk Utility” window.
5. Now, click on “Erase”.

6. A pop-up will be seen now. Here, changing the format will be required. Choose “macOS Extended (Journaled)”.
7. Then click on “Erase”.
8. From the menu of “Disk Utilities”, pick “Quit Disk Utility”.
9. You will see an option for reinstalling macOS. You have to choose “Install macOS”.
Within some time, new macOS will get installed. Then the procedure for Apple MacBook factory reset will be over.
Method 2: How to Reset MacBook to Factory Settings to Sell?
“How do I factory reset my MacBook if I am preparing to sell it?” When you are selling your MacBook, it is crucial to factory reset it. For doing this, you will need to logout of your accounts, remove the access from your messages as well as unpair the paired bluetooth devices. And then you can reset it to the factory settings.
To learn each step for this, you can read the directions given below.
1. Log out of your accounts on your MacBook.
2. Then open the application for “Music”, “TV” or “Books” on your system.
3. In the app, click on “Account”. Then click on the “Authorizations” option. Choose “Deauthorize This Computer”. Write your Apple account’s credentials. Then click on “Deauthorize”.
4. Open the “System Preferences” and click on “Apple ID”. Then tap on “iCloud” on the left and deselect “Find My Mac”. Then tap “Overview” on the left and choose “Sign out”.
5. Access the app for “Messages” and click on “Messages”. Click on “Preferences”. Then select “iMessage”. Now, press “Sign out”.
6. Open the “System Preferences” on your MacBook. Then click on “Bluetooth”. Unpair the device you wish to by pressing the “X” button. Then click on “Remove”.
7. Now, restart the MacBook.
8. Access the “Recovery Mode” on it by tapping the “Command” and “R” keys together”.
9. As soon as the Apple logo comes up, you will not be required to tap the keys.
10. Click on “Disk Utility” in the “MacOS Utilities” window.
11. Hit “Continue”.
12. Choose the startup disk. If it has not been renamed, then you will find it with the default name “Macintosh HD”.
13. Tap the “Erase” button on the top.
14. You will see three fields now. In “Name”, write the new volume’s name. In “Format”, you need to pick “Mac OS Extended (Journaled)”. Alternatively, you can select “APFS”. In “Scheme”, you can select “GUID Partition Map”.
15. Press the “Erase” button. Then leave “Disk Utility”.
16. You will see the window of “MacOS Utilities” now. In case it does not appear, restart the device. At the time of rebooting, press the “Command” and “R” keys together.
17. In the window, tap “Reinstall MacOS”.
18. Install the OS with the help of the on-screen instructions.
19. When the “Setup Assistant” is seen, you can shut down the MacBook.
The factory reset has been done in the right manner. Your MacBook is up for selling. Now, you can hand it over to the new owner.
How Do I Reset My MacBook Air to Factory Settings?
How do you factory reset MacBook Air in a less complicated manner? Many users can find the factory reset procedures to be very complex. In our 2 methods, we have simplified these procedures for you. In the first method, we will implement Disk Utility. And in the other method, we will guide the users of macOS Mojave to factory reset it.
Method 1: How to Factory Reset MacBook Air via Disk Utility?
Learn how to reset MacBook Air to factory settings without disc in this post. This can be done in 22 steps. These steps have been explained in simple language below. Let us read them.
1. On your MacBook Air’s keyboard, press the combination of keys given here.
“Command” key + “R” key
2. Start your MacBook Air while holding the combination of keys.
3. When you see the Apple logo, you can release the keys.
4. You will be asked to choose a “Language”.
5. Now, select “Disk Utility”. Then press “Continue”.
6. Via the sidebar, you can select the “Startup Disk”.
Note: By default, the “Startup Disk” may be labelled as “Macintosh HD”.
7. Now, tap “Erase”.
8. After erasing, select a name for the disk.
9. Using the dropdown menu, make a selection for “Choose Mac OS Extended (Journaled)”.
10. Then press “Erase”.
11. For encrypting the disk to receive additional security, you can select “Journaled, Encrypted”. Also, you will have to set a password for this.
12. Now, select “GUID Partition Map”.
13. Click on “Erase”.
14. Click on “Done”.
15. Now, you can exit.
16. The next step is to make a connection with the wifi.
17. Go to the “Main Menu”.
18. Click on “Reinstall macOS”. Then press “Continue”.
19. Press “Continue” again.
20. From the pop-up, click on “Continue” again.
21. Going through the “Software License Agreement” is the next step. Then press “Agree”.
22. Choose the disk for booting. Then click on “Install”.
The installation process will start. Your system will restart and keep the installation process in continuation. Your computer will restart again. That will be all.
Method 2: How to Reset MacBook Air to Factory Settings with macOS Mojave?
Now, we will be answering one of the most asked questions, “How do I factory reset my MacBook Air with macOS Mojave”. Again, you can launch the Disk Utility for doing so. However, the steps will vary a bit. These steps can be found right here.
1. Start your MacBook Air.
2. Hold down the following keys at the same time
“Option” key + “Command” key + “R” key
3. Once the logo of Apple is seen, you can stop holding the keys.
4. The startup will be over when the “Utilities” window is seen. You can remove the startup disk using the “Disk Utility”.
5. On the left, you can find the name of your drive. In case you have not renamed it, you will find it will be the default name “Macintosh HD”.
6. In case the startup drive is not seen, please click on “View”.
7. Now, click on the option of “Show Sidebar”.
8. Then click on “Erase” in the next step.
9. Select either “APFS” or “macOS Extended (Journaled) from the “Format” menu.
10. The disk needs to be given a new name now. You can also use the default name, that is “Macintosh HD”.
11. Tap on the “Erase” option. When you choose the “Erase” option, some time will be needed for completing the process.
Note: Every piece of information kept on the disk will now be removed. Also, your data and personal files will be deleted.
12. Please exit “Disk Utility” after you have erased the disk.
13. Access the “Recovery Menu”. Pick the option of “Reinstall macOS”.
14. You will see the instructions on your screen. Follow them for going ahead with reinstallation.
Note: Should you encounter any problem while installing macOS, internet recovery will be helpful. For this you can shut down your MacBook Air. Then tap the “Option” key, “Command” key, and the “R” key together.
15. Your MacBook Air will now restart. You will soon see the welcome screen.
Note: For some reason, you may want to leave your device in the default factory state. You can simply tap on the “Command” and “Q” keys and choose to shut down your system.
The factory reset MacBook Air method has been accomplished by you now.
How to Reset MacBook Pro to Factory Settings?
Discover the 3 widely-used methods to factory reset MacBook Pro in the sections coming up. In the first method, Disk Utility will be applied. In the second method, we will show you how to factory reset it in case of a forgotten password. And in the last method, we will be using the installation disc to factory reset MacBook Pro 2010.
Method 1: How to Factory Reset MacBook Pro via Disk Utility?
Check out how to reset MacBook Pro to factory settings in 19 steps. It will be suggested to first read these steps, understand them well, and then begin with executing them.
1. Press the “Command” key together with the “R” key on the keyboard.
2. Keeping the keys pressed, let the device start. Stop pressing the keys when the Apple logo is visible.
3. Selecting a “Language” is the third step.
4. Make a choice for “Disk Utility” and tap on “Continue”.
5. In the sidebar, you have to tap on “Startup Disk”. The default name for this is “Macintosh HD”.
6. Click on “Erase” and then enter a name for this disk.
7. Click on the dropdown menu. Then tap “Choose Mac OS Extended (Journaled)”.
8. Tap “Erase”.
9. Some of you may want to get additional security for the disk by encrypting it. For this, please choose “Journaled, Encrypted”. Then set up a password for the same.
10. Tap “GUID Partition Map” and press “Erase”.
11. In the next step, tap on “Done”. Afterwards, you can leave the window.
12. Connect your MacBook Pro to your wifi.
13. Launch the “Main Menu” of your device.
14. Click on “Continue” after choosing the option of “Reinstall macOS”.
15. Again tap on “Continue”.
16. You will see a pop-up. In it, press “Continue”.
17. The “Software License Agreement” will show on your screen. Read it and click on “Agree”.
18. Pick the disk that needs to be booted.
19. Finally, tap on “Install”.
As soon as you hit “Install”, installation will be initiated. Your MacBook Pro will start again during the installation process. Your device will restart once more. Till then you can wait.
Method 2: How to Reset MacBook Pro to Factory Settings without Password?
How to factory reset MacBook Pro without password? If this is what you too are thinking in your mind, then you can get the answer right here. Go through the method shown as follows. In less time, you will be able to factory reset your system even when you have forgotten its password.
1. When your MacBook Pro is on, press the logo of “Apple”.
2. Click on the “Restart” option.
3. Hold the “Command” and “R” keys at the same time.
4. Leave the keys when a spinning globe or Apple logo pops up.
5. Make a selection for your “Language”.
6. The “Recovery Mode” utility window will be visible. Choose “Disk Utility”.
7. Pressing “Continue” is the seventh step.
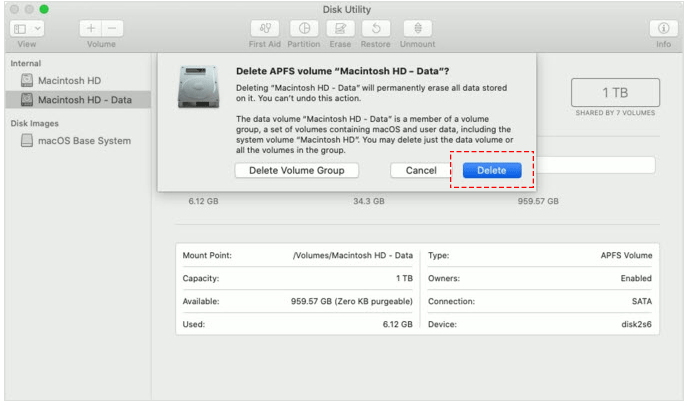
8. “Macintosh HD” disk and “Macintosh HD – Data” disk will be seen in Catalina. Delete the second disk. For this, Click on the disk and select it. Click on “Edit”. Then click on “Delete APFS Volume”. For providing your confirmation, press the “Delete” button.
9. Once the data volume has been removed, you choose “Macintosh HD” provided in the sidebar.
10. Click on “Erase”.
11. Fill in the following information.
Name: Write your name for the volume after it has been erased.
Format: The recommended format of Mac will be shown by default by Disk Utility.
12. Then press “Erase”. Now, you may be needed to provide your “Apple ID”.
Note: On the off chance that you do not remember your credentials for the “Apple ID”, you can go to the website of the account and find them.
13. Now, you can exit “Disk Utility”.
14. Access the “Utility”. Then pick the “Reinstall macOS” option.
15. You will see the directions on the screen. Do as directed for reinstalling macOS.
Note: A version of macOS or Catalina will be downloaded on your MacBook Pro. It will then be installed. Your system will restart. The welcome screen will appear. Then you can start using your system.
Method 3: How to Factory Reset MacBook Pro 2010 via Installation Disc?
When you purchase a MacBook Pro 2010, you receive an installation disc along with it. You can use this disk to reset your device in the shortest way. Here is how you can use the disc to reset MacBook Pro to factory settings using the installation disc.
1. In the first step, inserting the “Mac OS X Installation Disc” is required.
2. Click twice on the icon of “Install Mac OS X”.
Note: “Remote Install Mac OS X” can be used to factory reset your device with no optical drive. You can use the optical drive of another computer for this.
3. Choose “Utilities” from the “Installer”.
4. Tap on “Restart”.
5. Pick the “Language” as per your choice and press “Continue”.
6. Click on “Utilities”. Then click on “Disk Utility”.
7. On the left, you will find a list. Choose your disk.
8. Move to the “Erase” tab.
9. The pop-up menu of “Format” will appear. Click on “Mac OS Extended (Journaled).
10. Name the disk and then tap “Erase”.
11. Wait for the disk to get erased. Then tap “Disk Utility”.
12. Quitting the “Disk Utility” is the next step.
13. For installing the Mac OS X again, you can read the on-screen directions.
Note: Allow the installation to finish. Now, you will be required to insert the “Applications Installation Disc” received with your MacBook Pro 2010. Using this disc, you can install the “Life Applications” again by clicking on “Install Bundled Software”. Then proceed with the directions on your screen.
All in All
Here, you learnt how to reset your MacBook to the factory settings. We applied various methods for doing so. For those of you who have, by chance, forgotten the password of the device, our methods made it possible to factory reset your device.
Here is more for you to read. See how to factory reset HP laptop in different ways. Additionally, you can go through our post on how to factory reset Dell laptop as well.