Most users ask how do I add a new account in QuickBooks Online. If you have the same question in your mind, this guide is only for you.
QuickBooks allows you to create multiple accounts. If you have the admin rights then you can even assign different roles to each of its users. There can be other reasons to add accountant to QuickBooks online. For instance, you might need another account for yourself or probably you want to add a user to access QuickBooks company files.
If you are curious to know how to add an account to QuickBooks Online, stick through this guide to understand the procedure.
In this specific guide, you will know how to add accountant on QuickBooks online using the following ways:
- Why Do You Need to Add Bank Account in QuickBooks Online?
- How to Manage QuickBooks Permissions?
- How to Add Accountant to Quickbooks Online?
- How to Give Access to Users in QuickBooks Online?
- How to Change the Access Rights for the Users?
- How to Change the Name and Email Address for the Users?
- How to Delete QuickBooks Accountant Account?
- How to Add an Accountant to Quickbooks Desktop?
Why Do You Need to Add Bank Account in QuickBooks Online?
QuickBooks often come up with technical errors and to resolve those issues, you might need a user or accountant to add so that he can access the QuickBooks to resolve the issues. In addition to it, you can control the role of the accountant using QuickBooks features.
By adding a user or accountant, you can give full or selective access to the user. This will help you to keep the data under security. If it is required then you can change the information later. The added user or accountant can be removed as well. So without further ado, let us know how to add accountant access to QuickBooks online.
In the article, you will know the process to add accountant to QuickBooks online and along with that, you can learn how to manage QuickBooks user permissions. But before you proceed, know the benefits of QuickBooks user permissions.
How to Manage QuickBooks Permissions?
To know how to add accountant on QuickBooks online and manage user’s permissions, you are required to follow a number of steps in your QuickBooks account. For instance, you can add the accountant by sending an invitation,
Since QuickBooks can be accessed online as well as on Desktop, here are the steps for both; QuickBooks Online and Desktop.
How to Add Accountant to Quickbooks Online?
To add accountant to QuickBooks online, you are required to navigate through the QuickBooks settings. Let’s know how to add accountant access to QuickBooks online in the following steps.
- As the first step, you can sign in for your QuickBooks online company.
- Next to this, you can select the Gear icon and then go to Manage users.
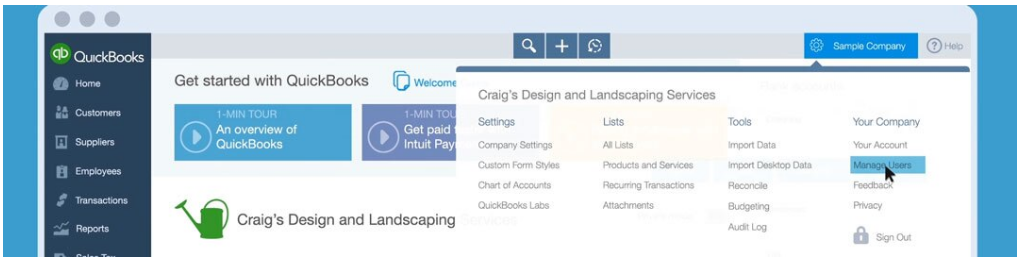
- Now, you can visit the Accountant section and click on the Invite Accountant option.
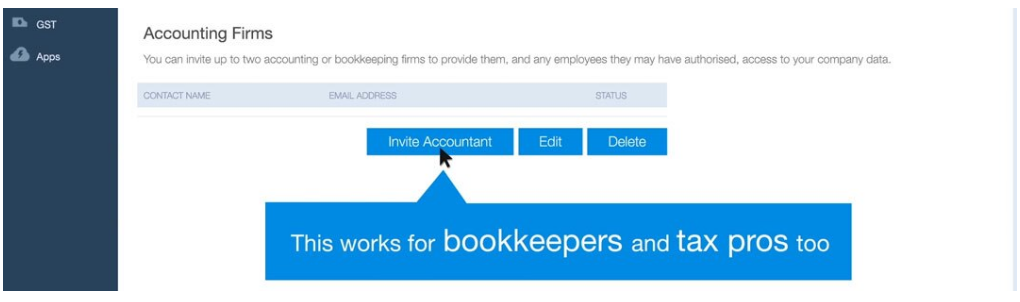
- After that, you can enter the email address of your accountant. Along with that, you can enter the first and last name.
- Once you do so, you will receive the link via email for the signup.
- Thereafter, you need to create a user ID before you sign up for the first time.
- Since your accountant would have received the invite so your accountant can sign in their status.
- Once the invitation is accepted, the status will change to active.
- Then, you can click on Next and Finish.
This is an easy process to add another accountant to your QuickBooks Online. All you have to do is to create an account for the user. Thereafter, you can send an invitation to a specific user so that the user can sign into the account.
How to Give Access to Users in QuickBooks Online?
Now, we will understand how to add a type of user to your QuickBooks Online. Doing so, the added accountant can run your account with limitations.
In QuickBooks Online, add accountant users with specific roles. To understand better, you can pursue the steps stated below:
- Firstly, you need to sign in to your QuickBooks online company.
- Now, you have to choose the Gear icon and select the Manage Users option.
- After this, you can choose the New Manager User section.
- At this point, you can select the type of user. It can be one of the following.
- Company Administrator
- Regular or Custom User
- Report Only
- Time Tracking Only
- Thereafter, you can choose the user’s access and go Next.
- Now, you can click on the administrative rights of the users and go with the Next button.
- Once you are done, enter the email address and name of the user and click on the Finish button.
By following these steps, you can easily give them access to the user. This is a great idea as you can add the user with certain limitations in your QuickBooks account.
How to Change the Access Rights for the Users?
There can be instances when you want to change the access for a particular user. For instance, you added a type of user as Report Only and now you wish to change it to Company Administrator. In this scenario, you can simply change the role of your user.
This can be done through QuickBooks settings. To change the access rights for the user, you can go through the steps mentioned below.
- The beginning process will be slightly the same as above. Go with the Gear icon first.
- Now, click on the Manage Users options.
- On the top right, you can click on the Change option.
- At this point, you can select the type of access you want to provide your users.
- Once you are done, click on Next and then Finish the process by saving the changes.
Once you are done changing the type of access for the user, it will be updated to your user’s account. Thereafter, they can run the account with the role they are being assigned.
How to Change the Name and Email Address for the Users?
In certain moments, you might need to change or edit the name or email address of the user. If that is the case, you can do it right through the QuickBooks settings. To change the name or email address of the user, you need to follow the steps one by one.
- Start clicking on the Gear icon.
- Now you can select the Manage Users option.
- Next to this, you can pick the name whose name or email address you want to change.
- Then, you can enter the information and save it.
This is how you can edit to change the name and email address for the user. Even if you added a wrong spelling of a user’s name, you can edit it in the same way.
How to Delete QuickBooks Accountant Account?
Till now we have learned to add a new bank account to QuickBooks Online. Now, in some situations, one has to delete the QuickBooks accountant account.
If you wish to do that, this can be done with the help of QuickBooks settings. To delete Quickbooks accountant account, you are required to look for the following steps.
- To remove the user, you can click on the Gear icon.
- Next to this, you can click on Manage Users.
- Now you need to select the name of the user whom you want to delete from the QuickBooks account.
- Thereafter, your screen prompts confirmation, you can select Yes to agree.
Once you confirm your actions, the account you created earlier will be deleted. If you want to remove other accounts for the accountant, you can do the same.
How to Add an Accountant to Quickbooks Desktop?
There are users who use QuickBooks Desktop. If you are one of them, the upcoming information is for you.
In case you wish to add a user or accountant to QuickBooks through QuickBooks Desktop, then you can do that on your computer. Follow the steps mentioned below.
- First of all, make sure you are logged in to your QuickBooks Desktop.
- In the company menu, you can select the Setup Users and passwords. Then, set up users.
- Next to this, you can click on the Add User option.
- Then, you can start entering the required fields.
- After this, you can go with Next.
- Now you are required to select which area of QuickBooks should be allocated to the user.
- Once you give access to the user, you can click on the Next button.
- Also, you can customize the restrictions. For instance, you can allow your users to have Full Access, No Access, or Selective Access. This feature will keep your data secured from each user.
- Once you are done, you can click on the Finish button to save the actions.
On QuickBooks Desktop, you can easily create an account, send invitations to the user, give selected access, change roles, and delete the user when required.
Summing Up
By gaining QuickBooks user permission, you can distribute customized access to office managers, sales representatives, and other employees or partners. With the QuickBooks user permission, you can set different roles for your personnel. Doing so, your data will be secured and your duties would have been allocated to each user simultaneously.
If you want to know how to add account on QuickBooks online or how to add my accountant to QuickBooks online, this guide would help you.
With the help of the aforementioned steps, you would be able to manage the account and role of the QuickBooks users. If you want to add an accountant to QuickBooks online or add a user on QuickBooks Desktop, you can do that easily.
Apart from this, you can change the access, name, and email address of the user. If it is required in the future then you can remove the user from the QuickBooks account as well.
Don’t miss out on reading on how to import accountant’s copy in QuickBooks?