The QuickBooks C-47 error code is a commonly occurring problem on the software. It can surface on your system as a result of the incorrect settings of Internet Explorer and improper browser configuration. However, it will be important to note that there can be more causes of this error code which you should know. As you read this blog, you will get to know all the causes of the problem on QB as well as QuickBooks Desktop. By eliminating these causes, we will show you how to fix the C-47 error code.
The following topics will be covered on this page for your complete understanding of the error code C-47 in QB:
- What is the QuickBooks C-47 Error?
- How to Fix QuickBooks Error C-47?
- Fix 1: Scan Your System for Malware
- Fix 2: Configure Internet Explorer in the QB Software
- Fix 3: Ensure that the System Driver is Updated
- Fix 4: Run Rebuild Data Utility and Verify Utility on Your System
- How to Fix the Error C-47 in QuickBooks Desktop?
What is the QuickBooks C-47 Error?
The error code C-47 can be found in QuickBooks when a problem occurs with the settings of your internet browser, especially in the case of a protected website. This error code can indicate that a particular transaction has not been identified. It can further be present when you try to remove that transaction from a particular report.
What are the Causes of the C-47 QuickBooks Error Code?
The following are the causes of the C=47 error code in QB:
1. The settings of Internet Explorer may not be proper.
2. In case your QuickBooks data file’s old backup exists, this error code may come about.
3. In case a file folder on your system has become corrupted and the transaction log file has been placed in it, this error may be showing up.
4. Problems may have occurred while doing the configuration of Internet Explorer for a stable website.
5. You may be trying to remove certain entries from QuickBooks. This task may not have been properly done.
6. The entries may have been edited by you. Any issues with the same may be resulting in this error.
7. Internet Explorer’s SSL settings may be incorrect.
8. Malware may be affecting your system and generating the error code.
How to Fix QuickBooks Error C-47?
The error code C-47 in QuickBooks can be fixed by executing the 4 fixes given as follows. These fixes have been gathered as per the different causes of this Intuit QB error code. You can read all of these fixes. Then depending upon the exact cause of this error code on your system, you can implement the ideal fix. Let’s scroll below and know the complete information about these fixes.
Fix 1: Scan Your System for Malware
Malware can be one of the reasons for seeing the QB C-47 error code. In addition to this, if the message “Error When Loading \3\LXCRtime.dll” is also appearing, then you should definitely go for scanning your system for the presence of malware. As you scan your system, the error should get resolved.
Fix 2: Configure Internet Explorer in the QB Software
As you would know the QB C-47 error can surface when the settings of the browser are not correct. You can simply configure the settings of Internet Explorer in the QuickBooks software. It should work very well in troubleshooting the error code.
Fix 3: Ensure that the System Driver is Updated
For doing away with the QuickBooks C-47 error message on your system, you can get the updates for the system driver. Getting these updates require you to start your computer and perform the configuration of the drive. Later, you can choose the option to sort the Device Manager and then proceed to download the updates.
Here, you can browse through the 10 steps of this fix for resolving the error message.
1. Turn on your computer
2. Configure your drive.
3. When the configuration is over, click on “Start”.
4. “Sort Device Manager” has to be selected.
5. Select the gadget on which the driver has been employed.
6. Now, the software has to be updated.
7. A new window will be available. Use it to browse the driver software.
8. From the list, select the gadget driver.
9. Proceed with the verification of the driver. Then launch it.
10. Then press “Next” to finish this fix.
Fix 4: Run Rebuild Data Utility and Verify Utility on Your System
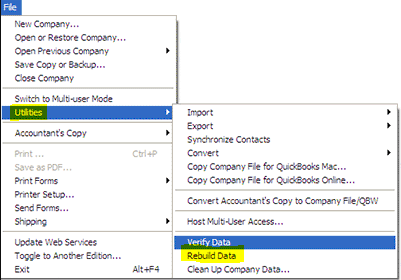
Rebuild Data and Verify are among the most helpful utilities that you can run on your system when faced with the QuickBooks error C-47. In this section, we will first show you how to implement the Rebuild Data utility from the File Menu. From this menu, you can use the Rebuild Data option to run this utility. After you have finished implementing it, you can run the Verify utility via the Utilities option from the File menu.
The complete steps of this fix can be gathered below.
1. Begin with running the Rebuild Data utility on the company file. For this, tap on “File”.
2. Select “Utilities”.
3. Thirdly, tap on “Rebuild Data”.
4. In the window of “QuickBooks Information”, you have to press “Ok”.
5. You will be asked to create a backup of the “Company File”.
6. You can press “Ok” in the sixth step.
Note: While you prepare and save the backup of the “Company File”, you may see the message “QuickBooks is Not Responding” on the screen. If the cursor can move over the screen, then the message would indicate that the “Rebuild” process is not yet complete. You can wait for some time to let the process finish.
7. Soon, your screen will display a message stating “Rebuild has Completed”.
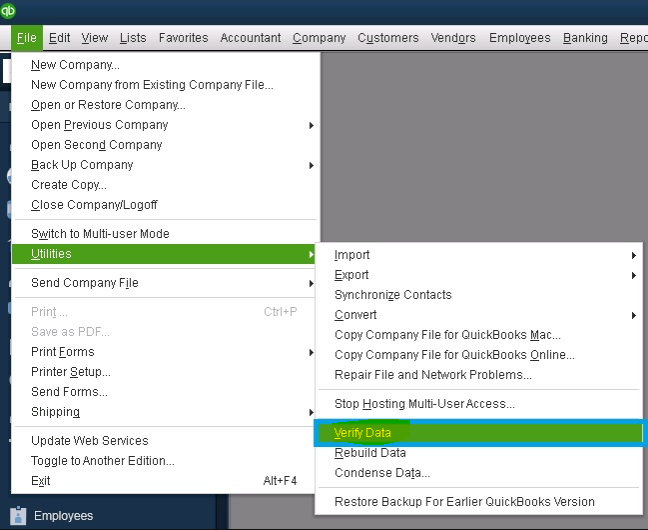
8. Now, let us start the “Verify Utility” after the data has been repaired. You can click on “File”.
9. Choose the option of “Utilities”.
10. Select “Verify Data”.
11. In case no problem is identified with the data, you can press “Ok”.
12. You can use the QB company file.
13. In case the “Verify” utility is able to find problems with the data, you can click on “View Errors” or “Rebuild Now”.
How to Fix the Error C-47 in QuickBooks Desktop?
For those of you who are using QuickBooks Desktop, it may not be unusual to come across the QuickBooks C-47 error message on the software. To fix this error on QuickBooks Desktop, you can get the updates for it as well as re-sort the files. If you would like to know more about this fix, you should read below.
Fix 1: Get Updates for QuickBooks Desktop and Re-sort files
QuickBooks Desktop may be requiring an update to work error-free. Also, if it has been updated but not in the correct way, then the QuickBooks C=47 error message may turn up on your system. So, in this fix, you will be guided for updating QuickBooks Desktop in the right way. Once the updates have been correctly downloaded and installed, we will show you how to re-sort the files.
Take a look at the complete steps of this fix below.
1. Run the “QuickBooks Desktop”.
2. Click on “Help”.
3. Enter the tab titled “Update Now”.
4. Choose all the updates you would like to download.
5. Press the “Get Updates” button.
Note: In the column of “Updates”, you can access more information with respect to the updates.
6. Open the link for “Maintenance Releases”.
7. On the new page that has just opened, detailed information of the “Changes” or “Improvements” in all the updates will be displayed.
8. Then exit the “QuickBooks Desktop” software.
9. Restart “QuickBooks Desktop.
10. As you restart “QuickBooks Desktop”, a window will open. You can press “Install Now”/”Yes” in case you would like to get the updates installed right away.
11. When the installation of the updates is over, you can start over your computer.
12. Now, let us begin with re-sorting the files. For this, you have to click on “Lists” when the QuickBooks software is open.
13. Opt for the “Chart of Accounts”.
14. Click on “View”.
15. Now, press “Ok”.
16. The “Menu List” will present you with the “Re-sort List” option.
17. From the list of items, you can make the necessary changes.
18. Click on the “Customer List” and perform the instructions.
19. Via the option of “Customer Center”, click on “Customer and Jobs”.
20. Open the “Re-sort List” via “View”.
21. Wait for the re-sorting to be over.
22. After that, exit “QuickBooks”.
23. Then restart your system.
24. Now, open “QuickBooks Desktop” again and ensure whether the error message is showing up.
To Conclude
From the definition to the causes of the C=47 error, we discussed everything in this blog that can help you in doing away with it. Make sure that each of the fixes given above is carefully administered by you. You will surely stop seeing this error when the fixes have been successfully implemented.
For further readings, these ones should be your pick. Know why the QuickBooks error 15106 is taking place on your system and get it removed with us. Along with that, know what is bad debt in QuickBooks and how you can write it off.