
Rules are important in QuickBooks for companies, firms, etc. When you create a rule in QuickBooks Online, you enable the software to work in a certain way. Hence, for the transactions you add or any procedures you conduct, these rules can make changes or categorize them in a particular way. For this to happen, you should also know how to set up rules in QuickBooks Online or the other versions of the software. Presently, you can make and set up rules in QBO and QuickBooks Self-Employed. When the setup is also complete, better categorization and use of information are seen.
How to Create Rules in QuickBooks?
You can create a rule depending on its type and software version. With reference to bank rules, you may use QBO’s Banking menu. To explain how to create rules in QuickBooks Online for prices, please see the Settings. Then you can apply the rules for your products. You can also create transaction rules. In the Self-Employed version, the option for adding them is given in the settings.
Method 1: Make Bank Rules in QuickBooks Online
Bank rules are mainly for the better categorization of your transactions in QBO. To make them, you can either see Transactions or the menu called Banking. When you find the Rules feature here, you can select it. In doing the process, you can clarify the transactions for which the banking rules will work.
How to create a rule in QuickBooks Online for banking is explained more below:
- In the starting, you have to use one of these menus:
- “Banking”
- “Transactions”
- Choose “Rules”.
- From this tab, you have to arrive at “New Rule”.
- In the field given as follows, add one name:
- “What do You Want to Call this Rule?”
- Hit the dropdown called “Apply this to Transactions that are”.
- You can click on “Money out”. Or, the option of “Money in” can be selected.
- Tap on “In”. here, you have to choose either the account for a credit card or bank.
- Specify the conditions of the bank rule you are setting up. You can do this by choosing “Set and Include the Following”.
- Now, you may press “+ Add a Condition”.
- Come to the “Conditions” option. Make it clear whether this bank rule is for “Amount”, “Description” or “Bank Text”.
- After this, you have to choose one of these options:
- “Is Exactly”
- “Contains”
- “Doesn’t Contain”
- Let us now establish further settings. You can apply the following 3:
- “Category Tags”
- “Transaction Type”
- “Payee”
- Push the “Save” option now.
Via the tab For Review, the new bank rules that you set up shall be auto-applied to the transactions. In case you want to add a particular rule for these transactions later, you can use the same tab. Tap on Create a Rule and then comply with the instructions.
- To review the transactions, tap on “For Review”.
- Under “All Transactions”, choose “Recognized”.
- For further setting up auto addition, you can make a new rule.
- Then the user has to choose “Automatically Confirm Transactions this Rule Applies to”.
- Again, you have to save this information.
Method 2: Add Price Rules in QBO
When a company is selling multiple products or providing services, it may want to add certain rules for prices. To create a rule in QuickBooks Online for prices, you can open the Company Settings. It can help you navigate to Sales. You can locate the option Products and Services here. Further, activate the option for price rules and then you can create them.
- You have to enable QuickBooks Online price rules. Click on “Settings”.
- Visit “Company Settings”. Optional to this, you may use “Account and Settings”.
- Come to “Sales”.
- Now, you have to navigate to “Products and Services”.
- Using “Edit”, you can tap on “Turn on Price Rules Beta”.
- Save this change and also press “Done”.
- The user can create or make the rule now. Visit “Settings” again.
- Choose “All Lists” from here.
- Tap on the option “Price Rules”.
- After this, please click on “Create a Rule”.
- Add the 1st rule. Then you can move to “New Price Rule”.
- Input this rule’s name.
Method 3: Create Transaction Rules in QuickBooks Self-Employed
In QuickBooks Self-Employed, a user can find a feature called Rules. It is of use for creating rules. For the transaction type, you can add a description while creating the rule. Based on the kinds of transactions, you can make the rule applicable. In addition, to your past transactions as well, you can make the created rule valid.
- Go to QBSE’s “Settings”.
- Then you have to visit “Rules”.
- Check the option which says “Create Rules”.
- Tap on “Description”.
- Input your vendor/customer. This should be the one for which the rule is being made.
- Click on “Match Exactly”. This option applies the rules to the exact transactions.
- Tap on “Account” and choose one for keeping the transactions.
- Use either “Split”, “Business”, or “Personal” to proceed.
- Enable “Category”. This is an optional step. It lets the software categorize your transactions.
- For the transactions that are categorized, choose “Also Apply to Past Transactions”.
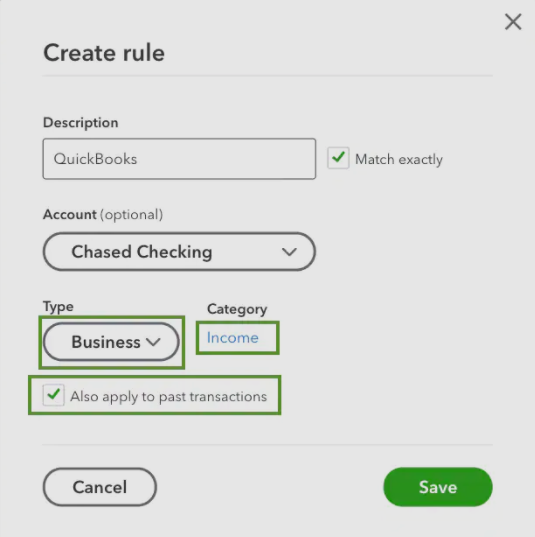
- Then save the changes.
How do You Set up Rules in QuickBooks?
You can set up mainly price and bank rules in the accounting software. You may find how to set up rules in QuickBooks Online for prices after activating them. In the instance of bank rules, you can directly use the Banking option. For both rule types, you can add the relevant details and finish the setup.
Method 1: Setup Price Rules in QBO
To set up prices rules, you require 2 options in QBO. This is inclusive of Start Date as well as End Date. Once you fulfill their requirements, you can decide whether the price rule will be set at default or customized. Should you want to customize it, then please add information such as percentage and rounding.
Read more about how to set up price rules in QuickBooks Online with these instructions:
- When the price rule has been activated, please find the following options in QBO:
- “Start Date”
- “End Date”
- Keep in mind that the rule shall be applicable to your customers. To change the default setting, use “Select Customers”.
- Click on “Select Individually”.
- Now, go to “Add Customer”. Here, specify the customer to whom the price rule should apply.
- This rule will also be applicable for all your services/products. To change this, press “Select Products or Services”.
- Following this, mention the type of product or service.
- The option of “Set Sales Price or Rate by” has to be chosen.
- Then select “Percentage”.
- Next, press the dropdown for “Rounding”. Make customizations as you like.
- Opt for “Apply” to set up rules in QuickBooks Online successfully.
The setup will be done and the customizations of the rule will be applicable. To see the changes you have made, you can check the Adjusted Price section. Make sure to save the customizations in the end.
Method 2: Setting up QuickBooks Online Bank Rules
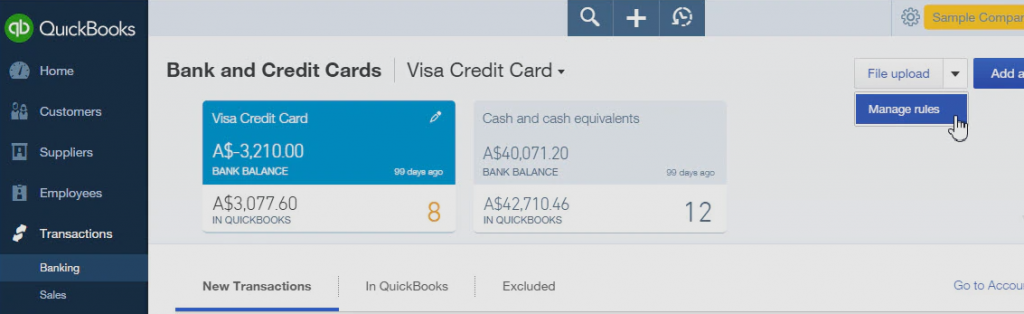
Banking rules are chiefly needed for transactions. After you have created them, you can start setting these rules with the option Banking. It is found in the menu named Transactions. Explaining further how to set up bank rules in QuickBooks Online, you can go to File Upload. Then you can start managing the rules.
- See “Transactions” in “QBO”. Press the option.
- Proceed to the option for “Banking”.
- Then you have to choose “File Upload”.
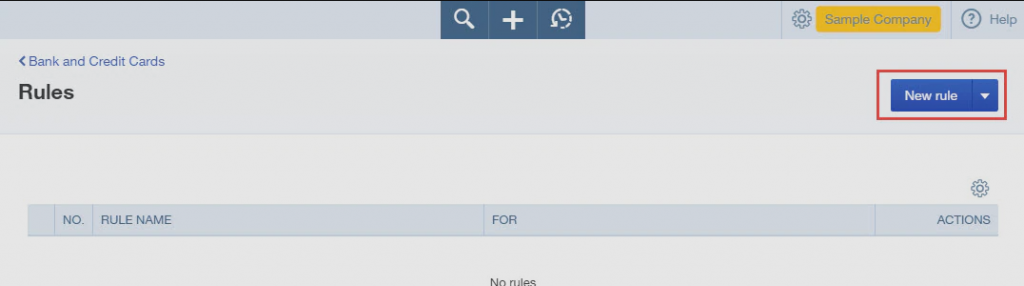
- The “Manage Rules” option has to be selected.
- After this, you have to come to “New Rule”.
- In “Rule Name”, add a name. It will be applicable for transactions.
- Specify one of these in “For”:
- “Money in (Income)”
- “Money out (Expenses)”
- In the option called “In”, you have to mention a bank(s) to which this rule will be applicable. You can also use an account for a credit card in place of the bank.
- Select “Any” or “All” for “Conditions”.
- Fill in “Description” as well as the spaces within it.
- As you reach the option “Bank Text”, you have to use the bank feed information to fill it.
- Mention the amount for your transactions.
- Then go to “Add Line”. This option enables you to fine-tune the bank rule while you set it up.
- In the next direction, please tap on “Transaction Type”. Then choose one of these in “Money out”:
- “Transfer”
- “Expense”
- “Cheque”
- For the option “Money in”, you can pick among:
- “Credit Card Credit”
- “Deposit”
- “Transfer”
- Continue to set up bank rules in QuickBooks Online by filling in these options:
- “Payee”
- “Location”
- “Tax Code”
- “Category”
- “Class”
- Eventually, you have to enter a memo for your transaction.
Note: At the end of this, you can see the option “Split” as well. You may use it when numerous line items have to be added. Be it as a percentage or even amount, this option lets you add the items.
This method for setting up QBO bank rules requires that you enter several pieces of information. Though it takes time to manually enter it, later on, the application of rules becomes automated.
Conclusive Lines
For the simpler functioning of businesses and companies, QB lets them create rules. While you create them, you can mention their type and things to which they will apply. Afterward, you can focus on how to set up rules in QuickBooks Online to complete their application on transactions, banking procedures, etc. With the methods added here for both creation and setup, using rules will be easier.