QuickBooks audit trail can comprise the records of all the activities taking place in the software through multiple users. This feature can enable you to make a report as well. These reports are the records of the QB edits. They can help you to keep track of all the amendments made in the data file of the accounting software.
The Accounts & Taxes option in the software provides you with all the details of the work related to the accounts. You need to look for this tab for doing an audit trail. You may also turn off this feature if you do not require it for certain reasons. You can do so by availing of the Utilities option. This option can be found on the menu of the QuickBooks Desktop.
Before you turn on/off or do an audit trail, learning more about it can be significant.
What is QuickBooks Audit Trail?
Audit Trail is a feature provided by the QuickBooks software that lets its users record and track each of the changes that have been made in the data file. With the help of QuickBooks Audit Trail option, you can authorize other users to make edits in the file. This can become a beneficial feature for the users.
Why Do You Need an Audit Trail in QuickBooks?
The usage of an audit trail can be useful to track all the logins that have been made by the other users. With this, you can also get a record of their activities. You can gather this information in a report to further maintain it for the future.
Other reasons to use QuickBooks audit trail report by the user are provided under:
- A transaction that has been lost or deleted earlier can be found out.
- You can check who is making changes in the books of accounts.
- You may even locate the name of the past accounts that have now been combined with the current accounts.
How to Do an Audit Trail in QuickBooks by Making a Report?
Creating a report can be a preferable way to exercise the audit trail feature of the Intuit software. You can make a QuickBooks audit trail report with the help of the Accounts & Taxes button. First, you need to make a visit to the Reports tab to find this button. After that, you are required to head to the Audit Trail feature.
Let us see how to do an audit trail in QuickBooks through the addition of its report:
- Run your “QB” account.
- Tap on “Reports”.
- Next, click on the “Account & Taxes” option.
- Press “Audit Trail” in this step.
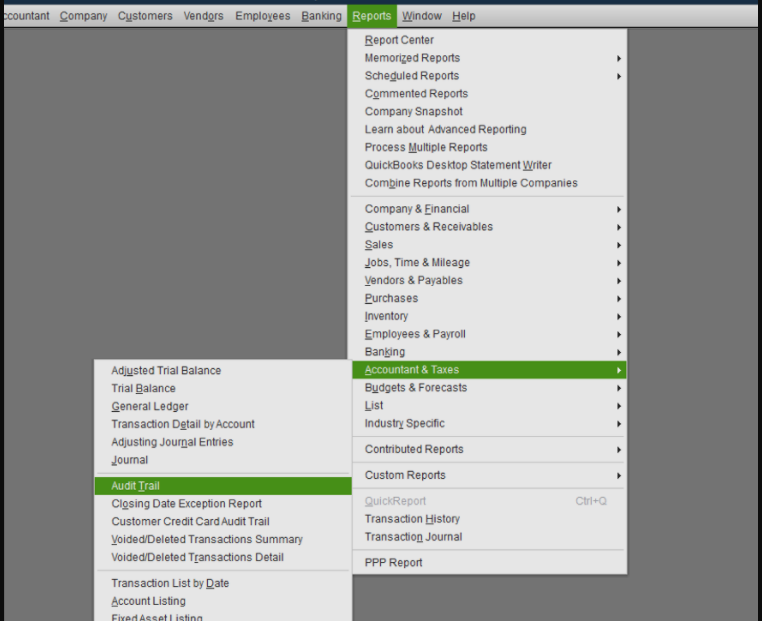
The report will be created with this step. Audit trail can be done now.
How Can the Audit Trail be Turned off in QuickBooks Desktop?
You may find that after turning on the audit trail, your software has started lagging. This can be an issue with this feature. Interestingly, disabling it can quickly resolve the issue. There may be no direct way to disable the feature other than performing a cleanup.
To run the cleanup, you need to opt for the Utilities tab. Proceed towards the Utilities option. Next, you need to choose among the given options on the screen. Also, set a date span and then go ahead.
Complete the remaining procedure to learn how to turn off the audit trail in QuickBooks Desktop:
- Visit “QuickBooks Desktop” or “QBDT”.
- Head to “Utilities”. Go for one of the options following this.
- Then provide the date range.
- Put a tick against all the boxes.
- Now, proceed to the cleanup.
Let the cleanup procedure be complete with no interference observed. Soon, the audit trail QuickBooks Desktop feature should get turned off.
Note: Using the cleanup process, you can both turn off and delete audit trails in the software.
In Closing
Audit Trail can turn out to be an important feature in QuickBooks when it comes to keeping a track of the activities performed by the users. The post highlighted the details about this feature. It put forth the steps for making an Audit Trail report. In addition, the process for turning off an audit trail was outlined as well. As per your convenience, you may choose to enable/disable it.