Quicken error CC 502 arises on your screen when you update the bank account especially while using the online services. This may happen due to the down server of your bank website. If your bank’s website is running the maintenance then the Quicken users may encounter glitches. As a result, you receive Quicken CC 502.
Due to this error, users cannot access their bank account. If you have stumbled on such an error, you don’t need to panic. Here, we will show you how you can get rid of the CC 502 error in Quicken in the following guide.
The blog has a focal point on several details including the causes, symptoms, and troubleshooting methods for Quicken error 502.
What Causes Quicken CC 502 Error?
The primary reason why this Quicken error CC 502 has appeared is that your bank website is on maintenance. However, there can be other possibilities this error is caused by. A few of the reasons are listed below:
- Financial institutions have updated a few services.
- There can be issues with the data file.
- Your Quicken software might fail to run with the new release.
- Temporary maintenance of the server.
- Viruses can also attack your computer due to which you are having problems with the program.
- Bank’s website is under maintenance.
Whichever the reason could be, you can solve this problem by implementing the right solutions. Before you move forward, let’s know how your computer system reacts when it is injected by CC 502 in Quicken.
What are the Symptoms of CC 502 error in Quicken?
Generally, when you encounter Quicken CC 502 with Chase bank, your system starts lagging or behaves strangely. A few of the symptoms are listed below that you may notice on your PC.
- When you run any programs, your computer crashes frequently.
- Windows turn sluggish and it responds slowly to the keyboard or mouse.
- Your computer machine might get frozen frequently.
These symptoms indicate that there is something troubling with your PC and software applications that are installed on your computer. To deal with such a scenario, you can implement effective methods to remove the CC 502 in Quicken.
Must Read: Quicken Install Error Code 1603
Things to Remember Before You Solve Quicken Error 502
Before you perform any troubleshooting step, one should take care of certain things. For instance, you should take a backup to avoid conflicts later and disable the transaction automation feature in Quicken. Below are the two steps that you need to consider.
Step 1: Take a Backup for Quicken Data File
It is always recommended to create a backup of your Quicken data files before implementing any method to fix the error. That is because if there is any fallback during the process of fixing the error, you can recover the files using the data file backup.
To create a back for your Quicken data files, you can follow these instructions:
- Launch “Quicken” software.
- Then, go to the “Backup and Restore” option.
- Now, click on the “Backup Quicken File” option.
- Hit the “Back up Now” button.
Once the backup is taken successfully, you also need to take care of another thing; don’t let your transactions be added automatically into the register. Read more in the next method.
Step 2: Ensure that the Transaction Doesn’t Get Added Automatically
It is suggested to prevent transaction duplicates in your account register. Besides that, you should make sure that the transactions don’t get added automatically into your account register. To disable the automation, you can do the following:
- Launch “Quicken” software.
- Then, click on the “Edit” button.
- Go to the “Preferences” option.
- Choose the “Downloaded Transactions” option.
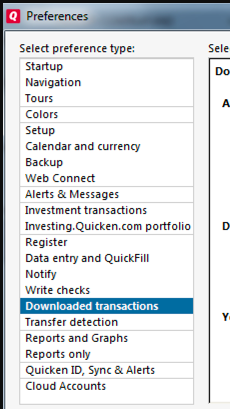
- Now, remove the checkmark for the “Automatically add to banking register” option.
- Hit the “Ok” button.
These are two steps that you have to follow before going with any technical method. Once the backup is taken and the automation option is unchecked, you can continue fixing the Quicken error 502 using the following guide.
Troubleshooting Methods for Quicken Error CC 502
Since you are aware of the causes and symptoms of Quicken error 502 so you can fix it accordingly. Here, in this guide, we will show you a number of methods with a step by step guide.
For instance, you can update Quicken, refresh online account information, verify your Quicken data files, deactivate your Quicken account, and create a new test file to ensure if there is an issue with the original Quicken data file. You can try on these methods one by one in order to get rid of CC 502 in Quicken.
Method 1: Upgrade Quicken to the New Release
The first and foremost way to treat this error is to make sure that you run the latest update of Quicken software. In this method, you are required to check for the updates using the following steps:
- Launch “Quicken” software.
- Then, go to the “Help” button.
- Click on the “Check for Updates” option.
At this stage, if you find any new updates available for your software then you can download and install it immediately. Thereafter, you can check for the error. If it still persists then it must be a case of online account information that you need to refresh. Know more in the next method.
Method 2: Update Your Online Account Information
Sometimes your account information needs to get updated. Therefore, in this method, we will show you how you can refresh your online account information in order to vanish the Quicken error CC 502.
- In Quicken, select the “Account” option located on the left.
- When the register is opened, you can go to the “Gear” icon located on the top right as a dropdown menu.
- Then click on the “Update Now” button. Alternatively, you can use the “Ctrl + Alt + U” key combination.
- When your screen prompts, enter your bank or vault password.
- After that, hit the “Update Now” button.
This will start updating or refreshing the account information. Once you are done following these steps, you can verify if the error occurs. This should solve the error. However, if it does not then you can continue following the other troubleshooting method.
Method 3: Verify Quicken Files and Disable Your Account
In this method, you are suggested to validate your Quicken files and then deactivate your account. Later you can reactivate the account. To understand the whole procedure, you can follow these steps stated below:
- Click on the “Tools” option.
- Then, go to the “Account List”.
- Select the “Edit” button (for the account that has errors) located under the account list.
- Go to the “Online Services” option.
- Hit the “Deactivate” button.
- Click on the “yes” button to confirm your action.
- Click the “OK” button.
- Click “Done”.
Important: Make sure that the Quicken files are not corrupted or damaged. To ensure this, you can do the following:
- Click on the “File” option.
- Select the “File Operations” option.
- Go to the “Validate and Repair…” option.
- Check the box for “Validate file”.
- Hit the “OK” button.
- Here, the “Save transaction” window might open, click the “Save” button.
After you follow these steps, the file validation will be initiated. The whole process may take time depending on the file size. Once the file validation is finished, you will receive a DATA_LOG where you will see if there is any damage in your Quicken files.
If there is any error, you can ask for assistance from a professional so that they can recover the file. In case you don’t find any damage in files, you can reactivate the account which you deactivated before. To do so, follow these steps:
- Click on the “Tools” option.
- Click on the “Account List”.
- Hit the “Edit” button.
- Go to the “Online Services” option.
- Click on the “Set up Now” button.
- Enter your username and password for your account.
- Check the option for “Save password”.
- You might be prompted to add “Vault Password” or “Quicken ID & Password”.
- Hit the “Connect” button.
While you reactivate your account, you will see the account information. You need to make sure that you Link (LINK- to existing Quicken Account) to your Quicken account rather than adding it again. This way you can get rid of the CC 502 error in Quicken.
Method 4: Make a New Quicken File for Test
If you are bothered by the Quicken CC 502 error then you can create a new file for the test just to make sure that your account connects easily. If the test file works correctly then it indicates the issue with your original file.
To create a Quicken file, you can go through the following steps mentioned below:
- Go to the “File” option.
- Click on the “New Quicken File” option.
- Hit the “OK” button.
- Type a name for your test file.
- Then, you will be prompted to log in to your account using your Quicken username and password.
- Now, click on the “Add Account” button.
- Select the “Account Type” e.g., checking, savings, credit card, etc.
- Pick the same financial institution that has the Quicken error 502.
- Enter your ID and password for the financial institution.
- Once your account is added with your test file, click the “Finish” button.
- Now, you will find the upcoming transactions. You can click on the “Accept All” button to put them in the register.
- To ensure the status, you can update the bank account in your test file.
- Once done, hit the “Close” button.
- Click on the “File” option.
- Select the “Original File” at the bottom.
- Now, click on the “Tools” option.
- Hit the “Add Account” option.
- Select your account financial institution and account type for the account.
- Enter your ID and password.
Note: When you click on the Save password, you may be prompted for Quicken username and password or vault password.
- Now, hit the “Sign In” button.
- Click on the “Connect” option.
- Here, it will add to the original file.
- Now, you don’t need to add the account again. All you have to do is place your cursor to add and then select the LINK- to existing Quicken Account.
- Then, select the account that has the error.
- Hit the “Next” button.
- Once the account is added successfully, click on the “Finish” button.
After following these steps, you will have to make sure that there is no error with your original Quicken File. To ensure that, you can follow these steps:
- Go to the “One Step Update” icon.
- Mark the account which you were having issues with.
- Enter the password.
- Hit the “Update Now” button.
- When it says “One Step Update Complete”, click the “Close” button.
This is the whole procedure of creating a test file to ensure there is no trouble with your original Quicken File. This should solve the CC 502 error in Quicken.
So these are all the methods that can help you to eliminate unwanted errors from your Quicken account. If you are having some issues with the Quicken data file then you can contact your bank website or financial institution so that you can ask for assistance.
In a Nutshell
Quicken error 502 is caused when the bank website is under maintenance due to which you cannot access your bank account details. However, there can be instances when your Quicken data files or the Quicken software need to get updated.
Therefore, you should check the update release for Quicken software, refresh online account information, verify your Quicken data files, deactivate your Quicken account, and create a new test file to ensure if there is an issue with the original Quicken data file.
By following these methods, you can easily remove the error from your Quicken software. In case you are receiving the same error even after implementing different solutions then you can contact your bank institution.
Hopefully, you find this guide helpful. If you have any questions, don’t hesitate to drop your query in the comment section.
If you use QuickBooks and are facing stubborn errors then you can check out the following guides to get rid of certain errors.