Based on your requirement, you may want to start a new QuickBooks company file. In this software, there are various methods that can be implemented for making a fresh file for your company. These options include Start Setup, Express Start, and Detailed Start. Preferably, they can be used for setting up new company files in QuickBooks Desktop and its versions Premier Accountant, Enterprise, and Enterprise Accountant. In the software’s versions like QuickBooks Pro and Premier, the Utilities option provides a shortcut for making these files.
You can learn in detail about how to start a new company file in QuickBooks and its versions by reading more. Along with the options mentioned above, we will also show you how an existing or old company file can be used for making a new one.
Here, you can find a synopsis of this blog.
- How Do I Create My New Company File in QuickBooks via Express Start?
- How to Start a New QuickBooks File from an Existing Company File?
- How to Create a New Company File in QuickBooks Desktop?
- Option 1: Making New Company File via Start Setup/Express Start
- Option 2: Creating New Company File from Detailed Start Option
- How to Set up a New Company File in QuickBooks Pro/Premier?
How Do I Create My New Company File in QuickBooks via Express Start?
Express Start is an option that enables you in quickly starting a new QuickBooks company file. To utilize this option, you can locate it in New Company in the File option. Opt for QuickBooks Setup and then select the mentioned option for continuing. Your company’s information will have to be filled in. Then you will be able to make your file.
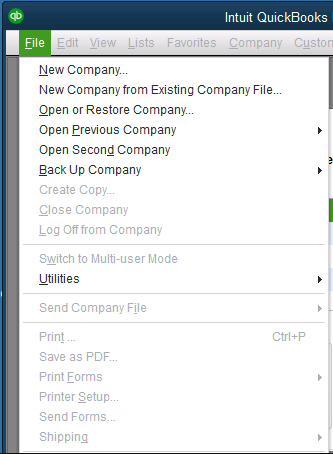
- Tap on “File” in the software.
- Go to “New Company”.
- In “QuickBooks Setup”, opt for “Express Start”.
- Write the information in the dialog box and press “Continue”.
- Input your company’s legal name as well as contact details.
- Choose “Preview Your Settings”. In its dialog box, select “Chart of Accounts”.
Important: In “COA”/“Chart of Accounts”, the accounts’ list can be viewed. You can add or remove accounts as per your preference.
- Enter the tab for “Company File Location”.
- Tap on “Change Location” for changing your company file’s default location.
- Press “Ok”.
- Again, select “Ok”.
- Now, choose the option of “Create Company File”.
- After this, you can start adding the data of your company. Add the following using the prompts:
- “Customers”
- “Vendors”
- “Employees”
- Provide the details of your products/services.
- Include your bank account’s information.
- Now, select “Continue”.
Tip: After creating your company file, you may want to update it at some point in time. You can get complete information here to update your QuickBooks company file.
How to Start a New QuickBooks File from an Existing Company File?
With the help of an existing QuickBooks company file, you can prepare another file. You can obtain the reports for Vendor Balances, Account Balances, as well as Customer Balances. Then you can print or save them in the form of a PDF. Following this, your lists and accounts can be exported. Then you can get the new company file prepared from the data of the old file.
Tip: Before you create a new QuickBooks company file from an existing company file, ensure that the change is needed. You can also connect with your accountant to confirm the same.
- Back up the account balances in “QuickBooks”.
- Click on “Reports”.
- Choose “Company & Financial”. Now, select “Customer Balance Detail”.
- Click on “Customers & Receivables”. Choose the “Customer Balance Detail” option.
- Opt for “Vendors & Payables” and then tap on “Vendor Balance Detail”.
Important: Steps 3, 4, and 5 should be executed only when you need the reports for “Account Balances”, “Vendor Balances”, and “Customer Balances”. Or, you can perform those steps that help you in obtaining the desired reports.
- The reports obtained can be customized in this step.
- Tap on the dropdown for “Print”.
- Choose the “Print” option.
- Pick “Save as PDF”. This step is optional.
- Export the lists, as well as accounts, from the existing company file.
Important: As an alternative to exporting them, the lists can also be manually entered.
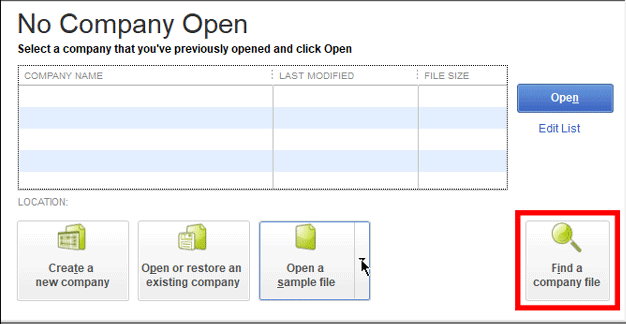
- Now, make a new QB company file. Visit “No Company Open”.
- The option of “Create a New Company” has to be picked.
- Pick one of the following setup options:
- “Express Start”/“Start Setup”
- “Detailed Start”
- Mention the required information after selecting the option.
- To prevent the overwriting of the data, input a unique name for this file.
- In the end, the “Start Working” option has to be selected.
- The lists need to be imported now.
- Provide the beginning balance for each of your accounts.
- Next to this, payroll services, online banking, and other features can be set up.
How to Create a New Company File in QuickBooks Desktop?
New QuickBooks Desktop company files can be created using the Start Setup or Express Start option. This option can be accessed from Create a New company feature available in the software. There is another option, Detailed Start, that is useful for starting company files from a scratch. In QuickBooks Desktop Enterprise, Premier Accountant, and Enterprise Accountant, you can make a new company file from the data of an existing one.
Below, you can learn more about how to create a company file in QuickBooks Desktop.
Option 1: Making New Company File via Start Setup/Express Start
A new company file can be made from the window of No Company Open in QB Desktop. Using the window, you can pick the Create a New Company option. Start Setup or Express Start can be used for making the new file for your company. You will be required to follow certain instructions. Now, you can continue to create a new company file in QuickBooks Desktop.
- Open “No Company Open” in “QuickBooks Desktop”.
- In this window, “Create a New Company” has to be clicked on.
- Choose “Express Start”/“Start Setup”.
- Provide the following information:
- “Business Name”
- “Industry”
- “Business Type”
Important: There may be an option to provide this information later. On finding this option, you can input the information after some time.
- Press “Create Company File”.
- The instructions on your screen will have to be followed.
- Enter a name for the file.
- Ensure that the file’s name is unique.
- Click on “Start Working.
Option 2: Creating New Company File from Detailed Start Option
To prepare a new QuickBooks Desktop company file, the Detailed Start option can be used. It should be used when you want to set up the file from scratch. You will find this open in Create a New Company in the window of No Company Open. After selecting it, fill in all the fields to complete the new file’s setup.
- Look for “No Company Open” after running the software.
- Tap on “Create a New Company”.
- Click on the “Detailed Start” setup option.
Important: When “Detailed Start” is used for creating a new company file in QuickBooks Desktop, you will have to do the setup from scratch.
- You will be provided with a few directions in QuickBooks Desktop. Implement them.
- Add a name for the newly made company file.
- Now, press “Start Working”.
Option 3: Preparing New Company File in QuickBooks Desktop Enterprise/Enterprise Accountant/Premier Accountant
In versions of QB Desktop like Enterprise Accountant, Enterprise, Premier Accountant, etc., we will set up a new file via the New Company from Existing Company File option. Your existing file can be run and its data can be copied to another file. This is how you will be able to create a new company file from your existing file in QuickBooks Desktop.
- Click on “New Company from Existing Company File” in the “File” menu.
- Press “Browse” for finding your existing company file.
- After choosing your file, press “Open”.
- Add a name for the file that will be made now.
- Pick “Create Company”.
- Now, the following will be copied into the new QB company file:
- “Preferences”
- “Sales Tax Items”
- “Memorized Report”
- “Chart of Accounts”
- You can wait till these items get copied.
Important: Information like “Payroll”, “EIN”, etc., that is sensitive will not be copied to the new file.
How to Set up a New Company File in QuickBooks Pro/Premier?
The users of QB Premier and QB Pro can open Utilities by visiting the File menu for setting up a company file. Clean up Company Data will be available. Select it and then start rebuilding the outstanding balance. After this, the vendor balance needs to be made again. For this, you will have to run the menu for Vendors. Again click on File and use New Company to continue making and setting up the file.
These are the remaining directions that explain how to start a new company file in QuickBooks Pro or Premier:
- In “QuickBooks Premier” or “Pro”, visit the “File” menu.
- The option of “Utilities” has to be clicked on.
- Choose “Clean up Company Data”.
- Every outstanding balance needs to be rebuilt.
Important: The outstanding balance should be rebuilt in the accounts receivable. For doing so, single invoices can be created again or invoices with balance forward type can be made for your customer’s balance.
- Go to the menu for “Vendors” for making the vendor balance again.
Important: Along with the vendor balance, the option of “Enter Bills” can be used. In “Uncategorized Expense Account”, the bills shall be charged. For payroll users, this feature may be unavailable. Also, the users of online banking in QB will not be able to use this feature.
- Now, enter the menu for “File”.
- Tap on the “New Company” option.
- Choose “Start Interview”. This option will be available in “EasyStep Interview”.
- On the display, some directions will appear. Follow them.
- You will be asked to provide some information. Correctly provide it.
Your new company file will be made in the accounting software. Also, its setup will be complete.
In Essence,
Making new company files in QuickBooks may not seem challenging after reading this blog. The methods included here showed you how to start a new QuickBooks company file step by step. As long as these steps are correctly followed, no problems should be faced in making or setting up your new files. Should you face problems even then, drop us a comment for assistance.
Along with establishing new company files in the software, you can also change their names. In the next reading, we have explained how to change your company file’s name in QuickBooks. Click here to read.