Invoices or bills can contain important information regarding the details of products or services and their prices. For purposes ranging from accounting to taxes, you need to save these details. Saving them in QB can be convenient with its option to import. You can import invoices into QuickBooks in different ways. A user may prefer an IIF format to do so. In addition, a CSV or an Excel file remains suitable for their import. With these ways, you can either import one invoice or multiple/a batch of the documents. Additionally, you can do this for versions including QuickBooks Enterprise, Desktop, and Online.
How to Import Invoices into QuickBooks Enterprise?
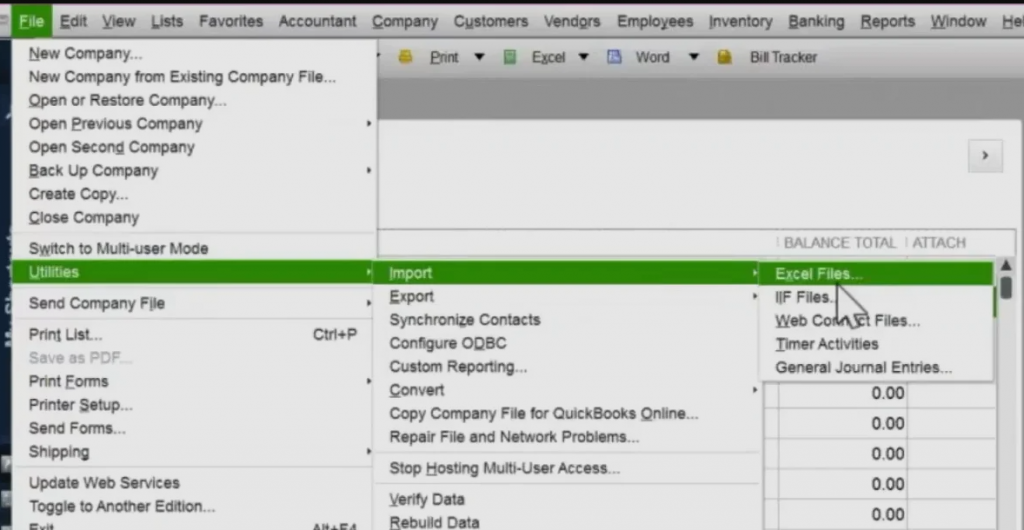
For the enterprise version, you can use Excel files. To import invoices into QuickBooks Enterprise with them, run its File menu. From here, you can choose the option for Import and then upload these files. Once the method is over, the software will open your imported files and you can check the data in them.
- You need to visit “Utilities” after you choose “File”.
- Please press “Import”. You can find it in the dropdown.
- Now, “Excel Files” has to be clicked on.
Note: You may choose an option for the CSV format should you want to use it for import purposes.
- For not adding/editing batch entries, you can tap on “No”.
- Further instructions should come on screen. Perform them.
- Ensure that you specify this data’s type.
Once the method is done, you will find a spreadsheet of Excel with complete formatting of the files. It will be automatically opened by QuickBooks Enterprise.
Note: This method is also available for application to other versions of the accounting software. Thus, you can apply it on QuickBooks Desktop as well.
Can I Import Invoices into QuickBooks Desktop?
You get the feature to import your invoice/bill in QBDT via an IIF file. You can place all the information of the document in it. Then it can be uploaded to the software. Should you prefer a CSV format, then you can select the tab called Banking. Specify the format in it and the import of your files should start.
Method 1: With IIF Files Option
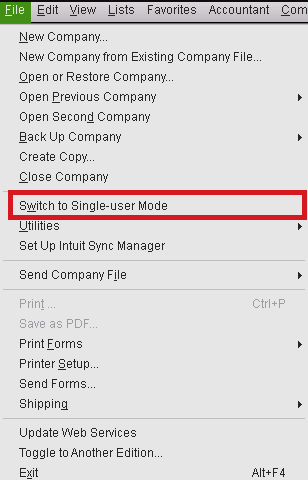
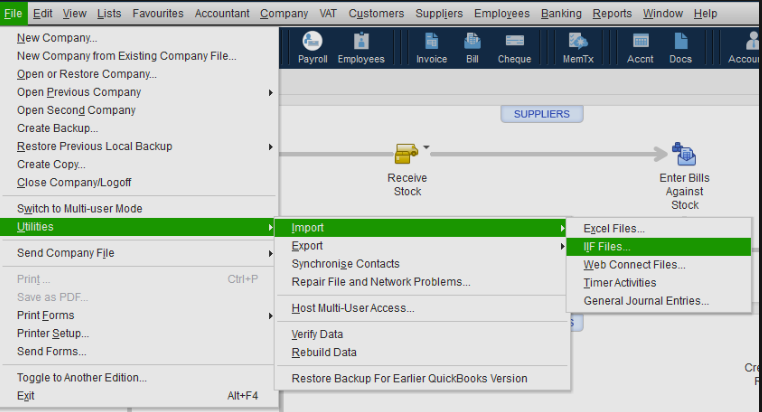
To import invoices into QuickBooks Desktop, keep your IIF/Intuit Interchange Format file ready. Then you can open a particular company file. It will have a File menu. You can use it to turn on the single-user mode. Now, when you go to Utilities, you will see the Import feature. With its use, the files can be added to QBDT.
- Log in to the company file with admin rights.
- Go to the “File” option on the top.
- Click on the “Switch to Single-user Mode” option.
- Hit the “File” option again.
- Pick the “Utilities” feature.
- Tap on “Import”.
- Select “IIF Files”.
- Browse your IIF file and then hit the “Open” button.
- Tap on “Ok”.
This way, you can import your invoice to the QuickBooks Desktop account. If the software does not allow this format to be imported, then you can use an online file converter. By doing so, you can change the file format as per the supported one.
Method 2: Via CSV Format
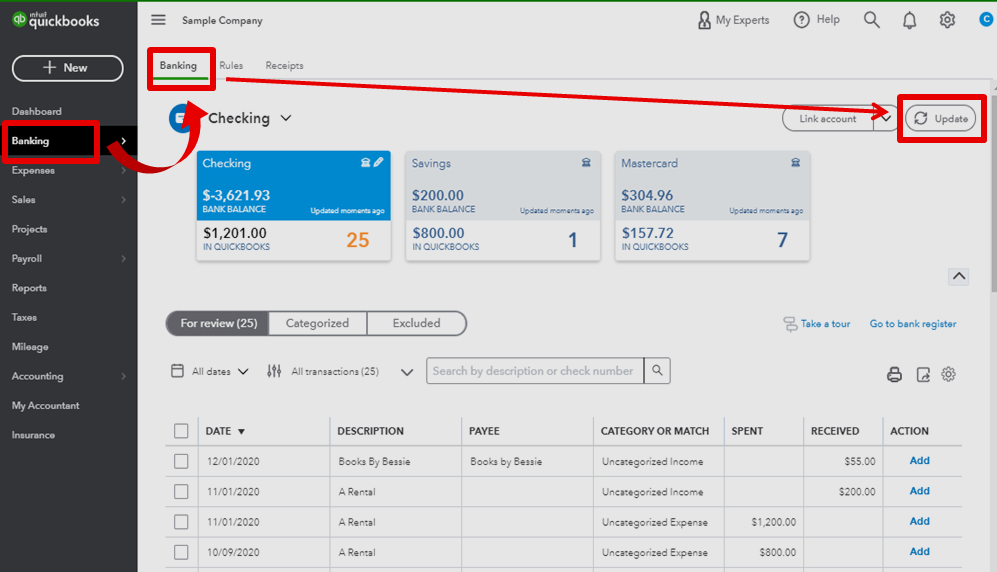
A CSV file can be your choice to import the data of invoices. In QBDT, this file gets uploaded from the Update button. You can find it in Banking. After this, you may import the invoice data into QuickBooks Desktop by mentioning the format of the file. Later, you will have to map the information and then finish this method.
- Open the tab for “Banking”.
- Tap on “Update”.
- Now, you have to choose:
- “File to Upload” or,
- “File Upload”
- Make your selection for “.CSV”.
- Hit the “Next” option.
- You have to choose “QuickBooks Account” from the dropdown.
- Start the mapping of the fields as per the format you chose.
- Again hit “Next”.
- After receiving a notification, press “Yes”.
- Tap on “Finish”.
Can You Import Invoices into QuickBooks Online?
Some users may find it convenient to use the QuickBooks Import Invoices Wizard for the Online version. It imports the data as Excel files. You may also use an application with the name Excel Transactions. It has a direct Upload File menu for documents like bills and invoices. Try checking the store of Intuit QuickBooks to find and download this application.
Method 1: With Import Invoices Wizard
Import Invoices is a wizard that provides enough instructions to bring in your financial documents from the system to the accounting software. You can import invoices into QuickBooks Online by running this wizard from the menu known as File. Mainly, in Utilities, you can locate it. In the method, you will require an Excel file too.
- Log into your “QuickBooks Online”.
- Click on the given “File” menu.
- Then, go to the “Utilities” option.
- Hit on the “Import” button. This will open the “QuickBooks Import Invoices” window.
- Choose the “Excel Files” option.
- Now, select the “Advance Import” and choose the file you wish to import.
- Open the “Preferences” option. Decide how you would like QBO to handle the duplicate data or errors.
- Click the “Preview” button to view your invoices/bills.
- Press the “Ok” button and wait for the confirmation.
Method 2: Through Excel Transactions
The application Excel Transactions provides you with the option to upload several files for their import. This is inclusive of invoice files as well. When you keep the invoices in a spreadsheet, you can simply upload them with the app. In brief, how to import invoices into QuickBooks Online via this can be started from Upload File. You can find this menu right after the launch of Excel Transactions.
- Click the “Upload File” menu.
- Look for the spreadsheet and file that have invoices to import.
- Click on the “QuickBooks Entity” as Invoices.
- Now, map the column headers with “Invoice Fields”.
- Tap the “Import” button in order to add the invoice.
How to Import Invoices into QuickBooks in a Batch?
In instances wherein you have multiple invoices, you can import them in a batch. In QuickBooks, you have the Batch Actions feature to do this. Speaking of QuickBooks Online, you may need to keep the invoice data in a spreadsheet. Later, this sheet can be imported from the settings. For how to import invoices into QuickBooks Online Accountant version, you can utilize a similar spreadsheet.
Note: The following methods may be of use to import invoices into QuickBooks 2013, 2014, and 2015 as well.
Method 1: In QuickBooks
Batch Actions remains a useful feature of the Intuit software. You can see its main use for bringing crucial information in vast amounts such as that of your invoices. A user can locate the feature from Sales in QB. On finding it, please choose what information you wish to include and then proceed with the upload. This explains how can invoices be imported into QuickBooks together when they exist in multiple numbers.
- Use the menu for “Sales”.
- Then “All Sales” has to be clicked on.
- For the invoice transactions, choose the relevant checkboxes. You can either print or email them.
- Tap on “Batch Actions”.
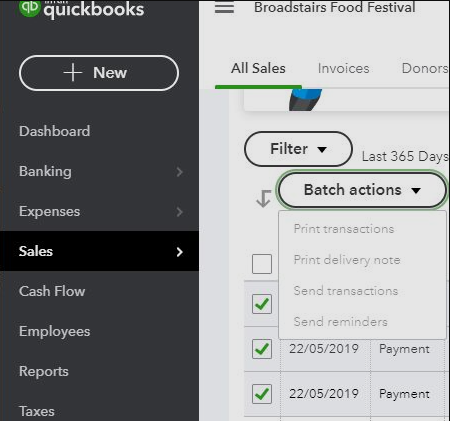
- To continue to import invoices into QuickBooks in a batch, follow the instructions afterward.
Method 2: For QuickBooks Online Users
Users can generally find several options in the settings of QBO for multiple purposes. As one of them, when you have to understand how to import invoices into QuickBooks Online all at once, you can see these settings. In particular, you have to see the Import Data option. Then you may opt for a batch of invoices/bills. In the process, mentioning the format date and mapping the information is essential.
- Start by adding a spreadsheet with all the relevant information for the invoices.
- Then open “Settings”.
- Choose “Accounts and Settings”.
- Tap on the tab for “Sales”.
- Visit “Edit”.
- Now, you can opt for “Custom Transaction Numbers” and enable it.
- Once you save the settings, hit “Done”.
- To upload the sheet for invoices, press “Settings”.
- Choose “Import Data”.
- Go to “Invoices”.
- Click on the “Browse” tab.
- Tick the boxes as per your requirements.
- Again press “Browse” to attach the spreadsheet.
- Tap on “Next”.
- Begin the mapping process especially for the fields with asterisks.
- Click on “Not Applicable”.
- Enter a format for the date.
- Choose between one of these for taxes:
- “Inclusive”
- “Exclusive”
- Press “Next”.
- Click on “Start Import”.
- After the process, please press “Ok”.
- You may choose “Done” if the process fails and then see the fault.
Method 3: In QuickBooks Online Accountant
Speaking of the import of batch invoices in QBOA, you have to initially make a spreadsheet. It should have details such as invoice number and date. Then you can activate Custom Transaction Numbers. The option helps you go ahead with the import of your data. Eventually, when you map the main fields of the sheet, you are able to import your invoice data into QuickBooks Online Accountant.
- Create a spreadsheet. Arrange columns based on the information you want to add to your invoices such as:
- “Customer”
- “Invoice Number”
- “Invoice Date”
- “Item Amount”
- “Due Date”
- “Item Tax Code”
- Click on the software’s “Settings”.
- Go to “Account and Settings”.
- Click on the “Sales” option.
- Hit the “Edit” button in the “Sales Form Content” tab.
- Tap on “Custom Transaction Numbers”.
- Choose the “Save” button.
- Press “Done”.
- Let us now upload the spreadsheet. Click on the “Settings” icon.
- Choose the “Import Data” option.
- Hit on the “Invoices”.
- In the “Browse” section, add your new products, customers, and services as required.
- Now, push the “Browse” button and select the spreadsheet that you just created.
- Click on the “Next” button.
- After that, you can map the fields.
To Sum up
Whether you need to import a single bill/invoice or numerous such documents, you can find QuickBooks worth using. In its several versions, you can upload the data. As per the file format or mediums you find available, you can quickly import the information.
Frequently Asked Questions
There is no direct feature to import the PDF invoices, however, one can use the third-party tool that supports PDF format to import the invoices in QuickBooks.
In QuickBooks Online, you can import the invoices with or without using the Excel Transactions program.
QuickBooks also supports batch import for invoices. If you have more than one invoice that you prefer to import, QuickBooks allows you to upload multiple files at once. This requires you to create a Spreadsheet, enable the transaction numbers, and upload this spreadsheet.
You can upload an invoice into the software by importing it. To start, you should tap on “File”. then you can look for a direct “Import” option. After this, you can use the “.IIF” file option. With the import process coming to an end, the invoice should be uploaded.
For QBO, you can use the Import Invoices Wizard. It lets you attach an Excel file in which you can store the invoice or bill data. Then you can upload this file to import the bill or invoice. Excel may not be used for QuickBooks Desktop for this purpose. Rather, you can attach an IIF file and then import these documents.
