
When a journal entry has been made, a user may want to import it. QuickBooks is one of the software into which such an entry can be imported. Usually, the Excel file format is preferred for importing QuickBooks journal entries. Certain users may also use the CSV file format for this purpose. To import journal entries into QuickBooks in these formats, you can find the needed assistance on this page. Our methods can be excellent for QB, QuickBooks Online, and QuickBooks Desktop. Also, it will be of use to know that these methods will help you import journal entries as well as general journal entries.
This blog comes with 2 sections. The contents of these sections have been listed below. To quickly navigate to a particular section, you can make use of the following:
Can You Import Journal Entries into QuickBooks Online?
Journal entries can be imported into QBO by making a spreadsheet. This spreadsheet should be inclusive of information such as Journal Code, Account Name, Journal Date, etc. After you have made the spreadsheet, you can open QuickBooks Online’s Settings and tap on the Import Data option. Now, the option of Journal Entries will get displayed. Select and then press the Browse tab. This tab will help you in downloading a sample file. This file can be preferred for formatting your journal entries. They can either be formatted in Excel or in the form of a CSV file.
This procedure is inclusive of multiple steps. To understand all the steps for how to import a journal entry into QuickBooks Online, you can read further:
- Begin with making a spreadsheet. For this, gather the information mentioned below:
- “Journal No”
- “Journal”
- “Account Name”
- “Journal Date”
- “Debits”
- “Journal Code”
- “Select Date Format”
- “Credits”
- Check whether there are any new accounts in the spreadsheet.
- Add the new accounts available in the spreadsheet to “COA” or “Chart of Accounts”.
Note for You: In case there are no new accounts in the spreadsheet, you will not be required to add them to “COA”.
- Now, open “Settings”.
- “Import Data” has to be chosen.
- Click on “Journal Entries”.
- Tap on the “Browse” option. It will be available on the page for “Download”.
- You may choose “Download a Sample File” to format the journal entries.
- Look for the “Excel” or “CSV” file.
- Choose this file and press “Open”.
- Tap on “Next”.
- Start mapping the information.
- You will see certain headers represented by fields on the spreadsheet. You will see a downward arrow. Press it for a particular field.
- Now, choose “Next”.
- You may find an error that prevents you from continuing. You can edit your file and then continue.
- Click on “Start Import”.
- Press “Done”.
After this, the journal entries will begin to be imported. The process may take a few minutes. You can wait and let the process continue.
Tip for Readers: While importing a journal entry in QuickBooks, you may come across an entry that may not be needed. See here how you can delete a journal entry in QuickBooks.
How to Import Journal Entries into QuickBooks Desktop?
To import journal entries into QuickBooks Desktop that are existing, the Accountant menu should be preferred. This menu has been provided with a feature that lets you filter the existing general journal entries and then import them. In case you wish to import journal entries that are non-existing, you can still use the menu for Accounting. The Make General Journal Entries option in this menu will help you to go further.
For importing the general journal entries of both of these types, you can get additional information in the following sections.
Option 1: Import Existing General Journal Entries into QuickBooks Desktop
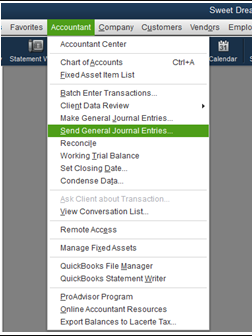
Certain general journal entries are already existing in QuickBooks Desktop. To import them into the software, you can initially run the menu for Accountant. Through this menu, you have to find Send General Journal Entries and use this option. In the next step, certain dates will have to be mentioned for the existing general journal entries. Soon, you will come across the option to select those entries that need to be imported. You can select them and then continue to import these entries.
- Open the menu for “Accountant” in QB Desktop.
- Tap on the option of “Send General Journal Entries”.
- Choose the dropdown for “Dates”.
- Enter the date for the following:
- “From”
- “To”
Note: By entering the dates for “From” as well as “To”, you will be able to filter a list that carries journal entries.
- Tick the box for every journal entry that needs to be imported.
- Edit the selected journal entries if you wish to.
- In “Account”, you will see a link. Select it.
- Now, update the entries from the window of “Make General Journal Entries”.
- Tap on the “Save & Close” option.
- Deselect the following:
- “Allow Recipient to Select which GJEs to Post to File”
Note: The option in this step should be deselected only when you wish to confirm that every journal entry gets imported by your recipient.
- Select “Email as Attachment” for sending the entries.
- For saving the entries in the “.QBJ” file format, press “Save as File”.
Note: You can also send a general journal entry in the “.QBJ” file format through an email.
By following these steps in the sequence in which they have been mentioned, you will be able to import journal entries into QuickBooks Desktop.
Tip for Readers: Along with importing journal entries in QB, you can also enter fresh ones. To get the required assistance for entering general journal entries in QuickBooks, please click here.
Option 2: Import General Journal Entries into QuickBooks Desktop that are Not Existing
There are some non-existing types of general journal entries in QuickBooks Desktop. You may wish to import them. For this purpose, you can first find the menu that says Accountant. In this menu, you need to find the Make General Journal Entries option. Then opt for Save and go to Send GJEs. You may wish to edit certain entries. You can edit them now or skip the option if not required.
Let us now look at the other steps using which the users of QuickBooks Desktop can import journal entries that are non-existing.
- Visit the menu that says “Accountant”.
- Go to “Make General Journal Entries”.
- Press “Save”.
- Click on “Send GJEs”.
- Now, edit the entry if required.
- After this, find the column for “Account”.
- Via this column, find a link and press it.
- Now, begin updating the general journal entry.
- Choose the option of “Save & Close”.
- Ensure that the option mentioned below has not been selected:
- “Allow Recipient to Select which GJEs to Post to File”
Note: You will be suggested to perform this step for ensuring that the recipient imports every general journal entry.
- Now, opt for “Email as Attachment”.
- Then save the entries using the format “.QBJ”.
- You may attach this file in the mail. Alternatively, you can transfer it to any preferred portable media.
- After this, click on the “Save as File” option.
On the Whole,
In this blog, we assisted you in learning how you can import journal entries in the QB program. Our methods were suitable not only for the users of QuickBooks Desktop but QuickBooks Online as well. We ensured that you were provided with the needed help to import both existing and non-existing journal entries into the software.
Let us know how helpful these methods were for you. Give us a rating by scrolling below.
Along with the knowledge of importing the journal entries, you should also know how to export them. Click here to find reliable methods to export journal entries from QuickBooks to Excel.