When you see the error 12031, you get an indication that some troubles are being experienced during the installation of updates for QuickBooks. The updates themselves may not be the cause of the problem. However, a poor internet connection that is being used to get the updates can be one of the causes.
Several users believe that fixing the network connection can resolve the QuickBooks error 12031. While this can be true, looking at the other fixes of the error code can also be helpful. Sometimes, updating the accounting software and getting the payroll service updates in the Safe Mode can also work.
More such fixes can be browsed in this reading. These fixes will be based on the varying causes of this QuickBooks update error.
We have summarized this reading’s contents as follows:
- Causes of the 12031 Error in QuickBooks
- Troubleshooting the QuickBooks Error 12031
- Fix 1: Ensure that Network Connectivity is Correct
- Fix 2: Uninstall QB in Selective Startup and Reinstall it
- Fix 3: Update the Payroll Service of QuickBooks
- Fix 4: Update QuickBooks Using Safe Mode on Windows
- Fix 5: Prevent QuickBooks from Getting Blocked by Firewall
- Fix 6: Reconfigure the Settings of Internet Explorer for QB
Causes of the 12031 Error in QuickBooks
Problems relating to internet connectivity may be the reason why you are seeing the error 12031 in QuickBooks. However, there can be additional causes of this. 4 of them have been given here:
- Network timeout can prompt this error code in QB.
- The accounting software may be perceived as a threat by the Firewall.
- The SSL settings may not be valid. They may be causing troubles when you update QuickBooks and further result in this error.
- Your default browser may not be Internet Explorer.
Troubleshooting the QuickBooks Error 12031
To begin eliminating the QuickBooks 12031 error, you can improve your network connection. When this error code surfaces at the time of updating payroll, the updates should be downloaded again and in a correct manner. You can also see whether the Firewall on Windows is blocking the accounting software. In such a case, permissions can be given to QuickBooks. Then the Firewall won’t continue to block the software.
We believe that there can be more ways to fix the 12031 error code in QB. Therefore, we have been able to find other fixes as well. You can read further to discover them.
Tip: Before you begin doing the following fixes, it will be helpful to form a backup of your QB company files. In the software, you can select “File” and opt for “Back up Company”.
Fix 1: Ensure that Network Connectivity is Correct
Regarding network connection-related issues as the source of the error code 12031 in QuickBooks, you will be guided to first be sure of this cause.
To be certain that there is no problem with the network connectivity, you can visit QB’s Help menu. For selecting the option of Use My Computer’s Internet Connection Settings, you can pick Internet Connection Setup from the menu. Any bugs with the network connection may get fixed now.
- To check the connection of the internet, click on “Help” in the “QuickBooks” program.
- Locate “Internet Connection Setup”. Press this option.
- A window will open. In it, push the following option’s radio button:
- “Use My Computer’s Internet Connection Settings”.
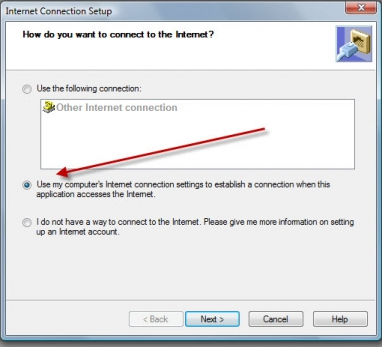
- Choose “Next”.
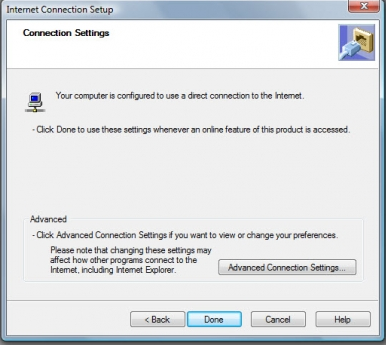
- Tap on “Done”.
Fix 2: Uninstall QB in Selective Startup and Reinstall it
Some of you may be familiar with the Selective Startup mode on Windows. You may have also used the mode for certain work. You may be surprised to know that the same mode can be used for deleting QuickBooks to get rid of the error 12031.
To remind you how this mode is run, a summary can be found here. You can use the command MSCONFIG. The command can be implemented through Run. Then you can switch to General. Via this tab, choose the Selective Startup option. Make sure that you do not opt for Load Startup Items. Accompanied by this, you can restart your computer. After this, QuickBooks has to be uninstalled. A few minutes after this, the accounting software can be installed again.
- Using “Run”, implement the command “MSCONFIG”.
- Select “Ok”.
- From “General”, opt for “Selective Startup”.
- Avoid selecting “Load Startup Items”.
- Continue by clicking on “Ok”.
- Choose “Restart” in this step.
- Followed by restarting, uninstall the “QB” program.
- Now, reinstall the accounting software.
When the software’s reinstallation is over, please use it to check that the QuickBooks error 12031 cannot be found now.
Fix 3: Update the Payroll Service of QuickBooks
Certain users reported that while downloading the updates for QuickBooks’ payroll service, they kept running into the error 12031. Let us inform you that the error 12031 can be a QuickBooks update issue. So, when you attempt to update the payroll service, some factors may result in this error code. Or, the procedure to update this service may not be correct and then this problem may turn up.
Below, we have outlined how you can update the payroll service in a way that the 12031 error doesn’t bug the accounting software. Using the Internet Connection Setup, we will be beginning this procedure.
- Let us begin by running the “QB” software.
- Pick the option of “Internet Connection Setup”.
- Click on “Internet Properties”.
- Enter the tab of “Advanced”.
- In this step, you have to check that the advanced settings are matching.
- Push the “Apply” button.
- Select “Ok”.
- Now, the window won’t be required. You can close it.
- After this, “QuickBooks Payroll” has to be updated.
- Finally, see to it that the QuickBooks update error 12031 has been troubleshot.
Fix 4: Update QuickBooks Using Safe Mode on Windows
In a few instances, you may see some service messages along with the error 12031 in QB. Updating the accounting software can be a fix for removing this error. However, these messages may prevent you from updating QuickBooks. You will be suggested to run the Safe Mode on your Windows system. Using this mode, updating the software can be initiated with no interruptions from these messages.
Windows’ Safe Mode can be launched by pressing the Power key. After this, you can tap the Shift key. Now, you can select Restart. To continue, you can tap on Troubleshoot. A few selections will have to be made. Then your system will start running in the Safe Mode.
Remember: The following method can enable the users to update QuickBooks via Safe Mode on Windows 10.
- Push the “Windows” key.
- Press “Power”.
- Tap the key for “Shift”.
- Select “Restart”.
- Opt for “Troubleshoot”.
- Now, choose “Advanced Options”.
- Pick the option of “Start-up Settings”.
- Now, hit the “Restart” option.
- Certain boot options will be given here. Choose one of these:
- “4) Enable Safe Mode”.
- “5) Enable Safe Mode with Networking”.
- “6) Enable Safe Mode with Command Prompt”
You can press the “F4” key, “F5” key, or “F6” key to select it.
- Wait for your system to start running in “Safe Mode”.
- When the system is available for use, open “QuickBooks” and update it.
- Now, your system needs to be started again. This time, “Normal Mode” has to be used for starting it.
Remember: On the off chance that you were unable to update the accounting software in the Safe Mode, you can do so in the Normal Mode.
It will be essential to run QuickBooks in the Normal Mode. On running it, you have to make certain that the QuickBooks service messages and the error 12031 have been settled.
Fix 5: Prevent QuickBooks from Getting Blocked by Firewall
It is not uncommon for QuickBooks to get blocked by Windows Firewall. The Firewall may be considering the software as some form of threat. This may be serving as the reason to block QB. Blocked access to the software may be causing the QuickBooks code 12031. To unblock the access to it, open Windows Firewall. Enable the option of Allow a Program or Feature through Windows Firewall. Then you can prefer to change the settings and click on the QuickBooks option.
You can also get the directions for this fix below:
- Press “Start” or the icon of “Windows” to see the menu.
- Write “Firewall” in the area of “Search”.
- Select “Windows Firewall”.
- The following option has to be chosen:
- “Allow a Program or Feature through Windows Firewall”
Remember: The users of Windows 10 may be unable to see the same option. They will have to choose “Allow an App or Feature through Windows Firewall”.
- Following this, please tap on the “Change Settings” option.
- Place a tick in the box next to “QuickBooks”.
Remember: On ticking this option, “Windows Firewall” will not be able to block “QuickBooks”.
Fix 6: Reconfigure the Settings of Internet Explorer for QB
The settings of Internet Explorer, when not configured for QuickBooks, can make you run into certain issues just like the error 12031. To fix the QuickBooks update error 12031 and the service messages that you see along with it, you can reconfigure this browser for the software. In Windows Explorer, you will find Tools. Select it and then progress to Internet Options. Then, from the Security tab, select the icon of Globe to continue.
There are other directions that need to be followed after this. You can learn them by reading further.
- Run “Windows Explorer”. It has to be opened on the workstation.
- Visit the menu of “Tools”.
- Click on “Internet Options”.
- Enter the tab that says “Security”.
- Press the icon of “Globe”.
- Tap on the “Content” option.
- Prefer to turn off “Content Advisor”.
- Provide the password for disabling “Content Advisor”.
- Go to the tab of “Connections”.
- Select “Never Dial a Connection”.
Remember: The “Never Dial a Connection” option has to be selected only when “Dial-up Node” or “DUN” is not being used.
- Choose a suitable “ISP”.
- Press “Ok”.
- Click on “LAN Settings”.
- Tick the box for the option mentioned as follows:
- “Automatically Detect Settings”.
- Press “Ok” in “LAN Settings Display”.
- Now, head to the tab mentioning “Advanced”.
- Tap on the “Restore Advanced Settings” option.
- You will see these 3 options:
- “Use TLS 1.0”
- “Use TLS 1.1”
- “Use TLS 1.2”
The second and third options have to be deselected.
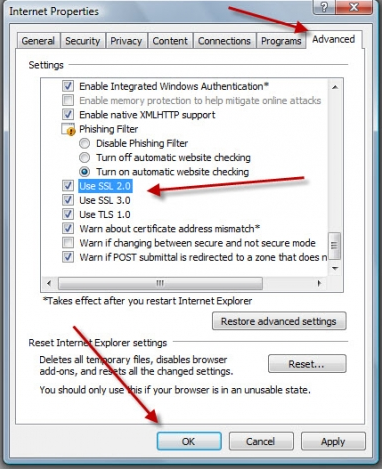
- Press “Ok”.
- Exit “Internet Explorer”.
- Start rebooting your laptop/computer.
To Come to the Point
The QuickBooks update error 12031 can be fixed by employing a range of measures. As you got to learn here, these measures can be inclusive of working on your internet connection and reinstalling the QB program. If the error code emerges while the updates are getting downloaded, then you can run the Safe Mode on your Windows PC. In this mode, the updates can be downloaded without getting bothered by the 12031 error code. In the end, we will advise you to keep the settings of your browser configured for QuickBooks. Thus, when you run QuickBooks using it, the same error can be prevented.