
When accessing the company files, QuickBooks users often stumble upon a warning message followed by the error code 6000, 301. This warning message with QuickBooks error 301 indicates your QuickBooks Desktop is having trouble accessing the company files and folders.
If you have no earthly clue why you are receiving this error, we will enlighten you. In this technical guide, we will discuss what causes QuickBooks 301 error and how you can repair your company files with effective methods. Let’s read ahead!
What are the Causes of QuickBooks 301 Error?
QuickBooks error 6000 301 occurs due to the damaged QuickBooks files and other key reasons which are specified below:
- QuickBooks supported files are corrupted that includes the following:
- Network descriptor file (ND)
- Transaction log file (TLG)
- Data Source name file (DSN)
- QBW company files are damaged.
- The user is accessing the company file that is stored in the hard disk of a server that accesses the QuickBooks server manager.
- Due to the low disk space on your system, you cannot open the company file.
- An outdated version of QuickBooks Desktop can also be the leading cause.
- The installation of encrypted software affecting the functions.
Based on these leading factors of error, you can implement fixation methods.
Things to Do Before You Fix QuickBooks Error 6000 301
Before performing any technical methods, make sure that you create a backup of the QuickBooks company files. If anything goes wrong while fixing the error, the backup files can be used to retrieve the company files.
To take a backup of QuickBooks company files, you can read the following instructions.
- Launch “QuickBooks Desktop”.
- Click on the “File” located on the menu.
- Go to the “Back Up Company” option.
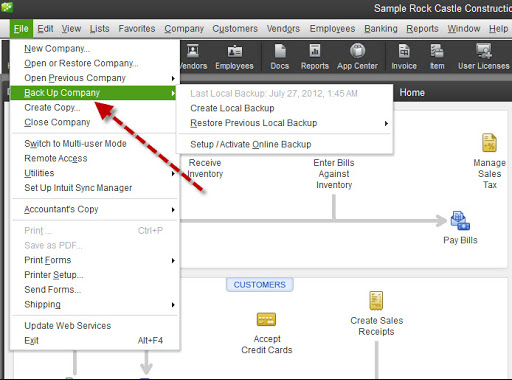
- Hit the “Create Local Backup” option.
- Follow the on-screen instructions.
Once the backup is successfully taken, you can continue following the troubleshooting methods to solve the error.
6 Fixation Methods for QuickBooks Error 301
Users can start with the basic troubleshooting methods such as restarting the Windows system or updating the QuickBooks Desktop to the latest build. Yet you find trouble accessing your company files then you can implement technical methods.
For example, you can rename the damaged QuickBooks support files, run QuickBooks File Doctor tool, uninstall unwanted QuickBooks files, or disable encryption software if you use any.
To make the process very clear to you, we are here providing these methods with a manual procedure. Let’s read them one by one.
Method 1: Restart Windows Computer
Unexpected bugs in Windows systems often create conflict running programs or accessing the company file. To avoid such conflicts, you can try restarting your computer.
All you have to do is click on the Windows icon and go to the Restart option. Later, you can reboot your PC where the company files are saved. This way you can access the QuickBooks company files. In case you are still facing the error, then you can switch to the next method.
Method 2: Download QuickBooks Update
Make sure your QuickBooks Desktop is updated to the latest version. If you want to reset and install the QuickBooks update, you can follow these steps:
- Close your QuickBooks program in case it is opened.
- Press and hold down the “Ctrl” key on your keyboard till the time you see QuickBooks opened on the computer.
- Now, go to the “Help” button.
- Click on “Update QuickBooks Desktop”.
- Now, click the “Update Now” button.
- Click on the “Get Updates” option.
- Hit the “OK” button if prompted.
- Close “QuickBooks Desktop” and reopen it.
- Click “Yes” if prompted to install new updates.
Once you are done updating your QuickBooks software, you can easily access your company files. If not, then move to the next method.
Method 3: Rename QuickBooks Support Files
QuickBooks error 301 can be easily resolved if you change the name of your ND, DSU, and TLG files. But before you do so, make sure that QuickBooks desktop is closed on all the devices. Thereafter, you can follow these steps:
- Open the QuickBooks company file on the server.
- Now, open the file related to QuickBooks but the extension (file name at the end) should be “TLG” or “ND” file.
- Then, click right on the “TLG” file and go to the “Rename” option.
- Add “Old” at the end of your file name. For example, “QB company file TLG old”.
- Do the same for the ND file. After renaming the files, you can close the folder.
- Doing so, your “.ND” and “TLG” filew will be created automatically when you access the company files.
By changing the name of your QB company files, you can easily get rid of the QuickBooks 301 error and access the company files.
Method 4: Run QuickBooks File Doctor Tool
If you are having issues with your QuickBooks company files then you can use the QuickBooks File Doctor tool. To do so, you can select this component called Company File Issues in this QuickBooks Tool Hub to repair the files.
Note: You can download the QuickBooks File Doctor tool separately, however, using QuickBooks Tool Hub, you can access more tools as this is a multi-purpose tool.
Once the QuickBooks Tool Hub is downloaded and installed, you can follow the steps mentioned below.
- Launch the tool and click on the “Company File” Issues section.
- Then, click on the “Run QuickBooks File Doctor” button.
- Hit the “Browse” button.
- Choose the company file that you want to repair.
- Now, make sure that the “Check your file” button is selected.
- Then, hit the “Continue” button.
- After that, log in to the company file with admin rights.
- Hit the “Continue” button.
Once you are done following these steps, the company files will be repaired. This way you can rectify the QB company files issues. All you have to do is run the QuickBooks File Doctor, browse the affected files, and let it repair.
Method 5: Repair QuickBooks Desktop
QuickBooks software applications on Windows computers take up enough space including files. Hence, this has to be made sure that you remove those files which are corrupted or you no longer use. Here we will show how:
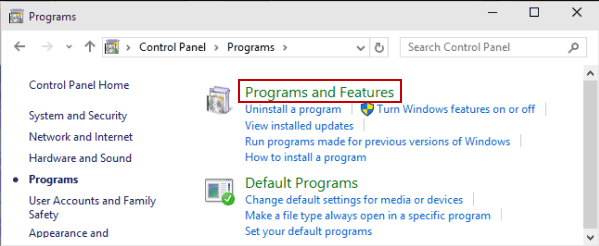
- Click on the “Windows” icon or “Start” button.
- Go to “Control Panel”.
- Switch to the “Programs” tab.
- Select the “Programs and Features” button.
- Now, click on the “QuickBooks” file.
- Hit the “Uninstall” button.
- Click the “Next” button when prompted.
- Then, click the “Radio” button located next to the “Repair” button.
- Hit the “Next” and “Repair” option respectively.
- Click the “Finish” button.
By following these steps, you can easily uninstall the unwanted programs from your computer. Once the files are repaired, you can try accessing your company files.
Method 6: Turn Off Encryption Software
This is an optional method. But if you are using some encryption software such as Ax crypt or Folder Lock programs then it is important to disable these programs. Such software encrypts the company files and folder due to which you fail to access them. If needed then you can take assistance from your software vendors to disable the program.
Remember it is not suggested to encrypt your QuickBooks company files using the third-party encryption application.
To Wind Up
Although QuickBooks error 301 can occur due to the low disk space, other technical glitches can also prevent you from accessing the company files. However, this can be rectified by repairing your company files.
To fix QuickBooks 301 error, we have provided a number of methods that are easy to perform. We hope you find this guide helpful.
In case you are bothered by other errors such as QuickBooks error code 102, we have prepared a detailed guide for that. Read it here