
When the sale accof any service or product occurs, the tax for it has to be paid. Along with paying for it, some users may want to record it in QuickBooks. In this software, sales tax payments can be recorded via the Manage Sales Tax option. It has the option of Pay Sales Tax that lets you submit the details of the checks and then record them. In addition to recording them, you can also print these checks for any requirements in the future. You can record sales tax payments in QuickBooks Online as well. However, in this version, the menu for Taxes will enable you in doing so.
For educating you more about the steps involved in recording your sales tax payments in QuickBooks and its QBO version, we have made this post available. You can follow these steps and without facing difficulties, the payment for the same will be recorded in the software.
You will come across 2 sections in this post. To know what these sections will focus on, please read here:
1. How Do I Record a Sales Tax Payment in QuickBooks?
2. How to Record a Sales Tax Payment in QuickBooks Online?
How Do I Record a Sales Tax Payment in QuickBooks?
When you need to record your sales tax payments in QB, we suggest using its Manage Sales Tax option to do so. This option is available on its Home Page. It takes you to a window that shows Pay Sales Tax. After this, you need to opt for Pay from Account and mention the bank account that will be suitable for this purpose. Enter the details associated with Sales Tax Payment such as the date of the check and the tax period. After a few more steps, you can press Ok to get the payment for sales tax recorded.
Tip: The steps given below can also assist you in checking how to record a sales tax payment in QuickBooks 2011, 2012, 2013, 2014, 2015, and 2016.
- Launch QuickBooks’ “Home Page”.
- Select the option stating “Manage Sales Tax”.
- Wait for a window to come up.
- Tap on “Pay Sales Tax”.
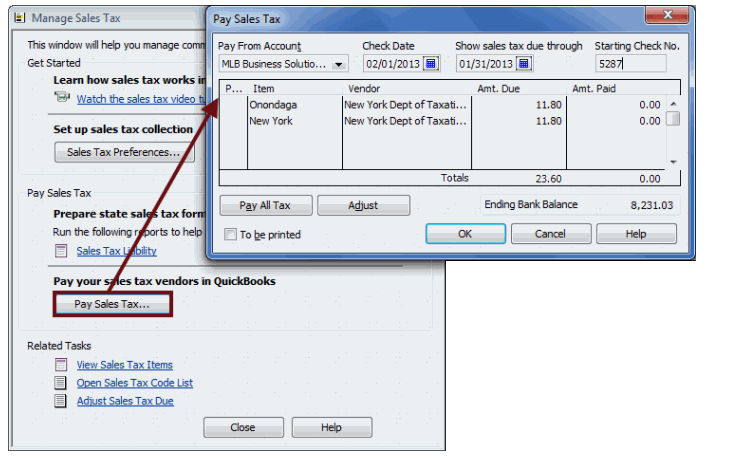
- View the dialog box that appears.
- Use the dropdown for “Pay from Account”.
- Choose a bank account.
Note: From this bank account, “Sales Tax Payment” will be deducted.
- Click on “Check Date”.
- Choose a date that should be mentioned on your check.
Note: You can also manually enter the date in “Check Date”.
- Go to “Show Sales Tax due through”.
- Input the tax period’s end date. Or, you can manually write it in the given field.
- Click on “Starting Check No.”.
- The check number by default has to be accepted. Or, you can add the number for this.
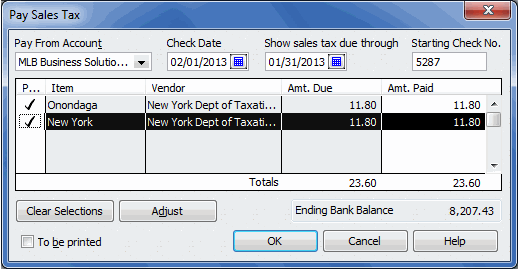
- A table will be seen. In it, select the items of sales tax for which you need to pay.
- Select “Amt. Paid” and use it if required.
Note: “Amt. Paid” is a column in QuickBooks. It can be used when you have to submit a payment that is lower than the complete amount. In addition, this column can help you make edits or changes to the values.
Tip: It will be essential to know that when the rate of sales tax is changed, there can be some effect on your transactions. In case this has occurred, you may have to make changes to the values of the sales tax payment being recorded in QB. See here to know more about these changes and the effect of changing QuickBooks’ sales tax rate.
- In this step, go through all the information that you have entered.
- Eventually, tap on “Ok”.
Note: Checks are auto-written to a tax agency by the QB accounting software. This agency will be the one that you select through the steps mentioned above. Additionally, the software records your transactions in your chosen bank account.
Once these steps are done, you can decide whether you need to print your checks. You can either print them now or whenever you wish to in the future. The total and amount of the sales tax, that is pending, will be updated by QuickBooks itself. As an advantage of this, you can find out the tax amount that has been paid by you to the tax agency. Further, you will know the period of tax for which the amount has been submitted.
Tip: Prior to paying the sales tax, you may want to know how you can set it up. You can read our methods to set up sales tax in QuickBooks and its versions.
How to Record a Sales Tax Payment in QuickBooks Online?
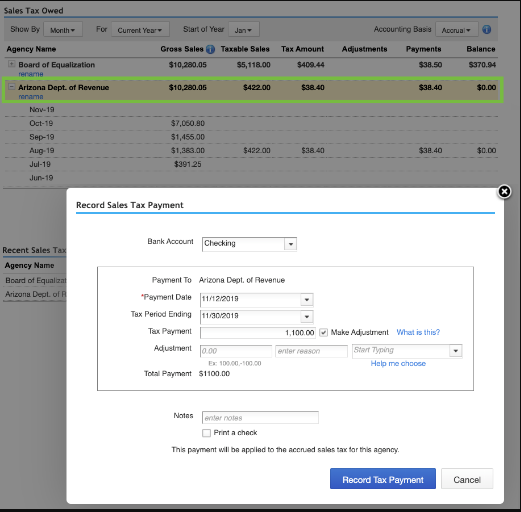
Sales tax payments can be recorded in QBO via its Taxes menu. You can find this menu on QuickBooks Online’s left panel. You can visit Sales Tax Owed. This option will help you in choosing an agency for which the tax payment will be recorded. Then you can mention the details relating to the tax payment in the software. After this, you can utilize the Record Tax Payment option. Thus, you will be able to record the sales tax payment in QuickBooks Online. Printing the check for the payment is also available along with this option, however, it is not mandatory.
- In “QuickBooks Online”, you need to view the panel available on the left.
- Choose “Taxes”.
- Move to the list for “Sales Tax Owed”.
- A tax agency or bank has to be selected. For this, you can use the “Bank Account” option.
Note: The chosen agency should be the one for which the payment is being recorded. Along with selecting it, you will have to provide the dates for “Tax Period Ending” as well as the payment.
- In “Tax Payment”, mention the amount of the payment.
- Locate a dropdown and tap on it.
- Select “Previous Year”.
- Opt for “Record Tax Payment”.
- To continue, you may have to provide some information. Correctly provide it.
- Now, press “Record Tax Payment”.
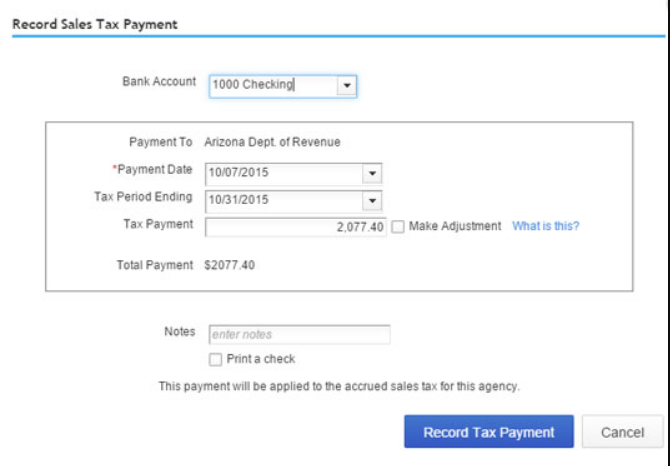
Note: The option of “Record Tax Payment” should be selected when you do not wish to get a printout of the sales tax check.
- For printing this check, click on “Print a Check”.
- Tap on “Record Payment and Print Check” in QuickBooks Online.
In a Nutshell
QuickBooks conveniently allows you to record your sales tax payments. A particular set of steps has to be followed when you have to record the sales tax payments in QuickBooks Online or the basic version of the software. Here, we provided those steps to save your time. In case you found these steps to be of much help, drop us your feedback below.
We believe that some of you may require help to record a vendor refund check in QuickBooks. Click here to get the help now. You can also see how to record a returned check in QuickBooks with this post.