
Recording loan payments in QuickBooks is helpful for keeping a track of them. You may be trying to record them all by yourself. You may be lacking a few steps in case you haven’t been able to successfully record them. To know how to record a loan payment in QuickBooks, QuickBooks Online, and QuickBooks Desktop with all the steps, you should continue reading this blog.
We will also guide you in setting up a liability account, vendor account, and expense account. Setting them up will be required prior to recording any loan payments in this accounting software.
On this page, we will be reading about the following:
- Methods to Set up a Liability Account Before Recording Loan Payments in QB
- Method 1: How to Set up a Liability Account Prior to Recording Loan Payments in QuickBooks?
- Option 1: Establishing a Liability Account
- Option 2: Establishing a Vendor Account
- Option 3: Establishing an Expense Account
- Method 2: How to Set up Your Liability Account Prior to Recording Loan Payments in QuickBooks Online?
- Methods for Recording Loan Payments in QB
- Method 1: How Do I Record a Loan Payment in QuickBooks?
- Option 1: How to Record a Loan Payment in QuickBooks for Cash?
- Option 2: How Do You Record a Loan Payment in QuickBooks for a Non-cash Asset?
- Method 2: How to Record a Loan Payment in QuickBooks Desktop?
- Method 3: How to Record a Loan Payment in QuickBooks Online?
Methods to Set up a Liability Account Before Recording Loan Payments in QB
Readers will benefit from knowing that a liability account works as a prerequisite for recording the loan payments in the QuickBooks software. So, before we learn the methods for recording the payments for loans in QuickBooks, we will set up your liability account. This is also inclusive of setting up the vendor and expense accounts too. In the upcoming sections, you will also get to know the method for setting up the liability account in QuickBooks Online.
Method 1: How to Set up a Liability Account Prior to Recording Loan Payments in QuickBooks?
Prior to recording the payment for any loan, you will be required to set up your liability account. In addition to this, you may also be needed to set up the vendor account and expense account. The three parts of this section will provide you with the steps for setting up these accounts in QuickBooks. Then you can start recording the loan payments in this software.
Option 1: Establishing a Liability Account
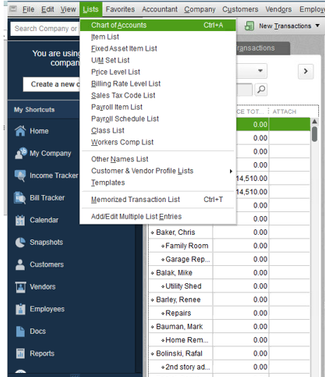
Let’s begin with setting up your liability account. You can access the menu of Lists and opt for the Chart of Accounts. After clicking on New, you can pick the Account Type as per the loan. To proceed, you can input the Name as well as Number of the account and save everything.
1. Start your computer and open the QB software.
2. Click on “Lists”.
3. Choose the option of “Chart of Accounts”.
4. Press “New” in the fourth step.
5. Choose the type of your account. You can either pick the “Other Current Liability Account” or “Long Term Liability Account”.
Note for Readers: In case you have opted for a short-term loan which is payable in a year, you can click on the “Other Current Liability Account”. On the off chance that you have opted for a long-term loan which is payable in more than a single year, you can click on the “Long Term Liability Account”.
6. Press the “Continue” button.
7. Fill in the “Name” for the liability account.
8. Then provide the “Number” for the liability account.
9. Tap on the option of “Save and Close”.
Option 2: Establishing a Vendor Account
Now, we will teach you how to create the vendor account via the Vendors menu. Using this menu, you can enter the Vendor Center and choose New Vendor. You can provide the required information of the vendor and press Ok. The account will have been created.
1. Open the menu of “Vendors”.
2. Choose “Vendor Center”.
3. Select the “New Vendor” option.
4. Provide the vendor’s “Name”. You can input the name of the company or bank in this field.
5. Next, input the vendor’s “Contact Information”.
6. Then press the “Ok” button.
Must Read: How to Merge Vendors in QuickBooks Desktop?
Option 3: Establishing an Expense Account
Let us now see the steps for making the expense account. You can click on Lists and Chart of Accounts. Then you can select New and Expense. After pressing Continue, you can write the name of the account and then save the changes.
1. Open the QB software and select “Lists”.
2. Click on “Chart of Accounts”.
3. In the third step, tap on “New”.
4. Opt for “Expense”.
5. Then press “Continue”.
6. Write the “Account Name” in this step.
7. Clicking on the “Save and Close” option is the final step of this method.
Method 2: How to Set up Your Liability Account Prior to Recording Loan Payments in QuickBooks Online?
Recording the loan payments in QuickBooks Online is not complex. However, before you can enter these payments in this software, you will have to make a liability account. To make this account, you can open the Chart of Accounts via the Settings and then click on New. After finalizing the Account Type, you can choose Notes Payable from Details Type. After setting an account name, you can enter a date for tracking the finances. This is followed by mentioning the account balance and loan’s complete amount. After saving everything, your Liability Account will get created.
1. Start the accounting software and access the “Settings”.
2. The “Chart of Accounts” has to be chosen.
3. Locate “New” and click on it.
4. The “Account Type” has to be chosen now. You will get the options of “Loan Term Liabilities Account” and “Other Current Liabilities Account. Pick one as per your preference.
Note for Readers: “Loan Term Liabilities Account” should be selected by those who will be paying the loan all through the fiscal year. “Other Current Liabilities Account” should be opted for in case the loan will be paid at the year’s end.
5. From the dropdown of “Details Type”, click on “Notes Payable”.
6. Input the account’s “Name”.
7. Select “When You Want to Start Tracking Your Finances”. Choose “Today” to track the transactions and payments right from the current day. Click on “Other” in case you want to track the payments, as well as transactions, from any other day. You will also be needed to select a particular date. When this date is entered, QuickBooks Online will begin to track your transactions from your account.
8. In “Amounts”, provide the account’s balance.
9. The complete amount for your loan has to be provided now.
Note for Readers: Ensure that the loan’s complete amount is entered in the form of a negative number as it will be a liability.
10. Tap “Save and Close” as the ending step of this method.
For recording the amount of the loan, you can perform these 7 steps.
1. Click on “New”.
2. Tap on “Journal Entry”.
3. Click on the newly made “Liability Account” for choosing it.
4. In the column of “Credits”, provide the complete amount which you will be putting in the bank.
5. Next, the “Bank Account” in which the loan will be stored has to be selected.
6. In the column of “Debits”, fill in the “Loan Amount”.
7. Press “Save and Close” to complete the procedure.
Note for Readers: In case you want to utilise the amount of the loan, you can communicate with the accountant.
Methods for Recording Loan Payments in QB
Now, let us browse through the methods for recording the payments for loans in QuickBooks. There are separate methods for recording a cash loan payment and non-cash asset loan payment. Along with that, you can get knowledge of recording the loan payments in QuickBooks Desktop as well as QuickBooks Online.
Method 1: How Do I Record a Loan Payment in QuickBooks?
The QuickBooks software provides you with two options for recording loans. Using the first option, you can record a loan payment for cash. With the help of the second option, you can attempt to record a loan payment for a non-cash asset. Now, let us read further to study these options in detail.
Option 1: How to Record a Loan Payment in QuickBooks for Cash?
The first option will help you understand the method for how to record a loan payment in QuickBooks for cash. You can run the QB software and enter the Banking Menu. After selecting Make Deposits, you can tap the Cancel option if you see a new window opening up for Payments to Deposit. Then you can enter the window of Make Deposit and fill in the necessary information. In the end, ensure to save the changes you have made.
1. Launch “QuickBooks” and click on the “Banking Menu”.
2. Then select the “Make Deposits” option.
3. Press “Cancel” in case you see a new window of “Payments to Deposit”.
4. In this step, provide all the information in the window of “Make Deposit”.
i. Pick the account for depositing the loan via the “Deposit To” option.
ii. Choose a relevant “Date”.
iii. Enter a “Memo”.
iv. In the “From Account” option, choose the newly made “Liability Account”. This will help you to track the payment of the loan.
v. In the column of “Amount”, provide the “Loan Amount”.
5. The fifth step is to press “Save and Close”.
Now, you will have successfully recorded your cash loan payment in the QuickBooks software.
Option 2: How Do You Record a Loan Payment in QuickBooks for a Non-cash Asset?
If you would like to record a non-cash asset loan payment in the QB software, you can follow the method given here. You can launch the software and select Lists. From this menu, you can pick the Chart of Accounts. Afterwards, you can access the “New” option by right-clicking in a blank space. Depending upon the asset, you can opt for the Type of Account from the available options.
Let us now read the 8 steps shown here for finding out the remaining steps of this method.
1. On your computer, open “QuickBooks”.
2. Tap on “Lists”.
3. Then tap on “Chart of Accounts”.
4. In any blank space, right-click and then click on “New”.
5. Pick the “Type of Account”. You can choose among three types, “Fixed Asset”, “Other Current Assets”, and “Other Assets”.
Note for Readers: You can select “Fixed Asset” in case a long-term value has been provided for the asset you have opted for as a loan. In case the asset is such that its value can be changed into cash, you can pick “Other Current Assets”. In case the asset does not match with the criteria mentioned for “Fixed Asset” or “Other Current Assets”, you can select “Other Assets”.
6. Now, tap the “Continue” button.
7. For the chosen asset account, fill in the “Name” as well as “Number”.
8. Then hit the “Save and Close” button.
Method 2: How to Record a Loan Payment in QuickBooks Desktop?
Recording loan payments in QuickBooks Desktop is simple and requires you to administer a short set of steps. You have to select your merge bank account in QuickBooks and then click on Banking and opt for the Write Checks option. The bank account for paying the loan has to be selected via the dropdown menu. Then you can verify the Check No. as well as the Date. Pick the required bank’s name and then make the additions in Expense.
1. When “QuickBooks Desktop” is running, enter the menu of “Banking”.
2. Select “Write Checks”.
3. From the dropdown menu, choose the option of “Bank Account”. Ensure that you select the account using which the loan payment will be done.
4. Next, the “Check No.” has to be verified.
5. Also, verify the “Date”.
6. Locate the field “Pay to the Order of”. Then input the bank’s “Name”.
7. Click on the tab of “Expense”.
8. On the 1st line, the “Liability Account” has to be selected for the repayment of the loan.
9. On the 2nd line, the “Interest Expense Account” has to be chosen for entering the amount of the interest.
10. Lastly, press “Save and Close”.
Note for Readers: The users of “QuickBooks Desktop” are provided with the option of memorizing the check. By memorizing it, the software will be enabled to automatically record a loan payment at regular intervals.
Method 3: How to Record a Loan Payment in QuickBooks Online?
This section will focus on how to record a loan payment in QuickBooks Online once the liability account has been set up. When you run QBO, you will find New. Click on it and then tap Check. This is followed by writing the Check Number. Now, you will be able to see a dropdown menu for “Category”. Using this menu, you can choose your Liability Account you just made. Then you can input the amount of the loan payment.
To know and execute the further steps, you can read below.
1. Select “New”.
2. Press “Check”.
3. Provide the “Check Number”.
Note for Readers: For direct withdrawal, fill in “ETF”/”Debit” in the field of “Check Number”.
4. Click on “Category”.
5. To track the loan payments, the “Liability Account” has to be chosen.
6. The amount of the loan payment has to be filled in.
7. Click on “Category” and choose your “Expense Account” for tracking the loan interest.
8. Next, provide the “Additional Fee”, if any.
9. Tap “Save and Close”.
Thoughts in Closing
Recording the loan payments in QuickBooks is quite useful. It helps the users in tracking the payments. Many of you may not know that a liability account is needed before recording these loan payments. After reading this post, you would have understood its importance and would have learnt how to set up the liability account. Once it has been set, you can easily record the loan payments in QuickBooks, QuickBooks Online, and QuickBooks Desktop.
Allow us to take you through our other helpful posts on the QuickBooks Library Files Failed Error and File Doctor crashes error. We assure you that after reading them, these errors will stop turning up.