Security deposits are mainly given to landlords. However, in certain other situations, you may deposit the sum for management. Later, you may receive a refund for it. For the complete maintenance of finance, recording such information is important. It is possible to enter the refund in QuickBooks Online as well as Desktop. For the former version, you can create checks. With these, the amount for deposits and refunds can be included. Speaking of how to record a security deposit refund in QuickBooks Desktop, you can use credit memos or the refund option. For both entering and posting the refunded amount in the software, the feature can be of use.
Recording Security Deposit Refund in QuickBooks Desktop
QuickBooks Desktop enables you to add the refund for a security deposit via its Customers menu. It comes with 2 options – credit memos and refunds. On choosing one, you can go to Customer: Job. When you land on the Detail option, input the deposit and refund information. At last, you can save the process. After you record the security deposit refund in QuickBooks Desktop, you may exit the window.
- In “QuickBooks Desktop”, please tap on “Customers”.
- The reader has to hit the “Create Credit Memos/Refunds” button.
- After this, you have to proceed to “Customer:Job”. From the list it shows, please pick either a job or customer.
- You need to go to “Detail”.
- Click on “Item”. Then ensure that you choose an item for the security deposit.
- Using “Amount”, you have to input the refund amount. After this, please save the information.
- Wait for seeing “Available Credit”.
- You need to choose the following options one by one:
- “Give a Refund”
- “Ok”
- Please tap on “Issue a Refund”.
- Pick an account to which the deposit was made.
- Again tap on “Ok”.
- How the refund is given has to be specified on reaching “Issue this Refund via”.
- Save the information and close the window.
How to Record a Security Deposit Refund in QuickBooks Online?
The users of QuickBooks Online can record the refund for security deposits as checks. The final information will have to be saved as a memo. When the amount is entered as a bank deposit, you can include the relevant details in an account. Throughout the methods, you need to see that the financial information is added correctly.
Method 1: Using a Check
QBO enables you to add a check for recording financial information. Be it for security deposit refunds, you can use the feature. Once you create the check, you can utilize a liability account. Later, you have to prepare an invoice. Going further with entering QuickBooks security deposit refund for the Online version, you can add one credit memo. As you apply this memo, the last part of the process will be done.
- When the check has to be issued, press “+ New”.
- Go to “Vendors/Vendors”. Here, you have to click on “Check”.
- The details of the check have to be written. The information should be as per the refund-related values.
- Select “Account Details”.
- For the security deposits, please choose a liability account. Via “Account”, it can be selected.
- Now, push the “Save and Close” option.
- You need to make a product for the invoice. Or, it can include a service. Choose “Lists” after you tap on “Settings”.
- Then you have to opt for “Products and Services”.
- Hit the “New” option.
- View the panel that says “Product/Service Information”.
- The item type has to be defined.
- For this item, you have to add the information.
- Then tap on “Save and Close”.
- In this step, you need to create a QuickBooks invoice.
- Ensure that the invoice is correctly made with all the information being accurate.
- Now, you have to prepare a credit memo and apply it.
Method 2: As Bank Deposit
You can find out how to record a security deposit refund in QuickBooks Online as a bank deposit. This deposit can be in the form of an expense or check. You can decide the form and choose the Bank Deposit option, you can indicate the Check Account to use. The refund amount along with the details will be recorded in it.
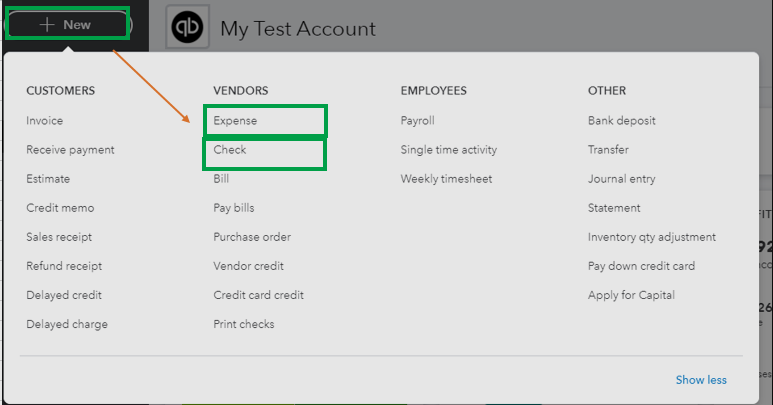
- With the help of “+ New”, you have to pick one of these:
- “Expense”
- “Check”
- Add the refund information through the chosen option.
- Navigate to the section for “Account Details”.
- Your liability account can be chosen from “Account”. It will be used for the security deposit.
- Save this information.
- Moving ahead with posting the refund, go to “Bank Deposit” using “+ New”.
- Tap on “Checking Account” after you select the option “Account”.
- Click on “Add Funds to this Deposit”.
- You need to hit “Received from” and fill in the information.
- Pick an account in the next step and enter the following for its description:
- “Security Deposit Refund”

- In the end, please save this information.
How to Record a Security Deposit in QuickBooks?
To record a security deposit in your QuickBooks account, you may need to create a liability account. Make sure you name the account to Other Assets. Thereafter, you can create the new product and give it the name Security Deposits.
To understand the whole procedure, have a look at the following steps on how to record security deposit in QuickBooks.
- Navigate to the “Chart of Accounts” menu in the QuickBooks account.
- Then, create an account for liability.
- Name the liability account as “Other Assets”. You can use this account to collect assets such as security deposits and rent.
Important Note: Those who give security deposits should create a liability account instead of creating an asset account. Then, name this account as Other Liabilities.
- After that, you can start creating a new product.
- You can name this product “Security Deposits”. This will contain information related to the security deposit made to you or by you.
- Once done, you can map the product to other liabilities or other assets.
- Those who receive security deposits can also create sales receipts in order to make it reflect in the right account.
- In addition, users who give security can make a Bill so that they can map it to the right account.
- When you are done, click the “Save and Close” button.
As you create, store, and map the security deposit correctly, you can continue creating the reports using them. The data (related to these deposits) can be viewed in the financial statement in the QuickBooks account. Remember to note these numbers as you create the financial statements.
Note: Incorrect details related to these deposits can cause issues while matching the financial statements such as a ledger, balance sheets, and others. It becomes difficult to solve such inaccuracies.
If required, you can reverse or refund the deposits or directly delete the deposit account related to them.
Endnote
In QuickBooks security deposit refunds can be crucial to enter. This measure makes it simple for you to know the details of each amount you add to the software. With the methods specified here, you can look at your convenience. In accordance with the same, you can record the amount.