
Opening balance can be recorded in QuickBooks by following several ways. One such way is to use a journal entry. This entry can be recorded in the Intuit software with the help of its Company menu. The Make General Journal entry option can help you record it. In the process of making the entry, you will be able to enter the opening balance.
In this reading, you can see how to enter a journal entry for an opening balance in QuickBooks. Along with this, we have added the methods to record this balance for QuickBooks Online as well as QuickBooks Desktop.
Let us now start reading this blog.
Using 3 sections, we have explained how you can make a QuickBooks journal entry and then record the opening balance in it. These sections are as follows:
How Do I Record an Opening Balance in QuickBooks through a Journal Entry?
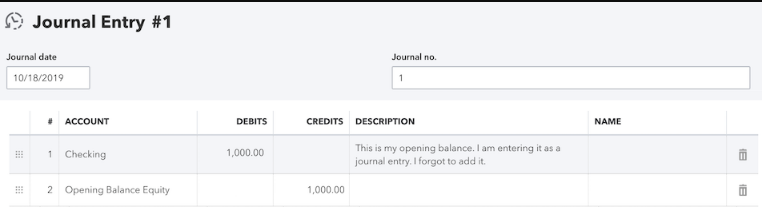
In order to add an opening balance in QB, you can prepare a journal entry. To start preparing it, you can visit Company. Through this menu, you have to utilize Make General Journal Entry. Followed by setting a date, the entry needs to be assigned a number. Now, determine the account for which the entry will be made and the opening balance will be entered in QuickBooks. Depending on the account’s type, you can add the required information in the respective columns.
In QuickBooks, an opening balance via a journal entry can be recorded using these directions:
- Go to “Company” after opening “QB”.
- Opt for “Make General Journal Entry”.
- Select a date for the entry.
- Assign a number to this journal entry.
- Select one account using “Account” for making the journal entry.
Tip: Those of you who do not have an existing account can create a new one in QuickBooks.
- The accounts can be entered in the same order that can be seen in “Trial Balance” or “Balance Sheet”.
- Decide the type of your account. Then enter the balance for it in a respective column.
Additional Information: When you have an “Equity” account or “Liability Account”, a positive balance will have to be added in “Credit”. On the contrary, when you hold an “Asset” account, a positive balance will be written in the column of “Debit”.
- Repeat Steps 5 to 7 for other accounts if required.
- After writing every balance, ensure that the “Credit” and “Debit” columns’ amounts are equal.
- When you find a difference between the columns, the account for “Opening Balance Equity” will be utilized as an offset for the same.
- Hit “Save & Close”.
- For an account that is not present in this journal entry, balances can be made.
- In “Opening Balance Equity”, the balances made can be distributed.
- Then prepare the final entry.
Tip: To learn in-depth about entering a journal entry in QuickBooks, you can refer to another post authored by us.
How to Enter an Opening Balance via a Journal Entry in QuickBooks Online?
You can make a journal entry in QBO and then record the opening balance in it. To make the entry for this purpose, tap on +New and choose the Journal Entry option. Decide the date for this balance. Then select the Account option and mention the name of the account for which you will be recording the balance. After this, you will have to fill in the fields for Credits and debits to proceed with making the Journal Entry. This is how you will be able to record the opening balance using a journal entry in QuickBooks Online.
- Use “+ New” to begin this method.
- Choose the option stating “Journal Entry”.
Tip: You may already have made a journal entry in QuickBooks Online. To use the same for recording an opening balance, you can find this entry. Read here to know how to find a journal entry in QuickBooks Online.
- Add a date.
Additional Information: This date should be earlier than the date of your account’s oldest transaction. Use this date for the opening balance.
- View the dropdown for “Account”. Check its first line.
- Choose an account for which the balance has to be recorded.
- In “Description”, mention why the journal entry is being made.
- Perform Step 4 again. This time, view its second line.
- Now, opt for “Opening Balance Equity”.
- Check the statements of the bank for adding the opening balance in QBO.
- State the real account’s balance as per the date entered in Step 3.
- Mention “Credits” as well as “Debits”.
Additional Information: The information needed in Step 10 should be on the basis of your account’s type.
- In “Asset” as well as “Expense Accounts”, access the “Debit” column. Write the balance in the initial line.
- The amount entered in Step 11 needs to be added in the column of “Credit”. Ensure that it is entered in line 2.
- For “Liability”, “Income Accounts”, and “Equity”, view “Credit”. In this column, write the amount of the opening balance in line 1.
- Now, in line 2, mention the amount of the balance in “Debit”.
- In the case of “Accounts Payable”, look for “Name”. In its first line, choose the vendor to whom the money is owed.
- For increasing this balance, mention it in the form of credit.
Tip: You can also choose to reduce the balance. For doing so, you can mention the opening balance in the form of debit.
- In the next line, write the opening balance’s amount.
- For “Accounts Receivable”, go to “Name” and view its first line.
- Choose every customer to whom the money is owed.
- Now, add the opening balance in the form of debit. This step will add to your balance.
Tip: For decreasing the balance, include it as credit. After this, in the column next to it, write the amount again.
- In closing, opt for “Save”.
- Taking reference from the bank statements, write the balance of the real account. Ensure that the entered balance is as per the date.
Additional Information: In the case of positive balance, write it in “Debit”. On the other hand, the negative balance will be mentioned in “Credit”.
- Select “Description” and write “Opening Balance” in it.
- Tap on “Account” and choose “Opening Balance Equity” from line 2.
- Again press “Save”.
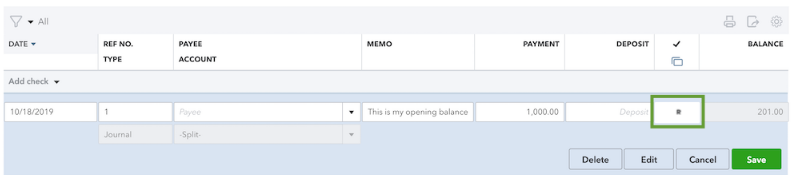
After this, the journal entry will be added to QBO. So, the opening balance will also be entered. You can mark the entry as reconciled if you want to. You can view the Chart of Accounts in Accounting. Using the View Register option, you can choose the journal entry and select R to mark it as reconciled. Then save the changes.
Creating a Journal Entry for Opening Balance in QuickBooks Desktop
For entering an opening balance using a journal entry in QuickBooks Desktop, you can view Company. From this menu, you need to use the Make General Journal Entries option. To create this journal entry, you will have to decide a date. Afterward, you can pick one account for which this balance will get recorded. Based on the type of account you have, you can fill in the Asset, Debit, or Credit columns. Once you succeed in making the journal general entry, the balance will be added to it.
Let us read the additional steps to execute this method for recording the opening balance in QBDT.
- Run “QBDT” on your PC.
- You need to enter “Company”.
- “Make General Journal Entries” needs to be used for proceeding.
- Decide a date to make the journal entry.
Additional Information: The date being picked in Step 4 should be the same as that of your opening balance.
- Tap on “Account” available as a dropdown.
- Select the 1st line.
- Pick the account for which the opening balance has to be recorded.
- This account’s real-life balance has to be written. This action will be done on the basis of the account type.
- For “Asset”, use “Debit” for writing the opening balance.
- Go to “Credit” to mention this balance for “Equity” and “Liability”.
- Choose “Account” one more time and view its 2nd line.
- Click on the account for “Opening Balance Equity”.
- In the column on the opposite side, add the same amount of the opening balance.
Additional Information: You may need clarity with respect to this step. The initial amount may have been written in “Credit”. In this instance, the next balance’s amount will have to be written in “Debit”.
- Push “Save & Close”.
For recording other information along with the opening balance, you can make more journal entries. This information can include accounts payable, sales tax payable, accounts receivable, etc.
Tip: In your account for “Opening Equity” in QBDT, you may find leavings or balance that is leftover. The same will have to be mentioned as retained earnings or in any other account for equity. Also, remember that the opening balance need not be recorded for your expense account or income account. Along with this, your vendor/customer may be having an outstanding balance. This balance may be existing before the date of the opening balance. It can be recorded as a single unpaid bill or invoice.
On a Final Note
Here, you learned that a journal entry can be made in QB for the purpose of recording an opening balance. The method involved in doing so can seem complex. However, by breaking it down into several steps, we tried to simplify this method for you. By following them, you are less likely to face any complexities in entering the opening balance in QB, QBO, and QBDT. Just in case you experience any issues, you can connect with us.
Along with adding the opening balance, you can also do more in QuickBooks. We will advise you to see how to change the ship to address in QuickBooks. You can also go through the method to change a company address in an invoice in QuickBooks.