Windows is a popular operating system among users whereas Ubuntu is an open-source distribution that is more resource friendly. If you are looking forward to proceeding with dual boot Ubuntu on Windows 10, 8, or 7, this guide will teach you the right way to do that.
In this blog, you will discover steps for the process of dual boot Ubuntu on Windows as well as for macOS.
This complete guide covers the following details about the dual boot process:
- Things to Keep into Consideration
- Requirements for the Dual Boot Windows alongside Ubuntu
- How to Dual Boot Ubuntu on Windows 10 or 8.1?
- Step 1: Create a Backup
- Step 2: Make Space on Windows Machine Hard Drive
- Step 3: Install Ubuntu for Dual Boot on Windows 10
- Step 4: Create Custom Partitions
- Step 5: Choose City Location
- Step 6: Create Your Ubuntu User Account
- Step 7: Complete the Installation
- How to Remove Ubuntu from Dual Boot System?
- How to Perform Dual Boot Ubuntu on Mac?
Things to Keep into Consideration
Your machine comes with a pre-installed Microsoft Operating System with Windows 10 or Windows 8.1 or 8. Get you system upgrade to windows 10 from 7, 8.1 for free.
In case, your system has no operating system installed and you are planning to dual boot Windows and Ubuntu then, you should install Windows OS first. Only after this, you can start with the Ubuntu installation.
Note: This guide can be followed for different versions of Ubuntu such as Ubuntu 18.10, Ubuntu 18.04, or Ubuntu 19.04, or Ubuntu 20.04.
Before installing the Windows operating system, when you format the hard disk, make sure that you free up some space on your disk. Space should be around 20 GB so that you can use it for installing Ubuntu later.
Also, if your hardware utilizes UEFI, you can change the EFI settings. Then, disable the Secure Boot feature.
Special Note: If you are a Windows 7 user and planning to proceed with a dual boot Windows 7 and Ubuntu then you can first upgrade your Windows version to 8.1 or 10 as It delivers more features and support for dual boot Windows 10 and Ubuntu.
Requirements for the Dual Boot Windows alongside Ubuntu
Before you learn how to dual boot Windows 10 and Ubuntu, there are a few items you need to have. These are as follows:
- Ubuntu ISO Image to burn to DVD or USB
- Windows System Backup
- Bootable USB for Windows
How to Dual Boot Ubuntu on Windows 10 or 8.1?
Most users asked if they can initiate dual boot Ubuntu on Windows 7 or dual boot Windows XP and Ubuntu. The answer is yes, you can do that by following the steps in this guide.
However, the process might not work well as compared with Windows 8 or 10. Therefore, you should upgrade your Windows version and execute the steps.
The process of dual boot Windows 10 and Ubuntu can be followed by creating a backup, making space on the hard disk, installing Ubuntu, creating Windows media installation, and making Ubuntu custom partitions. Thereafter, you can create the user account and finish the installation.
In this blog, we will show you how to dual boot Ubuntu on Windows 10 or 8.1 with a step by step guide. Let’s get started!
Step 1: Create a Backup
If you want to learn how to dual boot Windows 10 and Linux Ubuntu the first thing you should do is to take a backup of necessary files.
Although backing up your system is not required for this operation, doing so can save you from the blunder. For instance, if things go wrong during the process of dual boot Windows 10 and Ubuntu, you can at least restore the Windows settings and your important files on your system.
Step 2: Make Space on Windows Machine Hard Drive
Before following the process of dual boot Windows 10 with Ubuntu 16.04, what you can do is to make space on your hard disk (especially if your system is installed only on one partition).
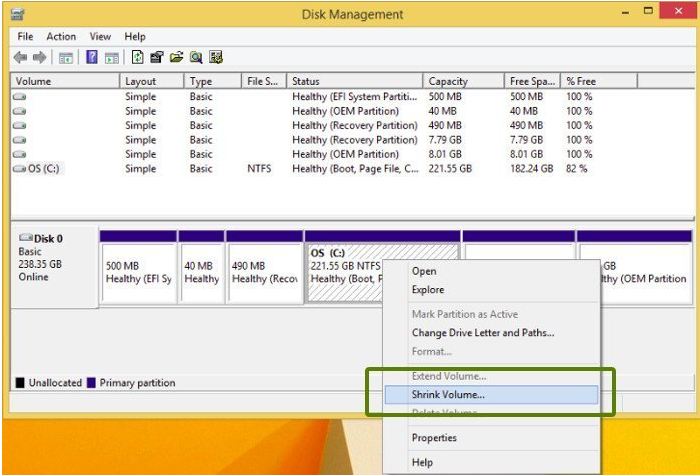
In this step, we will add value for Shrink Partition. This can be done in Disk Management. Below are the following steps one can follow: To do so, you can follow the instructions specified below:
- Click right on the ”Start” icon.
- Search for “Command Prompt”.
- Click on “Run as administrator”. This will open “CMD” with admin rights.
- Then, type the following command line. This will open the “Disk Management” utility.
- diskmgmt.msc
- Click right on C: and choose the “Shrink Volume” to resize the partition.
- In the “Shrink C:” window, add the amount of space in MB (20000 MB at least) based on your C: partition size.
- Click on the “Shrink” button.
When you are done resizing the space, you will see a new space on your hard drive. Thereafter, you can leave this as default and start rebooting your computer. Later, you can start installing Ubuntu.
Step 3: Install Ubuntu for Dual Boot on Windows 10
In the above step, you have created enough space so that Ubuntu can be installed on your system. Therefore, in this step, you are required to install the Ubuntu ISO Image based on the system building.
Once it is downloaded, you can burn the Ubuntu ISO image to DVD. Alternatively, you can make a bootable USB stick. This can be done using the Universal USB Installer or Rufus. Make sure there are BIOS and UEFI compatible respectively.
Thereafter, you can follow the instructions mentioned below:
- Insert the DVD or USB stick in the drive.
- Then, reboot your machine.
- Use function keys to guide UEFI or BIOS to boot up from USB or DVD. In this step, F2, F10, or F12 keys can be used based on the specifications.
When you boot-up by the media, you will see a new screen (Ubuntu Boot Screen). Here, you can do the following:
- Select the “Install Ubuntu” option from the menu,
- Press “Enter” in order to continue.
Once the bootup process completes, you will see Ubuntu running on your system. Now, you can do the following in order to launch Ubuntu successfully on your system.
- Click on the (2nd) icon located on the top and select the “Install Ubuntu”.
- Thereafter, choose your language for installation.
- Click “Continue”.
- Select the first option; “Normal Installation”.
- Click “Continue”.
- Pick the installation type. At this point, you can select “Install Ubuntu alongside Windows 10”. This option takes care of the partition.
Note: The recent steps can be followed when you do not prefer a custom partition. In case, you wish to go with a personalized partition then you can click on the Something else option and click Continue.
Caution: Do not select the Erase disk and install Ubuntu option as this will wipe out the disk in seconds.
Now you are done installing and launching Ubuntu on your system. Next to this, we will create personalized partitions.
Step 4: Create Custom Partitions
To learn how to dual boot Windows 10 and Ubuntu, you will have to create partitions. If you prefer to create custom partitions then you can go through the following discussion. Here, you can create two types of partitions; root and home (also swap if needed).
Quick Note: If you use a fast SSD or have very limited RAM resources then you can create a swap partition.
To create a root partition, you will have to choose the shrinking space that we created earlier. Then, click on the (+) icon located below. When you see the partition settings, you can apply the following settings:
- Type for the new partition- Primary
- Size- 20000 MB at least
- Use as- EXT4 journaling file system
- Location for the new partition- Beginning
- Mount point- /
After configuring the partition, you can click on the OK button.
To create the second partition which is home, you can perform the steps as specified above. However, the size and mount point would be different this time. Go through the following steps to understand better:
- Type for the new partition- Primary
- Size- remaining space
- Use as- EXT4 journaling file system
- Location for the new partition- Beginning
- Mount point- /home
When you are done creating custom partitions, you can click on the Install Now button. This will apply all your changes to the disk. As a result, the installation starts processing.
Note: If a swap space window appears on your screen, you can ignore it by using the Continue button.
Next to this, Write the changes to disks window pop-ups on your screen, you can click on the Continue button if you agree. After this, the installation process starts.
Step 5: Choose City Location
After installing Ubuntu, you can now adjust the location. When you see the Location screen, you can adjust the physical location. For this, you can pick your city (or nearby city) from the available map. Then, click on the Continue button.
Step 6: Create Your Ubuntu User Account
Now, it’s time to create your username and password. Enter the required details in the User Account window. It includes Your name, Computer’s name, Username, and Password. Once you are done adding your details, click the Continue button.
Suggestion Reading: Try 14 Ways to Reset your Windows 10 Password
Since you have implemented all the steps, your final installation process of Ubuntu will initiate automatically. This might take a little time and once it finishes, you can click on the Restart Now button. This is the final step for completing your Ubuntu installation.
Step 7: Complete the Installation
When your machine starts rebooting into the Grub menu, you will have to select the operating system you want to continue with. It could be Ubuntu or Microsoft Windows.
Since Ubuntu is set as the default OS so you can either press the Enter key or let the screen disappear in 10 seconds itself.
Once Ubuntu is done loading, you can log in with your username and password that you created during the process of installation.
Remember that Ubuntu supports the NTFS file system so you can easily access the files from your Windows partitions. For this, all you have to click on the Windows volume.
So this was the entire procedure of dual boot Ubuntu 18.04 on Windows 10 or 8. If you find any errors with the dual boot process, you can switch back to Windows from the Grub menu. Continue reading to understand this.
How to Remove Ubuntu from Dual Boot System?
In case you wish to go back to your Windows, you just need to reboot your PC. This time you need to choose Windows when you see it in the Grub menu. If you have no idea how to remove ubuntu from dual boot system, we will teach you.
Important Note: For this process, you will have to keep a bootable Windows disk. This will help you to repair the boot once you remove Ubuntu from the system.
Now, we will learn to uninstall Ubuntu from dual boot. To do so, all you are required to delete the created partitions. Now, removing the partition may result in an error such as a Grub rescue error. Therefore, in the following guide, we will enlighten you on how to delete Ubuntu partitions and repair the Windows boot loader.
Step 1: Find and Remove the Linux Partitions
To delete the partitions, you will have to search for the created Ubuntu partitions. For that, you can do the following:
- Press the “Windows” + “R” keys in order to launch the “Run” box.
- Type “diskmgmt.msc” in the text field. This will open the “Disk Management” tool.
- Identify the “Linux Partitions”.
Tip: To identify the Linux partition easily, you can look for the files that have no drive number and file system. Because Windows partitions use the FAT or NTFS file system and are usually tagged as drive C, D, or E.
- Since you have identified the Linux partitions, you can remove them. For that, click right on the partition and choose the “Delete Volume” option.
- Click “yes” when you see the confirmation prompt.
Now that you have successfully removed the Linux partitions, you will have free space. This space can be used to make Windows partitions or increase the volume if required.
Step 2: Repair Windows Boot Loader
In this step, you are required to fix the Windows Boot Loader after removing the Linux partition. To get this job done, you can do the following steps:
- Insert “Windows installation disk”.
- Then, “Restart” your computer.
- Use functions keys at the boot time such as F10 or F12. This will take you to the BIOS or UEFI settings.
- Select the “Boot from removable disk” option.
- Click on “Repair your computer” located on the bottom left.
- Now, choose the “Troubleshoot” option.
- Select “Advanced options” from the menu.
- Click on the “Command Prompt” option.
- Then, enter the following command:
- bootrec.exe /fixmbr
- Press the “Enter” key.
After that, you can restart your computer. This you just need to boot normally into Windows with your hard disk. In case you still encounter Grub rescue error, you can implement the following steps:
- Put “Windows installation disk” and restart your PC.
- Use function keys (F10 or F12) during the boot time. This will take you to the BIOS or UEFI settings.
- Click on the “Boot from removable disk” option.
- Select the “Repair your computer” option located on the bottom left.
- Now, choose the “Troubleshoot” option.
- Click on the “Advanced options” from the menu.
- Choose the “Automatic repair” option.
Once you are done following these steps, the error will be repaired automatically. This process might take time but your error will be surely resolved.
If you are concerned about how to uninstall Ubuntu from dual boot, the steps mentioned above are quite helpful to follow. After removing Ubuntu, you can install Windows again.
How to Perform Dual Boot Ubuntu on Mac?
The process of dual boot Ubuntu on Mac is not that easy. For some users, it is quite hard to install Ubuntu on your macOS.
If you install Ubuntu on Mac, a few hardware functionalities may not work properly. It can include a Touch Bar, USB-C, and others.
Caution: We suggest you install Ubuntu only when you are aware of the technical practice so that you can repair your PC if something goes wrong in between.
Yet you require Ubuntu to be installed on your macOS then we are bringing you some easy to go steps. Following these steps, you can initiate the dual boot process with Ubuntu and macOS. So let’s get started!
Step 1: Take a Backup
Before making any huge changes to your PC, it is recommended that you create a backup of your important files and documents. This is because if something does not happen as expected, you can at least create a partition of the boot drive and restore macOS.
Step 2: Install Ubuntu
In this step, you are required to download Ubuntu on your system. This can be done from Ubuntu’s official website. Also, make sure that the version you are installing of Ubuntu should be compatible with your Mac computer.
Step 3: Create Ubuntu Installation Drive
To create an installation drive, you can use a USB drive. The drive should have a capacity of 2 GB. Before you create an Ubuntu installation media, you need to format the USB to make sure it is empty.
Format the USB Drive
If you want to know how to format the drive then you can go through the following instructions:
- Go to the “Disk Utility”.
- Choose the “USB drive” from the left sidebar.
- Click on the “Erase” button located on the top of the menu bar.
- Now in the “Format” field, it should be “MS-DOS (FAT).
- In the “Scheme” field, select the “GUID Partition Map” from the drop-down.
This should format your drive. In case the Disk Utility does not allow you to have this format then you can try this same thing with diskutil and Terminal.
Burn or Write the ISO Image
Now, you are required to write or burn the image of ISO to your disk. For that, you can use Etcher. Thereafter, you can do the following:
- Launch “Etcher”.
- Click on the “Select Image”.
- Locate the “Ubuntu ISO” you installed before.
- Click on the “Select Drive” option in order to pick your USB drive.
- Click on the “Flash” button.
Once you are done following these steps, you can wait for it to burn the image. Thereafter, you are ready to prepare the boot drive. Continue reading to know more.
Step 4: Prepare the Boot Drive
Mac usually doesn’t have a boot menu that can be accessed easily. To deal with this, you need to install your own bootloader. Here, we are using rEFInd as a bootloader for macOS and Ubuntu.
Install rEFInd
- Download and install rEFInd and unzip the file.
- Find and drag this “refind-installer” on to the Terminal. Doing so, the installer script will run.
- Now, reboot the Mac PC. This helps you to know if you can see rEFInd in the boot menu options.
Note: In case you don’t see rEFInd in the boot menu then you can perform troubleshooting tips available on rEFInd’s website.
Resize the Boot Partition
Mac computers have one hard drive. If you are installing Ubuntu alongside macOS, you need to create an Ubuntu partition on the boot drive. If you wish to dual boot using the same hard drive then you can create an Ubuntu partition with the Disk Utility.
- In the “Disk Utility”, choose the boot disk from the left sidebar.
- Click on the “Partition” option located on the top menu bar.
- Click on the (+) icon in order to add a new partition.
- In the “Partition Information”, select the format as “MS-DOS (FAT). Also, cut down the disk storage.
When you are done resizing the boot partition, you can then initiate the Ubuntu installation on the Mac system.
Step 5: Proceed with Ubuntu Installation
Now, you can finally install Ubuntu on Mac. All you have to do is to reboot the Mac computer. Then, in the rEFInd menu, you can choose the Ubuntu installer.
- Run the “Ubuntu Installer”.
- Select the “Something else” option when you see the “installation type” screen.
- Pick your Ubuntu partition you created earlier. Then, click the (-) icon to delete and return it with some free space.
- Next to this, free space should be selected, and click (+) icon to make a new partition.
- Here, set the partition size as 4000 MB.
- In the “Use as” field, add “Swap”. This will become a swap partition.
- Now again, the free space should be selected when you make a new partition with the remaining space.
- In the use as” field, set it to “Ext4 journaling file system”.
- The “Mount point” should be set to “/”.
- Click “OK”.
- Select the partition (that you created with Mount point “/”) under the “Device for bootloader installation”.
Thereafter, you can complete the installer process and create your user account, and boot in the operating system.
Caution: Once you are into Ubuntu, make sure you don’t restart your computer. If you do so, the Mac will automatically start in the Ubuntu partition. This is why we used rEFInd so that we can select the operating system when you boot.
Final Verdict
The process of dual boot Windows 10 and Ubuntu can be very tricky for some users. Therefore, in this detailed guide, we provided you the easy steps for dual boot Ubuntu on Windows 10 and Mac systems. In addition, you can remove the Ubuntu partitions on your system to delete Ubuntu (in case you no longer wish to keep it).
Do you want to explore more such guides? Go through the following guide: