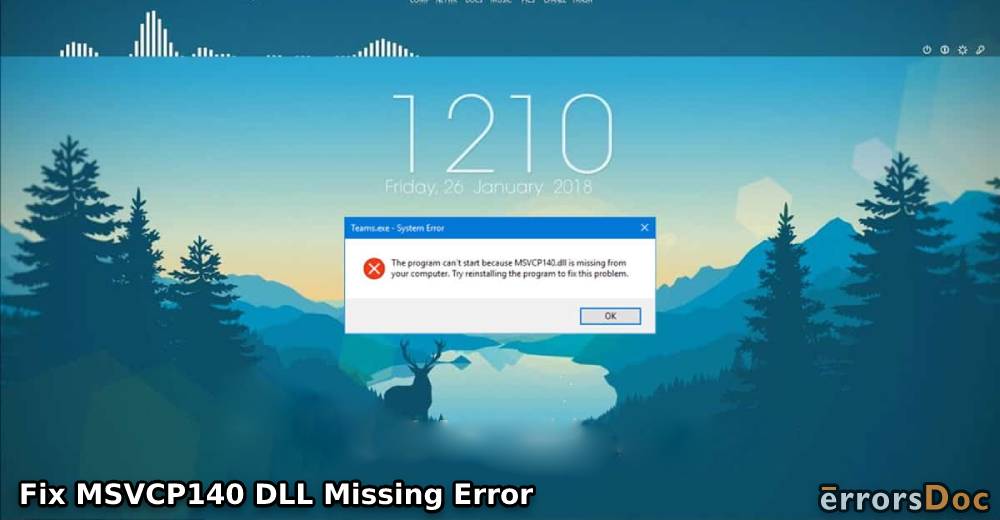
Most users have been complaining that every time they launch games on PC, MSVCP140 DLL missing error appears on the screen. This happens because MSVCP140 DLL is missing from your computer. If you have stumbled onto the same problem then don’t worry, this error can be resolved easily.
All you have to do is reinstall the file to make things work. To know more in detail, learn with us what is “MSVCP140 DLL was not found origin” error and how to fix it on Windows 7, Windows 8, and Windows 10 computers.
The blog explains about MSVCP140 DLL missing on Windows 7 32 bit or Windows 10 briefly and how you can fix this error by following the methods stated below.
- What is MSVCP140 DLL?
- How to Fix MSVCP140 DLL Missing Error?
- Method 1: Check Your Recycle Bin
- Method 2: Remove and Reinstall Troublesome Software
- Method 3: Download Windows Updates
- Method 4: Run SFC Scan
- Method 5: Remove and Download Microsoft Visual C++
- Method 6: Download MSVCP140 DLL Separately
- Method 7: Manually Register MSVCP140 DLL File
- Method 8: Use System Restore
These methods are effective and easy to follow. If you find errors related to the missing MSVCP140 DLL file, you can follow our guide. With no more delay, let’s know how to fix MSVCP140 DLL missing on Windows 10 or other Windows versions.
What is MSVCP140 DLL?
MSVCP140 DLL (Dynamic Link Library) is an essential file that refers to important system files of your Windows operating system. It contains driver functions and a set of procedures that are used by the Windows system.
Must Read: How to Update Drivers in Windows 10 Automatically?
Furthermore, MSVCP140 DLL is associated with Microsoft® Visual Studio® 2017. It makes sure that your system works properly. In case, MSVCP140 DLL origin is missing then you might not launch certain programs on your computer. Thus, it is important to install this file immediately on your system if not available.
Types of MSVCP140 DLL Missing Origin
Windows users encounter an “MSVCP140 DLL not found” error because MSVCP140 DLL was not found. However, there are different types of MSVCP140 DLL errors one can view on their screen.
- msvcp140.dll is missing
- msvcp140.dll was not found
- msvcp140.dll Access Violation
- msvcp140.dll could not be located
- msvcp140.dll crash
- msvcp140.dll error loading
- Cannot find msvcp140.dll
- The procedure entry point msvcp140.dll error
- Cannot register msvcp140.dll
If you encounter any of the aforementioned errors then you need to fix it by reinstalling the file on your Windows 7, Windows 8, or Windows 10 computer.
What are the Causes of MSVCP140 DLL Error?
There can be numerous reasons that MSVCP140 DLL was not found on your computer. The most possible reason is damaged or corrupted system files that might be affected by malware or virus. It may also happen when the age of mythology MSVCP140 DLL is missing from your computer.
Other causes:
- Microsoft MSVCP140 DLL missing
- PUBG lite PC MSVCP140 DLL missing
- Hearts of iron 4 MSVCP140 DLL missing
- MSVCP140 DLL missing GTA v
- MSVCP140 DLL missing PUBG lite
- Skype MSVCP140 DLL missing
- MSVCP140 DLL missing Reddit
- Sniper elite 4 MSVCP140 DLL missing
- Windows 8 MSVCP140 DLL missing
- MSVCP140_app DLL was not found Forza horizon 4
- The code execution cannot proceed MSVCP140 DLL was not found
In this case, you can scan your system and find out the precise cause of this error. If you are not aware of how to get this done then you can perform effective methods which we are going to provide in this guide.
How to Fix MSVCP140 DLL Missing Error?
To fix the “MSVCP140 DLL not found” error, you can implement a number of solutions. As the first action, you can check your Recycle Bin folder. If it contains the deleted MSVCP140 DLL file, you can restore or recover it.
However, if the Recycle Bin does not have Vcruntime140 DLL and MSVCP140 DLL missing file then you can uninstall the problematic programs from your computer, install Windows update (if available), and run System File Checker to scan your system.
Must Read: How to Delete Windows Update Files?
Thereafter, you can reinstall the Microsoft Visual C++, download MSVCP140 DLL separately, and manually register the MSVCP140 DLL file. You can use the System Restore tool as well if needed.
Now, we will explain these methods with a step-by-step guide. You can go through each method and execute the steps carefully. Continue reading!
Method 1: Check Your Recycle Bin
If the program can’t start because MSVCP140 DLL is missing then the first and basic method is to check the Recycle Bin folder.
There can be instances that you accidentally remove the file which gets stored in the Recycle Bin folder. If you find the file there, you can restore it. For that, you need to right-click on the deleted MSVCP140 DLL file and choose the Restore option. Thereafter the file will be recovered to the location it was available earlier.
Method 2: Remove and Reinstall Troublesome Software
Due to problematic programs, the origin MSVCP140 DLL file might fail to launch on PC. In this scenario, you can remove those programs that you think can cause issues. Skype or other third-party applications could create complications so you can try removing such applications. Here is how to do it on a Windows PC.
- Click right on the “Start” button to open the menu.
- Choose the “Apps and Features” options.
- Scroll down and click on “Skype” (or other names of the program that is causing difficulties).
- Hit the “Uninstall” button.
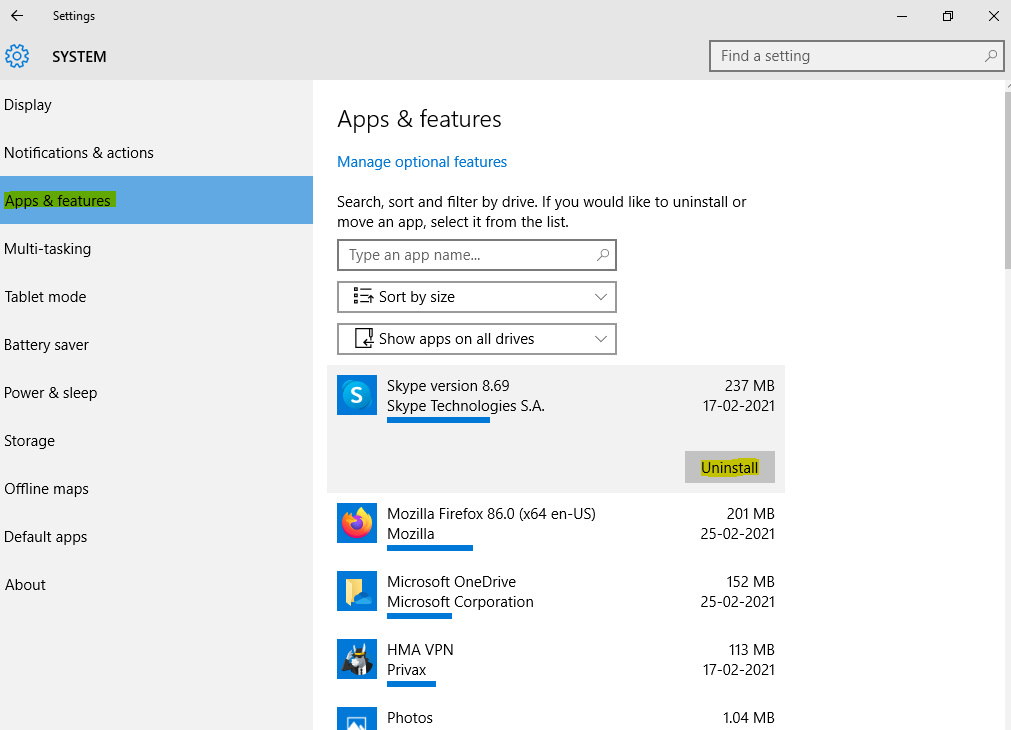
After confirming your actions, the culprit program will be uninstalled. Then, you can try launching the MSVCP140 DLL origin file. If you are still having troubles then you should upgrade your system.
Method 3: Download Windows Updates
Outdated versions of your operating system can cause multiple issues. In some cases, files or drivers get corrupted as they are no longer compatible with the new version. Due to this, you face unwanted errors.
If the program can’t start because MSVCP140 DLL is missing then you can check for updates and install it if available for Windows PC. To do so, you can jump to the following steps:
- Use “Windows” + “I” keys.
- Click on “Update & Security” option.
- Select the “Check for Updates” button.
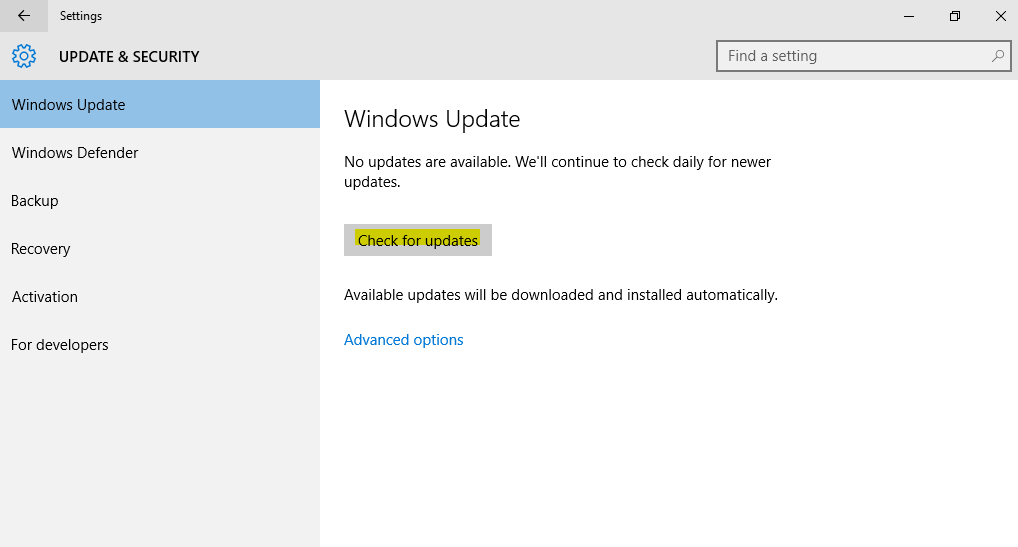
Once you do so, the Windows PC starts looking for new updates. If it is available, you can download it by following the on-screen instructions. After upgrading your system, you can check if the origin MSVCP140 DLL bug is still there. If yes, then you need to check your system files.
Method 4: Run SFC Scan
The code execution cannot proceed because MSVCP140 DLL is missing or not running. This happens due to the corrupted system file. To detect these corrupted files, you can execute an SFC scan. This can be done via Command Prompt. Let’s know how to do that.
- In the search box, type “Command Prompt” or “CMD”.
- Click on the “Command Prompt” when it appears in the result. Make sure you run it as an administrator.
- In the “Command Prompt” window, use the following command:
- Sfc /scannow
- Press the “Enter” key.
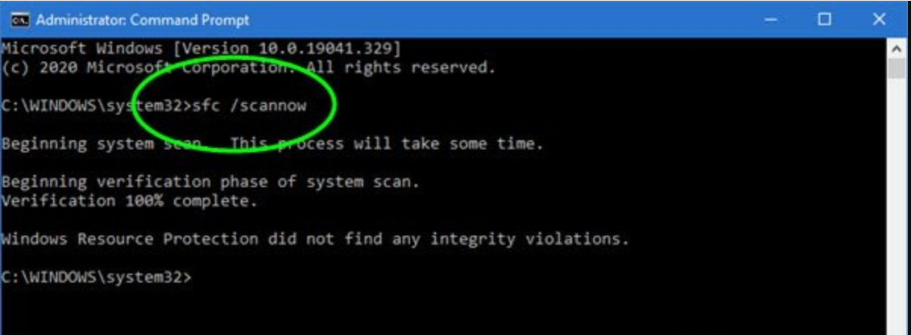
When you are done executing this command, it starts scanning and detecting the files to repair them. This method will help you to find and repair the corrupted files on your computer. Also, there are chances that you can run the MSVCP140 DLL file.
Method 5: Remove and Download Microsoft Visual C++
As stated earlier, the MSVCP140 DLL file is associated with Microsoft® Visual Studio® 2017 so it is necessary to have Microsoft Visual file installed on your PC. This is essential for running certain programs.
In this method, we will first remove the program and reinstall it again from the MSVCP140 DLL download page. Let’s know how to uninstall and reinstall the Microsoft Visual C++ in the following steps:
- Open “Control Panel” on your computer.
- Go to the “Programs” section.
- Click on “Uninstall a program”.
- Click right on the redistributable you wish to uninstall such as “Microsoft Visual C++”.
- Select the “Uninstall” button.
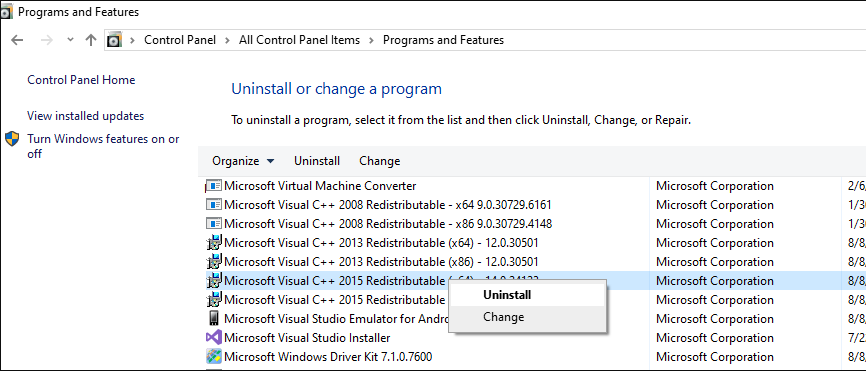
Once you are done with the uninstallation part, you can go to the MSVCP140 DLL download page to reinstall the correct file. This can be downloaded from the official website of Microsoft. After that, you can restart your device.
Method 6: Download MSVCP140 DLL Separately
Most users have been asking how to install MSVCP140 DLL. If you have the same question in your mind, this method is for you. Here, we will install and check the visibility of files on your computer.
If MSVCP140 DLL missing on Windows 7 32 bit or Windows 10 then you can download it again from the MSVCP140 DLL download page. Make sure you download it from the trusted platform otherwise the virus is likely to enter your Windows PC. Therefore, it is recommended that whenever you download the file, scan it before launching it on your computer.
Once you are done downloading and extracting the file, you can copy the content into the C:/Windows/SysWOW64 (for 32-bit systems) folder.
Note: For 64-bit systems, you can copy the content into C:/Windows/System32 folder
Alternatively, Windows users can copy the content to a portable device so that you can plug it into your computer and paste it into the right folder.
If you want to check the visibility of the MSVCP140 DLL file, you can go through the following instructions stated below:
- Open “File Explorer” on your computer.
- Click on the “View” tab.
- Click on the “Show hidden files, folders, and drive located under the “Hidden files and folders”.
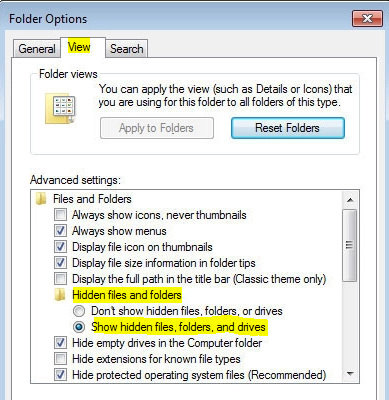
- Hit the “OK” button.
This is how you can check the file visibility. By installing the MSVCP140 DLL from the Microsoft download page, you can launch the programs with no interruption on your computer and follow the guide to uninstall programs in windows manually.
Method 7: Manually Register MSVCP140 DLL File
After downloading and installing the file MSVCP140 DLL Microsoft download page, you need to re-register it. To do so, you are required to pursue these steps mentioned below:
- In the search box, type “Command Prompt” or “CMD”.
- Click on the “Command Prompt” when it appears in the result. Make sure you run it as an administrator.
- In the “Command Prompt” window, use the following command:
- regsvr32 /u MSVCP140.dll
- Press the “Enter” key.
- Then, use the following command:
- regsvr32 MSVCP140.dll
- Press the “Enter” key.
Once you are done following these steps, the file will be registered on your system. Then, you can run the programs easily.
Method 8: Use System Restore
If no method worked properly then you can try using the System Restore method. This will revert your system to the earlier state when there was no file missing. This method does not affect your personal data such as photos, videos, documents, etc. Below are the steps one can follow:
- In the Windows search bar, type “Create a Restore Point”.
- Press the “Enter” key.
- Go to the “System Protection” tab.
- Click on the “System Restore” option.
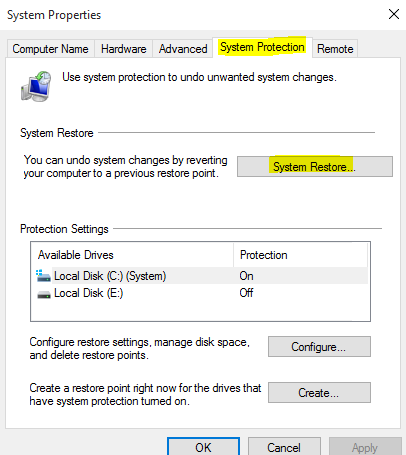
- Hit the “Next”.
- Then, select the “Show more restore points” option.
- PIck the points when this particular problem was not there.
- Hit the “Next” button.
After following these steps, you can complete the process by following on-screen instructions. This is the best way to get rid of errors related to MSVCP140 DLL on Windows 7 or Windows 10.
Bonus Tips
The aforementioned methods are quite sufficient for removing the “MSVCP140 DLL was not found” error. Yet we are giving you bonus tips to prevent error in the future.
- To repair the errors automatically, you can use software that automates tasks. It will be easy for you to detect problems and repair them instantly.
- By using a VPN client, you can protect online privacy.
- Also, use a Data Recovery tool as this will prevent you from losing files permanently.
To Wind Up
If your system has no Microsoft Visual C++, it is likely to receive errors such as “the code execution cannot proceed because MSVCP140 DLL is missing”. However, you can resolve this issue by reinstalling the file again.
In case you have no idea how to install MSVCP140 DLL, we have provided a full guide above. Here, you can check the deleted Vcruntime140 DLL and MSVCP140 DLL missing file in the Recycle Bin, uninstall the problematic programs from your computer, install Windows update (if available), and run System File Checker to scan your system.
After this, you can download the Microsoft Visual C++, install MSVCP140 DLL separately, and re-register the MSVCP140 DLL file manually. To automatically restore the system, you can use the System Restore tool as well.
This is how you can get rid of missing file errors. If you are facing other errors on your computer, we have prepared curated guides. Below are the following guides you can check out on Windows 10 errors.