Updating your Windows system is very crucial. Working on an updated Windows laptop or computer makes the output better. Sometimes when you are updating your Windows system you can encounter an update error like the 0x80070490 error code. The Windows update error 0x80070490 is a common occurrence. Is it bothering you too? If yes, then this post is worth your time. Let us see the various ways to fix this error quickly!
What Causes the Windows Update Error 0x80070490?
The 0x80070490 error code on Windows can occur due to several reasons. We have listed the 3 usual reasons why you may be seeing this error on your Windows system.
1. The first cause of the 0x80070490 error code is some interference caused by the antivirus software which affects the system’s functioning.
2. At other times, when the antivirus has not been installed, a virus may enter the Windows computer or laptop and cause this update error.
3. When the files in the SoftwareDistribution folder get corrupted, the error code 0x80070490 can be the consequence.
How to Fix Windows Activation Error 0x80070490?
The Windows activation or update error 0x80070490 can be resolved with three quick fixes. These fixes include using the Windows update troubleshooter, disabling the antivirus software, and ensuring that services like BITS and Windows update are running on your computer or laptop. Now, let’s head on to read more!
Fix 1: Use Update Troubleshooter on Windows System
When the Windows activation error 0x80070490 prevents you from using your computer, we will suggest you try using the Windows Troubleshooter. Learn how to use the Troubleshooter on your Windows system in just 7 steps.
1. Open the “Settings” on your Windows computer.
2. Click on “Update & security”.
3. Then tap on “Troubleshoot”.
4. Click on the option of “Windows update”.
5. Next, tap “Run the troubleshooter”.
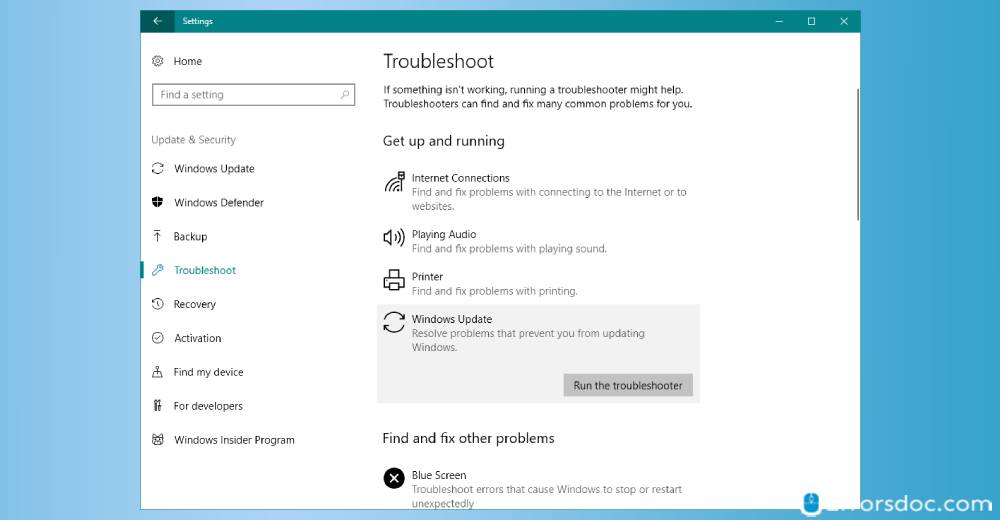
6. Now, you will find instructions on your screen. Follow these instructions to continue.
7. The final step is to restart your Windows computer or laptop.
Fix 2: Disable Antivirus on Your Windows System
Sometimes the antivirus software installed in your system can interfere with its functioning. If this is the reason that is causing the Windows update error on your computer, then you should try disabling the antivirus software. Learn how to fix Windows update error 0x80070490 by disabling the antivirus in just 2 steps.
1. On the “Taskbar” of your Windows computer, look for the icon of the “Antivirus software”.
2. When you find the icon, right-click on it and select “Disable”.
Fix 3: Run Windows Update Services, BITS, Cryptographic, & MSI Installer on Windows
Is the Windows update error 0x80070490 not fixed yet? This method will surely work! In this fix, we will tell you to ensure that the Windows update services, BITS, cryptographic, and MSI Installer are running on your system. Perform this fix in 4 really quick steps!
1. Open the “Run dialog box” on your computer/laptop.
2. Enter “services.msc” and click on “Ok”.
3. In the “Services window”, look for “Windows update services, BITS, cryptographic, and MSI Installer. Check that these services are running.
4. In case any of the above-mentioned services are not running, choose them and press “Start the service”.
How to Fix Windows 7 Update Error 0x80070490?
We have one genius fix to help you troubleshoot the update error code 0x80070490 on your Windows 7 system. This fix requires you to do a system restore. The complete information and steps of this fix have been given in the next section.
Fix 1: Perform System Restore on Windows 7
The error code 0x80070490 Windows 7 can be settled in no time by performing a system restore. Doing so will restore your Windows 7 computer to the former version. Check out how to perform the system restore in 8 steps only.
1. Tap the “Windows” and “R” keys together to open “Run”.
2. Enter “rstrui” in Run and press “Ok”.
3. When the “System restore” opens, press “Next”.
4. Ensure that the box for “Show more restore points” has been checked.
5. Then choose a restore point at which your PC was working normally without the error code. Then press “Next”.
6. Then press “Finish”.
7. When a prompt appears, tap “Ok”.
8. Wait for the system restore to finish. Then your Windows 7 computer will restart automatically.
How to Fix 0x80070490 Windows 8 Error?
For the users of Windows 8 laptops and computers, we have one clever fix to settle the 0x80070490 error code forever. This fix involves restarting your computer or laptop in the clean boot. Find more information about this fix in the following section.
Fix 1: Restart Windows 8 Computer in Clean Boot
Restarting your computer in the clean boot is an excellent solution for doing away with the 0x80070490 Windows 8 update error. Do you know how to restart your PC in the clean boot? If not, we will be pleased to help you. Here, we have shown the 10 steps for administering this fix.
1. Press the “Windows” and “R” keys at the same time to open “Run”.
2. Type “msconfig” in “Run” and press the “Enter” key.
3. Now, go to the “Services” tab.
4. Tick the checkbox for “Hide all Microsoft services”.
5. Now, press the “Disable all” button.
6. Next, go to the “Startup” tab.
7. Tap “Open task manager link”.
8. Disabling all the startup items is the eighth step.
9. Now you can exit the “Task manager” and tap “Ok” in the “System configuration window”.
10. The final step of this procedure is to restart your Windows 8 system.
How to Fix Windows 10 Update 0x80070490 Error?
With our 6 awesome fixes, you can fix the 0x800700490 error code on your Windows 10 computer or laptop in much less time than you can think. In these fixes, we will teach you to use the SFC scan, utilize the DISM tool, delete the SoftwareDistribution folder, and create a new local account to wipe this error on your Windows 10 system.
Fix 1: Run SFC Scan on Windows 10 Computer
Is your computer or laptop showing you the message “Feature update to Windows 10 version 1809 error 0x80070490”? SFC scan can resolve this error in no time. In case you have never used the SFC scan before, here we have defined the steps to use it.
1. Access the search box on your Windows 10 computer.
2. Type “cmd” in the search box. Then open the “Command prompt” and run it as administrator.
3. Now, fill in the command given below and then hit “Enter”.
“sfc/scannow”
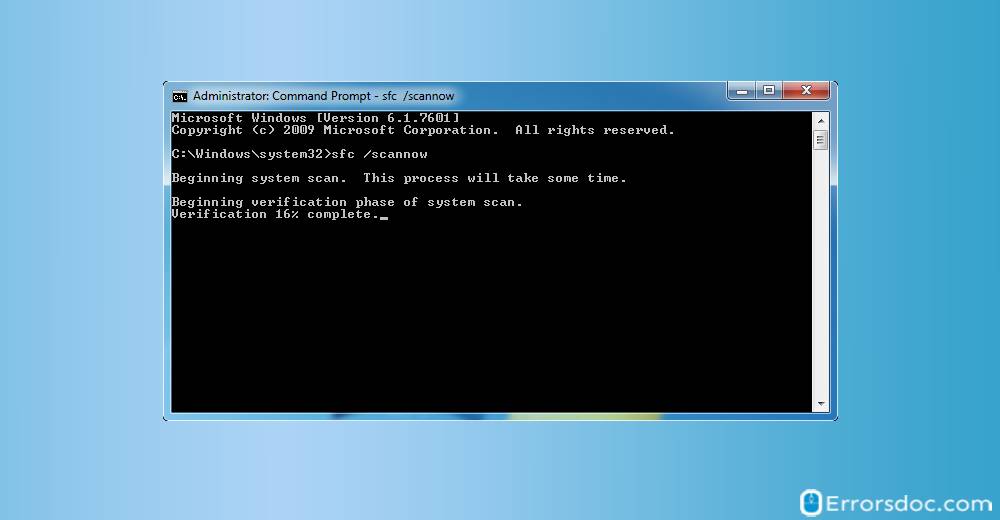
4. Allow this process to get completed and then restart your Windows 10 system. The Windows update error will not bother you now.
Fix 2: Use DISM Tool on Windows 10 System
Many users have used the DISM tool for fixing the Windows 10 version 1803 error 0x80070490 and have found it to be a big success. Go through the set of instructions given below to run this troubleshooting tool on your Windows 10 computer or laptop.
1. Open the search on your computer and type “cmd”.
2. Next, run the “Command prompt” as administrator.
3. Now, provide the following command and press the “Enter” key.
“DISM.exe/Online/Cleanup-image/Restorehealth”
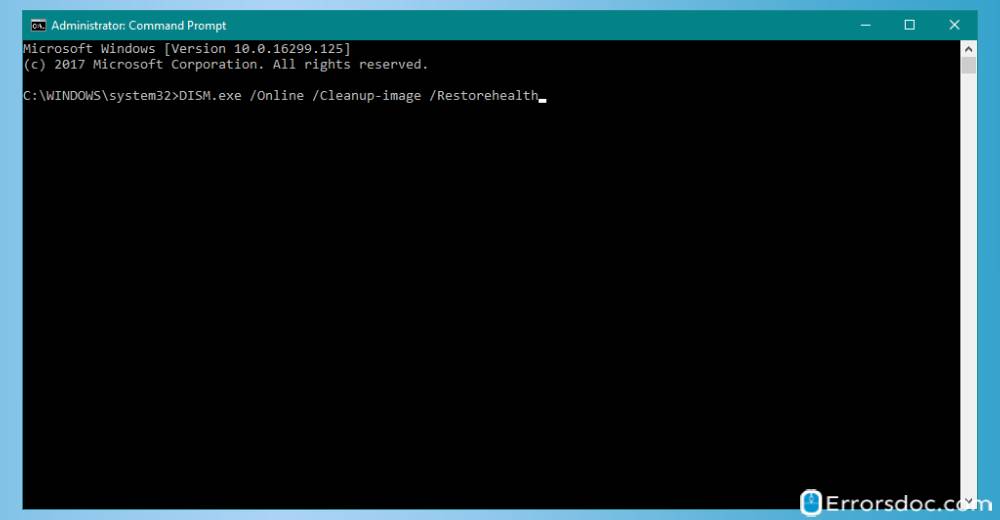
4. The DISM tool will fetch the files online. In case it is not able to, utilize a “DVD” or “Installation USB”. Insert the “DVD” or “USB” in your system. Then provide the command shown here.
“DISM.exe/Online/Cleanup-Image/RestoreHealth/Source:C:RepairSourceWindows /LimitAccess”
Important Note: For those of you who are using the DVD or USB, you will be required to replace its path “C:RepairSourceWindows”.
Fix 3: Move Personal Files to New Local Account on Windows 10 Computer
One of the easiest fixes of dealing with this Windows update error 0x80070490 is to create a new local account on your Windows system and then shift your personal files into that account. Let’s find out the steps of this solution!
1. Using the administrator rights, make a “New local account” on your Windows 10 computer.
2. Now, select all your important files and documents and move them to the newly created account.
3. The next step is to add your Microsoft account to the new local account you have just created.
4. Lastly, remove your old account from your system.
Fix 4: Remove SoftwareDistribution Folder from Windows
The SoftwareDistribution folder carries all the update data on your computer. Sometimes, its contents may become corrupt and cause the scam 0x80070490 Windows 10 error. Therefore, deleting this folder can remove this error too. To delete this folder, you will be required to first disable the Windows update service. The 11 steps for this procedure are as follows.
1. Type in “services.msc” in search for opening the “Services”.
2. Look for “Windows update” in the list of services. Then right-click on it to access the “Properties”.
3. Now, click on “Disable”.
4. The next step is to start your system again.
5. Now, go to “C:Windows” and search the “SoftwareDistribution” folder.
6. Use “SoftwareDistribution.OLD” for renaming the folder. Then you can delete it if you want to.
7. Now, start your computer again.
8. Type in “services.msc” to open the “Services” again.
9. Find “Windows update” and access its “Properties”.
10. Click on “Manual” and then restart your system.
11. Now, look for updates and install them. The error code will no longer be there.
Fix 5: Ensure Your Windows 10 Computer Against Virus
A virus in your computer can very well be a cause of the feature update to Windows 10 version 1803 error 0x80070490. Therefore, it will be highly essential for you to check that your Windows computer has no virus or suspicious malware. Also, if your computer has no antivirus software, then now is the right time to get one. The antivirus software works brilliantly. It keeps checking your computer from time to time to ensure that no suspicious malware or virus is attacking it and prevents such update error codes.
Fix 6: Clear User ID Store Cache Using Registry Editor on Windows 10
Windows 10 update 0x80070490 error code may be a result of the user ID store cache. Removing the cache on your PC or laptop can work great in troubleshooting this update error. We will be using the Registry Editor for this purpose. The 7 steps for this have been mentioned below.
1. On your keyboard, press the “Windows” key and “R” key together.
2. Then type in “regedit” and press “Enter”.
3. When the “Registry editor” opens, go to the following key.
“HKEY_LOCAL_MACHINESOFTWAREMicrosoftWindowsCurrentVersionAppxAppxAllUserStore”
4. Then look for the key given below.
“S-1-5-21-1505978256-3813739684-4272618129-1016”
Important Note: The key mentioned above is an example. Keeping in mind the format of this key, you can find the key according to your Windows system.
5. Now, choose all the keys. Then delete them.
6. Next, you can exit the “Registry editor” now.
7. The last step is to restart your PC. You will notice that the update error has been fixed.
All in All,
This blog helped you to troubleshoot the update error 0x80070490 on Windows 7, Windows 8, and Windows 10. We learnt several fixes and their step-by-step procedures too! Which fix did you find the easiest? Let us know in the comment section provided below.
Are you also on the lookout for the most awesome guide to mount ISO Windows 10? Are you searching for the best ever fixes for Windows 10 running slow as well? We got you covered for both of these. Read these posts in just a tap!