As a part of the system process, Windows 10 systems are auto-tuned for automatically downloading the systems updates as and when they are released. For many users, automatic updates can be useful. For some users, however, there may be a need to stop auto update Windows 10.
So, in this post, we will take you through various methods for how to stop Windows 10 update. Along with that, we will also show you how to stop Windows 10 update in progress.
How to Stop Windows 10 from Automatically Updating?
Windows 10 computers can be stopped from updating automatically by following several methods such as the Windows Update Service method and Command Line method. You can also set up a metered connection, change the Group Policy Editor Settings, modify Windows 10 settings, etc. We have shown all the methods and their steps in the following sections.
Method 1: How to Stop Windows 10 Auto Update via Windows Update Service?
Here is one of the best methods for Windows 10 stop automatic updates. We will learn to stop the Windows Update service to turn off the automatic updates functionality in this method. This service can be stopped in just 5 steps.
1. Open the “Run” dialog box by pressing the “Windows” and “R” keys together.
2. Type in “Services.msc” and press “Enter”.
3. The “Services” list will appear. Look for the “Windows Update” service and open it.
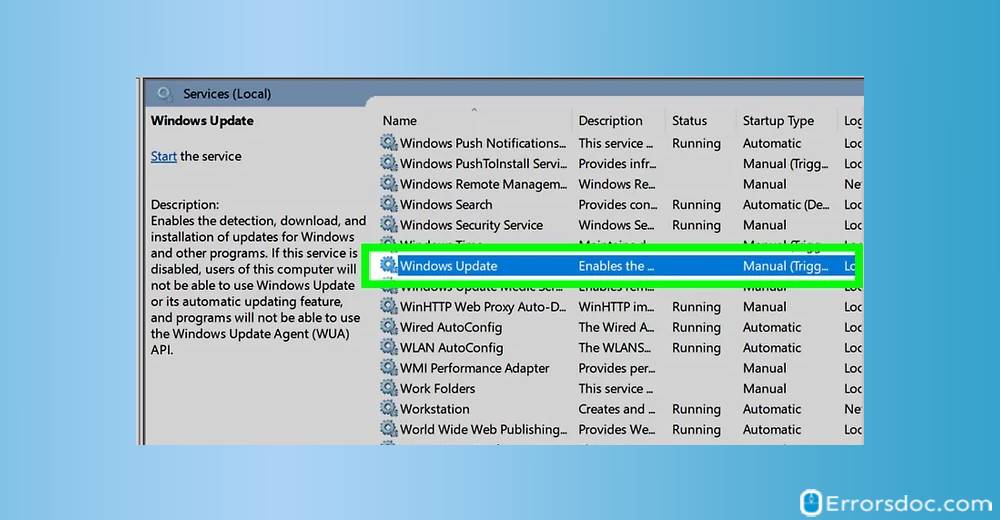
4. Under the ‘General’ tab, go to ‘Startup Type’ and change it to ‘Disabled’.
5. Restart your computer to apply the changes.
Method 2: How Do I Stop Windows 10 from Updating by Setting up a Metered Connection?
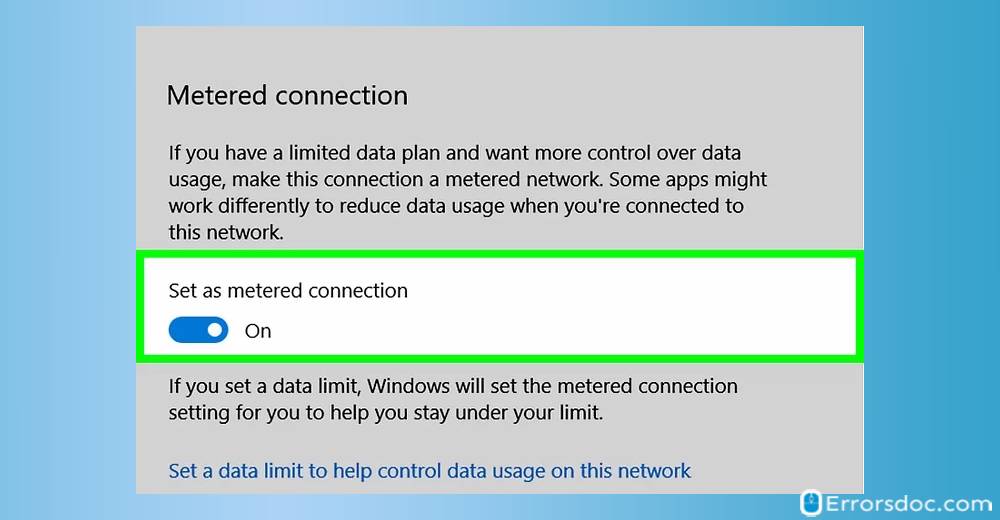
Not many of you will know that setting up a metered connection on Windows 10 computers can help stop the automatic updates feature. Our experts have found this method to be extremely effective. So, let us find out how to stop auto update in Windows 10 by setting up the metered connection in just 4 steps.
1. Press “Windows” and “I” keys to open the “Settings app”.
2. Open the “Network & Internet” section.
3. Now, open “Wi-Fi” and click on the “Advanced Options”.
4. Change “Set as metered connection” to “On”.
Method 3: How to Stop Windows 10 Auto update by Changing Group Policy Editor Settings?
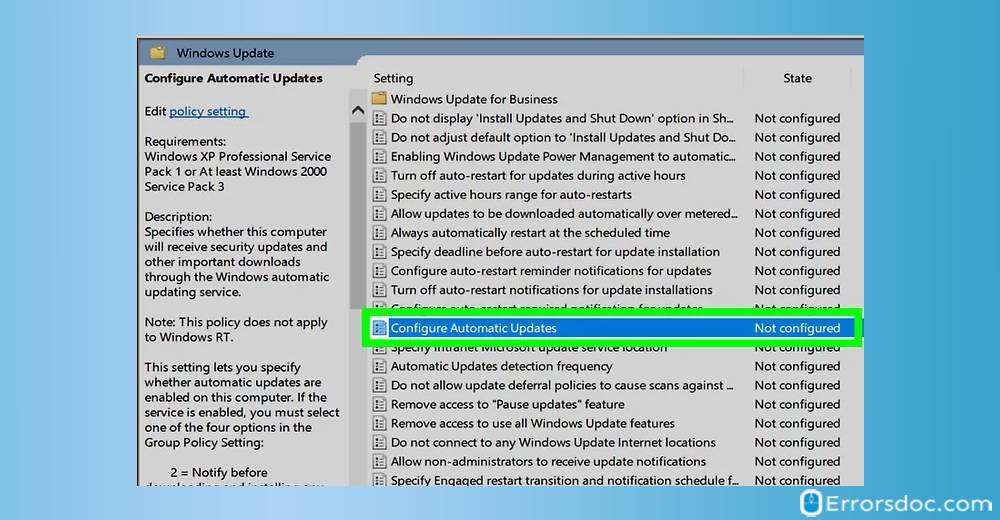
One quick way for how to make Windows 10 stop updating is by configuring the Group Policy Editor. When the Group Policy Editor settings have been changed, you will receive notifications about the new updates available for your Windows 10 system. These updates, however, will not get automatically installed prior to your permission. For carrying out this method, you can find its steps right here.
1. Press “Windows” and “R” keys together to open the “Run” dialog box.
2. Type in “gpedit.msc” and press “Enter”.
3. Go to “Computer Configuration” and click on the “Administrative Templates”.
4. Now, click on “Windows Components” to access “Windows Update”.
5. Change the “Configure Automatic Updates setting” to “2 – Notify for download and notify for install”.
6. Next, open the “Settings app” by pressing “Windows” and “I” keys together and navigate to “Update and Security”.
7. Click on “Windows Updates” and then click on “Check for updates” to apply the new configuration setting.
8. Lastly, restart your Windows 10 computer.
Method 4: How to Stop Windows 10 Update 1903 via Registry?
Among the quickest methods to stop installing updates Windows 10, this one can be performed in really less time. In this method, we will edit the Registry on the Windows 10 system. For trying out this method, you will be required to perform the 13 steps given below.
Important :-Editing the Registry is a really quick way to stop update download Windows 10. Editing the Registry can, however, give rise to irreversible damage when the procedure is not performed in the correct manner. So, just to be on the safer side, we will advise you to keep a complete backup of everything on your Windows 10 computer. Also, make sure that you perform the following steps very carefully.
1. First, make a complete backup of all the important files as well as documents on your Windows 10 computer.
2. Open the “Run” dialog box by pressing the “Windows” and “R” keys at the same time.
3. Enter “regedit” in the “Run” dialog box and then click on “Ok”.
4. When the “Registry” opens, go to the following path.
“HKEY_LOCAL_MACHINE\SOFTWARE\Policies\Microsoft\Windows”
5. When you see the “Windows (folder)” key, right-click on it. Choose “New”. Then tap “Key”.
6. The name of the new key should be kept as “WindowsUpdate”. Then tap the “Enter” key.
7. Now, right-click on the key you just created. Then choose “New” and click on “Key”.
8. The newly created key should be named as “AU”. Then hit the “Enter” key.
9. In the new key, you have to right-click on the right side and choose “New”.
10. Now, click on “DWORD (32-bit) Value”.
11. Name the new key as “AUOptions”. Then tap the “Enter” key.
12. Next, click twice on the new key. You have to change its value to “2” to receive notifications for downloading and installing the updates. Then press “Ok”.
13. The final step is to close the “Registry”.
Method 5: How to Stop Windows 10 Update Command Line by Modifying Settings?
In the fifth method for Windows 10 how to stop updates forever, we will be modifying the settings. This method is quite easy to perform. Below, we have defined 9 steps to help you go ahead with this method.
1. Open the “Start” menu on your Windows 10 computer.
2. Now, go to the “Settings”.
3. Click on the “Windows Settings Utility”.
4. Choose the option of “Update and Security”.
5. The fifth step is to access the “Advanced Options”.
6. In the “Advanced Options”, access the dropdown menu. Then choose the option of “Pause Updates”.
7. Next, select a date for pausing the updates.
8. To put off the updates, go to the dropdown menu and choose a suitable “Windows Update servicing channel”.
9. Choose for how long you wish to postpone the “Feature Updates” as well as the “Quality Updates”.
At the end of these steps, auto-updates will get disabled for a temporary period of time.
Important :-When you modify the settings to stop Windows 10 updates for good, your computer will stop updating automatically. However, it will be important for you to note that this setting is only a temporary option. It will last for only 35 days. After every 35 dates, you will have to choose a new date by performing the same set of steps that has been provided above.
Method 6: How Can I Stop Windows 10 Automatic Updates by Uninstalling Update Assistant?
In certain instances, Windows 10 users reported that they performed various methods to stop the automatic updates and were not successful. This can happen when the Windows 10 Update Assistant makes changes in the settings. For this reason, uninstalling the Update Assistant can work well for how to force stop Windows 10 update. Use the following steps to uninstall it.
1. Launch “Run” on your system.
2. Type in “appwiz.cpl” in “Run” and press “Ok”.
3. From the programs shown, choose “Windows 10 Update Assistant”. Right-click on it and press “Uninstall”.
4. Next, confirm the uninstallation.
5. Now, go to “File Explorer”.
6. Tap on “This PC”.
7. In case the Assistant is installed by default while installing OS for Windows, go to “This PC”, click on “C Drive”, click on “Windows”, tap on “Windows10Upgrade” folder, and delete the folder.
8. In case the Assistant is separately installed, head to the location of the “Windows 10 Update Assistant”. Then remove the installation folder which is usually named as “Windows10Upgrade”.
9. Next, open “This PC”.
10. Click on “Windows”.
11. Delete “UpdateAssistant” and UpdateAssistantV2” folders.
12. Restart your Windows 10 computer.
Method 7: How to Stop Windows Update Service Windows 10 Command Line?
You can stop update Windows 10 CMD functionality by using the Command Prompt. All you have to do is enter certain commands. This procedure is helpful and will not take much time as well. Read the 7 steps given here to learn what these commands are.
1. Open the “Command Prompt” via the “Start Menu”. Run it as an administrator.
2. Enter the following commands one by one. Then tap the “Enter” key.
“net stop wuauserv”
“net stop bits”
“Net stop dosvc”
3. Then exit “Command Prompt”.
4. When the commands have resumed, go to the “Start Menu” again.
5. Open “Command Prompt” and run it as the administrator.
6. Then enter the following commands one after the other. Press “Enter” after inserting each command.
“net start wuauserv”
“net start bits”
“net start dosvc”
7. Then exit “Command Prompt”.
Method 8: How Do I Stop Updates in Windows 10 via Show/Hide Tool?
In this section, we will be revealing a method for how to stop a Windows 10 update from installing with the help of the Show/Hide tool. For using this tool, you need to run it on your Windows 10 computer, then use the “Hide” feature. This feature will hide the update. And once the update has been automatically installed on your computer, you can uninstall it. It will not reinstall on its own.
Important :-For your information, the Show/Hide tool is not a part of your Windows 10 computer. You will be required to download it from the official website of Microsoft.
Method 9: How to Stop an Update from Installing Windows 10 by Disabling Windows Update Tasks?
Here we are with the smallest of procedures for how to stop update of Windows 10 within a couple of minutes. Do you know that you can use the Windows Task Scheduler for stopping the automatic updates? We do! Take a look at the steps of this procedure below.
1. In the “Windows Search Box”, type in “Task Scheduler”.
2. Run the “Task Scheduler”.
3. Then go to “Task Scheduler Library”.
4. Click on “Microsoft” in the library.
5. Click on the “WindowsUpdate” folder.
6. Right-click on “Schedule Start” on the right.
7. Click on “Disable” to continue.
8. Then exit the “Task Scheduler”.
Method 10: How to Stop Window Update on Windows 10 by Renaming Update Service File?
Are you thinking “How to stop Windows 10 from automatically installing updates by renaming the Update Service file”? You can now add a pause to that thought. The procedure to do so is right here. You can do it in 19 clear steps.
1. Go to the “Windows Explorer” on your Windows 10 computer.
2. Go to the following location.
“C:\Windows\System32\”
3. Find the file with the name “wuaueng.dll” file. Go to this file’s properties by right-clicking on it.
4. Then go to the “Security” tab.
5. Click on “Advanced”.
6. Tap the option of “Change Owner”.
7. Fill in your “Account Name” and then press “Ok”.
8. Then press the “Apply” button.
9. Click on “Ok” when the “Windows Security” information message pops up.
10. Press ‘Ok two (2)” and the “Properties” will get closed.
11. Now, again access the properties of the “wuaueng.dll” file.
12. Open the “Security” tab.
13. Click on “Advanced”.
14. Choose the “Administrators” entry.
15. Press “Edit”. Then checking the “Full Control” is the next step. Tap twice on “Ok”.
16. When the “Windows Security” warning appears, press “Yes” and then tap “Ok”.
17. The file “wuaueng.dll” needs to be renamed as “wuaueng.dll.BAK”.
18. Tap “Continue” in case the message “File Access Denied” shows up. Then tap “Yes”.
19. Lastly, restart your Windows 10 computer.
Method 11: How to Stop Windows 10 Pro Auto Update by Disabling Update Tasks?
Many-a-times the Windows Update Assistant will install the updates automatically. If you want to know how to stop Windows 10 update Assistant from installing these updates, then you can disable the Update Tasks for this purpose. It will surely help you. The 10 steps for disabling the Windows Update Tasks have been shown here.
1. Go to the “Task Scheduler” via the “Start Menu”.
2. On the left, click on the “Task Scheduler Library”.
3. Then click on “Microsoft”.
4. Click on “Windows”.
5. Tap “Windows Update”.
6. Right-click on “Scheduled Start”.
7. Then click on “Disable”.
8. Now, right-click on “sih”.
9. Next, press “Disable”.
10. Now, exit the “Task Scheduler”.
Method 12: How to Stop Windows Updates Windows 10 Pro via Group Policy Editor?
For those of you who don’t have the stop Windows 10 update software, you can utilize the Group Policy Editor to stop the updates on Windows 10 Pro. Check out the 10 simple steps for executing this method.
1. Press the “Windows” and “R” keys together to open “Run”.
2. Paste “gpedit.msc” in “Run” and then hit “Enter”.
3. In the “Group Policy Editor”, go to “Computer Configuration”.
4. Click on “Administrative Templates”.
5. Click on “Windows Components”.
6. Then go to “Windows Update”.
7. On the right, click on the “Specify Intranet Microsoft Update Service Location” policy.
8. Tap on “Enabled”.
9. Now, 2 fields will be visible to you. Paste “http:\\neverupdateWindows10.com” in both the fields. Then press “Ok”.
10. End the procedure by restarting your computer.
Method 13: Windows 10 How to Stop Updates Temporarily?
Now, we will tell you how to stop all the updates in Windows 10 Pro for a temporary time period. In this method, all you have to do is turn on the feature of pausing the updates from the settings of your Windows 10 Pro system. Let us read its 5 steps.
1. Open the “Settings” on Windows 10 Pro.
2. Click on “Update & Security”.
3. The third step is to tap “Windows Update”.
4. Click on the “Advanced Options”.
5. Tun on the option of “Pause Updates”.
Important :- Since this is a temporary method for how to stop automatic Windows update on Windows 10, this will only pause the automatic updates installation for 35 days.
Method 14: How to Stop Automatic Windows Update on Windows 10 via Windows Store?
Let us learn how to stop Windows 10 from trying to update by disabling the automatic app updates from the Windows Store. Using this procedure, you can stop the automatic updates in just a minute. Try out this super easy 5-step method now!
1. Click on “Start”.
2. Go to the “Microsoft Store”.
3. Press the “-” sign on the top-left and a dropdown menu will be available.
4. Click on the “Settings” in the dropdown menu.
5. Tap the coloured switch for “Update apps automatically” to turn it off.
How to Stop Windows 10 Updates in Progress?
We know 2 methods for stopping the updates on Windows 10 that are in progress. This can be done by stopping the Windows Update Services and by stopping the Automatic Maintenance. The steps for both of these methods have been stated in the following sections.
Method 1: How to Stop Windows 10 Update in Progress via Services?
There are times when the updates may have begun to automatically install on your Windows 10 computer. While the updates are in progress, you can still stop them through the option of Services. So, now you can head on to read how to stop Windows 10 update when in progress in 6 steps.
1. Open Windows 10 “Search Box” and Type in “Services”.
2. Once the “Services” application appears, right-click on it and select “Run as Administrator”.
3. In the “Services” window, check for the list of services running in the background.
4. Find “Windows Update” service from the list and right-click on it.
5. Select “Stop” or click on the “Stop” link available under “Windows Update” option.
6. A small dialogue box will appear showing you the process to stop the progress. Close the window once finished.
Method 2: How Can I Stop Windows 10 Update in Progress via Automatic Maintenance?
To know how to stop update for Windows 10 which are already in progress, this section will be very useful for you. You can use Windows 10 automatic maintenance for stopping the updates in progress.
1. Open the “Control Panel” from the “Start Menu”.
2. Tap “System and Security” in the “Control Panel”.
3. Then click on “Security and Maintenance”.
4. Press the “Stop Maintenance” button and that is all.
To Sum up,
This blog has been really useful for the users of Windows 10 to stop the automatic updates on their computers. We hope these methods help you as well.
Are you also searching methods for Windows 10 disable automatic restart? We surely can help you with the best methods. And if you would also like to prevent the commonly occurring error 0x80070643 Windows 10, then we have the best fixes for that too.
I have stopped windows 10 from updating automatically as a lot of times the new updates causes issue with my work software. But what i want to know is that how from stopping windows update in progress would do anything if i have stopped the auto update? Does the window update work in the background even while stopped?