
Microphone issues are quite common in Windows 10 PC. If you have stumbled into this, we will teach you to fix your microphone and make it work again effectively. Learn with us how to fix when the microphone is not working on Windows 10 in the following guide.
- Why My Microphone is Not Working on Windows 10?
- How do I fix my microphone on Windows 10?
- Method 1: Set Microphone Access Permissions
- Method 2: Set the Default Recording Voice
- Method 3: Check If Your Microphone is Mute
- Method 4: Disable the App-Exclusive Control
- Method 5: Run Troubleshooter for Recording Audio
- Method 6: Ensure Your Hardware is Compatible with Your Mic
- Method 7: Connect Bluetooth Headphones Manually
- Way 1: Switch back to Bluetooth
- Way 2: Disconnect and connect the Bluetooth Again
- Way 3: Uninstall the device temporarily and pair Bluetooth again
- Method 8: Download Correct Audio Driver for Windows 10 PC
- Method 9: Uninstall Your Microphone from the Devices and Printers
- Method 10: Remove Suspicious VOIP Apps
- Method 11: Check for Windows Update
- Method 12: Update or Reinstall Microphone Drivers
- Method 13: Restart Windows Audio Service
- Method 14: Restore the System with Restore Points
- Method 15: Disable Handset on Bluetooth Devices
Why My Microphone is Not Working on Windows 10?
There can be numerous reasons that your microphone is not working. For instance, your microphone will not pick up your voice if you do not allow your microphone to access the Windows apps. Similarly, there can be other possible reasons that affect your mic to receive or send voice.
How do I fix my microphone on Windows 10?
In this blog, we will discuss a number of methods that you can implement on your Windows 10. You can start with basic troubleshooting steps such as sound not working, running a troubleshooter for Recording Audio, settings access permissions, and more.
If no basic method works, you can then proceed with restoring your system, updating microphone drivers, removing suspicious VOIP apps, and so on. Let’s understand these methods with a manual procedure.
Method 1: Set Microphone Access Permissions
If on Windows 10, the microphone not working Realtek then you should set the correct microphone access permissions. For that, you need to visit the Microphone Privacy Settings page. To understand better, let’s follow these steps mentioned below:
- Click on the “Windows” logo located on the bottom left.
- Go to “Settings”.
- Click on “Privacy”.
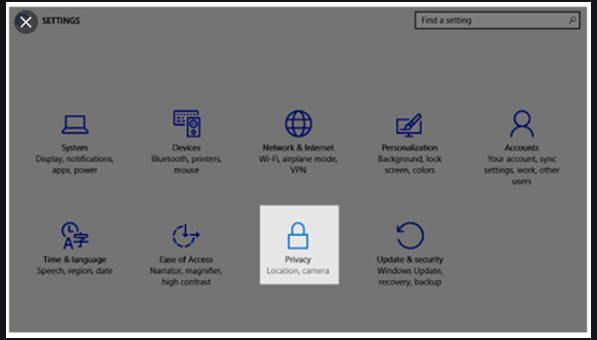
- Select “Microphone” from the left pane.
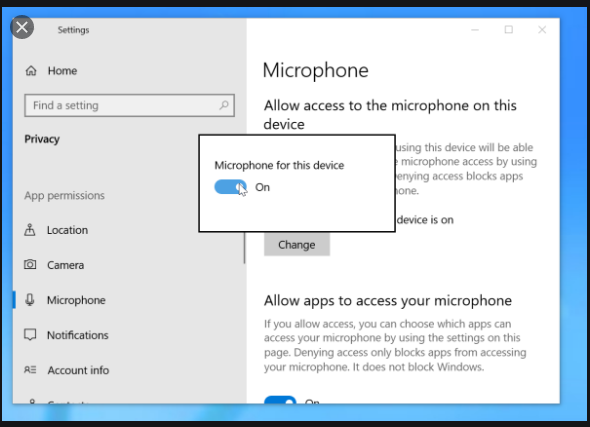
- Then, check the following settings:
- Enable the “Microphone access for this device” option, if it is turned off.
- Enable “Allow apps to access your microphone”, it disabled.
- Allow those apps from the list that you want your microphone to use.
Once you are done implementing these steps, your Windows 10 apps can use the microphone. In case your microphone problems are not resolved yet, you can check more methods down below.
Method 2: Set the Default Recording Voice
By setting the recording device as default, you can solve your “headset microphone is not working on Windows 10 Realtek” issue easily. To do so, you can follow the steps discussed below:
- Press the “Windows” + “R” key on your keyboard. This will open the “Run” dialog box.
- Type “Control Panel” in the search bar.
- Hit the “Enter” key or click on the “OK” button.
- Now, click on the “Hardware and Sound” section.
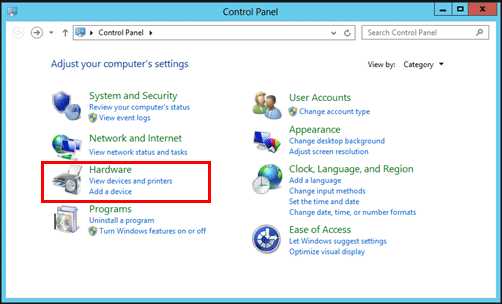
- Click on the “Sound”.
- When the “Sound” window appears, go to the “Recording” tab. It shows a list of recording devices.
- Click right on the empty place and check the following:
- Show Disabled Devices
- Show Disconnected Devices
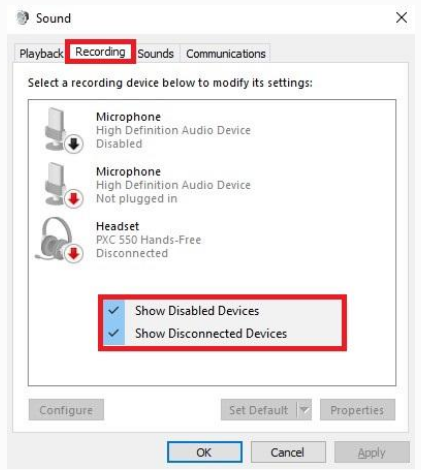
- Now, right-click on each recording device and make sure that they are enabled. If a recording device is enabled already, you will see a “Disable” option by clicking right on it.
- Test your microphone. You will see the Green bars rising on your screen when you speak on the microphone.
Note: To avoid confusion, stay away from other microphones while testing.
- Now, select that device that shows Green bars and click on the “Set Default” option.
Note: If there is only one device in your list or the device is set as default already then the button will become grayed out.
Method 3: Check If Your Microphone is Mute
If on Windows 10, microphone not working Realtek then you need to make sure that your microphone is not muted. To know this, you can go through the following instructions:
- Right-click on your speaker located in the “Taskbar”.
- Select “Recording devices” option.
- Pick the microphone or your recording device.
- Then, click on “Properties” located on the bottom right.
- Hit the “OK” button.
- Click the “Levels” tab in the “Microphone Properties” window.
- Make sure that the speaker does not have any Red sign next to it.
- Then, set the volume to 100.
- Click on the “Apply” button.
This is how you can make sure if your microphone is muted. If yes, then you can set the volume as per your preference and check if there is still a problem with your microphone. If you are still wondering why is my microphone not working on Windows 10, you can look for other methods.
Method 4: Disable the App-Exclusive Control
In case, your microphone is not working properly on Windows 10 then you need to make more settings for your recording device. Below are the following steps, you can follow.
- Open the “Run” dialog box by using the “Windows” + “R” key on your keyboard.
- Type “Control Panel” in the search bar.
- Press the “Enter” key or click on the “OK” button.
- Now, click on the “Hardware and Sound” section.
- Select the “Sound” option.
- When the “Sound” window appears, go to the “Recording” tab. It will show a list of recording devices.
- Select the one from the recording devices list and click “Properties”.
- In the “Microphone Properties” window, go to the “Advanced” tab.
- Then, uncheck both the following options:
- Allow applications to take exclusive control of this device
- Give exclusive mode applications priority
When you are done applying this setting to the recording device, you can test your microphone if it is working effectively.
Method 5: Run Troubleshooter for Recording Audio
After performing the aforementioned methods, if you still have this question “why is my microphone not working on Windows 10” then you should run Windows troubleshooter. To do so, you can follow the steps discussed below:
- Go to “Windows Settings”.
- Type “troubleshoot” in the search bar.
- Open “Troubleshoot” when it appears in the result.
- Under the “Find and fix other problems”, open “Recording Audio”.
- Click on “Run the troubleshooter” and follow the on-screen instructions.
- Additionally, you can run “Speech” troubleshooting.
After this, you can check if it has solved the issue with an internal and external microphone. In case your headset microphone is not working on Windows 10 Realtek then you need to check your hardware.
Method 6: Ensure Your Hardware is Compatible with Your Mic
Incompatible hardware may also cause problems for your microphone. Most users have this concern that their Zoom microphone is not working on Windows 10. If that is the case, then make sure that your hardware is compatible with your mic. Let’s know how to check it.
Types of Microphone
- A Headphone with two separate (3.5mm) jacks (one for audio and another one for microphone).
- Earphones or headset with one (3.5mm) jack (two in one; audio and microphone).
- USB headphones or headset with a microphone.
- Bluetooth headphones or headset with a microphone.
If you have any of the first two types of headphones, read about them below.
- If your headphones/headset has two separate (3.5mm) jacks (one for audio and another one for microphone) then your computer should have two separate (3.5mm) ports. Both of these ports are usually in Green and Red colors. Make sure that only one jack will not be sufficient.
- If there is only one jack on your computer then you need to get a headphone with one jack so that it can work with both audio and mic. Or, you can get the converter to change from double (3.5mm) jacks to one (3.5mm) jack.
Types of Converters
- Single (3.5mm) to double converter: This for headphones with one jack. This helps to connect to your computer with double audio ports.
- Double (3.5mm) to USB converter.
- Single (3.5mm) to USB converter.
Method 7: Connect Bluetooth Headphones Manually
When the Bluetooth of your headphones and computer is enabled then they can get connected automatically. However, not every time they both connect automatically. In some cases, the headphones are connected but you are unable to receive the audio through the microphone.
In that case, you should connect your Bluetooth manually. For that, we will follow three different ways which are as follows:
Way 1: Switch back to Bluetooth
- Click on the “Speaker” icon.
- Click on the small arrow (on the right) to go back to the computer’s speaker.
- Then, switch back to the Bluetooth headset.
- Make sure that you choose the headset or hands-free option (not the Stereo) to make your microphone work.
Way 2: Disconnect and connect the Bluetooth Again
- Go to “Control Panel”.
- Then, click on the “Hardware and Sound” option.
- Go to “Sound”. This will show you the headphone listed in your recording devices tab.
- Now, right-click on the headphone.
- Click on “Disconnect”.
- Then, right-click again on it and choose the “Connect” option.
- Doing so your connection will be reset and fix the problem.
Way 3: Uninstall the device temporarily and pair Bluetooth again
- Go to “Settings”.
- Click on “Devices”.
- Choose “Bluetooth & other devices”.
- Then, choose your headphone and select the “Remove Device”.
- Make sure that you check the “Download over metered connections” option located at the bottom. It will download the required Bluetooth drivers.
After performing these three ways, your Bluetooth will start working properly. Then, you can test your microphone.
Method 8: Download Correct Audio Driver for Windows 10 PC
The incorrect audio driver could be the reason that your USB microphone is not working on Windows 10. To deal with this, you can simply download and install the correct audio drivers for your computer.
- Visit the manufacturer’s website.
- Download and install the compatible audio drivers.
- Then, reboot the computer.
In case, you find it hard to install the audio driver then you can follow these instructions:
Note: Before moving forward, make sure that you disconnect all the connected devices except the microphone or headphones.
- Click right on the “Start” icon or press the “Windows + X” key.
- Then, select the “Device Manager” option.
- Now, expand the “Sound, video and game controllers” option.
- Then, right-click on the “High Definition Audio Device”.
- Choose the “Update driver” option.
- Now, click on the “Browse my computer for driver software”.
- Click on “Let me pick from a list of available drivers on my computer”.
- Choose the “High Definition Audio Device”.
- Hit the “Next” button.
- Click on “Yes” when you see the confirmation pop-up.
After applying your changes, you can reboot your computer. So if you are thinking about how to fix microphone not working on Windows 10, these steps will help you.
Method 9: Uninstall Your Microphone from the Devices and Printers
If your headphones or microphones (Bluetooth or USB ones) appear in the list of Devices and Printers then you should uninstall from the Control Panel. Later you can reinstall it to fix the microphone issues.. Let’s know how to do it in the following steps.
- Open the “Run” dialog box by using the “Windows” + “R” key on your keyboard.
- Type “Control Panel” in the search bar.
- Hit the “Enter” key.
- Click on “View devices and printer”. This will show a list of devices.
- Now, right-click on the microphone, headset or USB dongle linked with your microphone.
- Choose the “Remove device” option from the right-click menu.
- Click on “Yes” to apply your actions.
After disconnecting these devices from your Control Panel, you can re-install them again. If you are wondering why is my microphone not working on Windows 10, these steps would solve your problem. In case it does not help then try using other methods. Keep reading!
Method 10: Remove Suspicious VOIP Apps
Voice Over IP (VOIP) is used for audio and video chat. However, there are instances when some VOIP programs such as Zoom, Skype, and more may play with your microphone’s settings in otes own way. As a result, it may prevent your microphone from working properly.
Therefore, it is recommended that you review all the voice applications that are installed on your Windows 10 PC. Then, you can uninstall them and reinstall to fix the microphone issues.
Method 11: Check for Windows Update
Windows 10 keeps on sending the updates you can turn of the Windows updates manually if needed. Some of them updates automatically. If you are facing “Microsoft lifechat lx 3000 microphone not working on Windows 10” issue then you can check for updates and install if available. This is how you can check for the available updates on Windows 10.
- Press the “Windows” key or click on the “Start” menu.
- Go to “Settings”.
- Click on “Update & Security” option.
- Now, click on the “Check for updates” option.
If the Windows 10 update is available, you can download and install it by following the on-screen instructions for more space in disk you can also delete the Windows update files . After updating your Windows 10, it will fix the issues related to your microphone.
Method 12: Update or Reinstall Microphone Drivers
Sometimes, the USB microphone is not working on Windows 10 because you have not updated your microphone drivers. In case the drivers are up to date then you should uninstall and install them again. Here is how to do this.
To reinstall the microphone drivers, you can follow these steps:
- Open the “Device Manager”.
- Double click on the “Audio inputs and outputs” in the “Device Manager” window. Alternatively, you can click on the small arrow to expand the section.
- Now, right click on the microphone or recording device.
- Click on the “Uninstall device” option.
- Restart your PC and reinstall the required drivers.
In case the drivers fail to install properly, you can force your system to install it. For that, you can do the following:
- Go to the “Device Manager”.
- Click right on your computer name.
- Click on “Scan for hardware changes”.
Doing so, the Windows will start installing the missing drivers.
To update the drivers automatically or manually, you can click right on the device (in the Device Manager) and choose the Update driver option. It is up to you if you want to update drivers automatically or manually. This will hopefully fix your microphone issues.
Method 13: Restart Windows Audio Service
If any Windows app or Zoom microphone is not working on Windows 10 then you can try restarting Windows audio service. This will surely fix the microphone problems. Let’s know how to do that in the following steps.
- Open the “Run” dialog box by using the “Windows” + “R” key on your keyboard.
- Type “services.msc” in the search bar.
- Hit the “Enter” key or click “OK” button.
- Now you will see a list of Windows services in the “Services” window.
- Select “Windows Audio” service from the list and click right on it.
- Click on the “Restart” option. Alternatively, you can “Stop”. Then, right-click again to choose the “Start” option.
After this, you can check if it has fixed the issue. If no, then you can make the following settings:
- Right-click on the “Windows Audio” service.
- Click on “Properties”.
- In the “Windows Audio Properties” window, set “Startup type” as “Automatic”.
This is how you can restart Windows audio service. Yet you find that the microphone is not working properly on Windows 10 then there must be some issue with your system. Learn more to fix that.
Method 14: Restore the System with Restore Points
To use Restore Points, you must have restore points created. This feature will bring your system in the earlier state without harming your data and files. To restore the system with Restore Points, you can follow these steps.
- Press the “Windows” + “R” key on your keyboard. This will open the “Run” dialog box.
- Type “rstrui.exe” in the search bar.
- Hit the “Enter” key or click on the “OK” button.
- When the “System Restore” window opens, click “Next”.
- If you have the created restore points, you will see them in a list.
- Here, you can check the “Show more restore points” option located below.
- Now, select the appropriate restore point and click “Next”.
Note: Check the time of created restore points while selecting it. Make sure that you don’t pick the restore points of the time when your microphone was having issues (because you would not want it to restore the system to that state).
- When you see the event details in the “Description” box, click “Finish”.
Once you are done implementing these steps, the process of restoring the system will begin. Then, you can check if on Windows 10, microphone not working Realtek or resolved successfully.
Method 15: Disable Handset on Bluetooth Devices
Disabling the hands-free on Bluetooth devices can also help you to fix the microphone problems. To get the job done, you can follow these steps:
- Open the “Start” menu or press “Windows” key.
- Search for “Manage Audio Devices” in the search bar.
- In the “Sound” window, go to the “Playback” tab and “Recordings” tab one by one.
- Right-click on any of the hands-free Bluetooth devices.
- Click on the “Disable” option.
That’s it! After that, your handset or hands-free will be disabled on the Bluetooth devices. This will surely make your microphone work effectively.
In a Nutshell
Microphones’ issues are not a big concern for Windows 10 users. If this issue ever persists, you can resolve it by following any of the methods we have discussed above. Although the basic troubleshooting steps would be enough to help but in case it does not then you can go further with other methods.
If on Windows 10, microphone not working Realtek, the blog has all the possible methods to fix your microphones problems without taking your more efforts.
Are you interested in learning more Windows tweaks? Check out these amazing guides on Windows 10.