![USB Device Not Recognized on Windows 10 [Resolved]](https://www.errorsdoc.com/wp-content/uploads/2020/11/124-1-59.jpg)
USB plays a vital role in transferring media between devices. However, there are instances when your Windows does not recognize USB devices. As a result, it fails to transfer media. If you are facing issues such as USB device not recognized on Windows 10 or 7 then you can fix it by following our guide.
This blog will guide you through the following process so that you can fix the “Windows USB device not recognized” error.
- Why Windows 10 Does Not Recognize USB Devices?
- What do you do if your USB Device is not Recognized?
- Method 1: Check Your USB
- Method 2: Check Device Compatibility
- Method 3: Update Operating System
- Method 4: Use Disk Management Tool
- Method 5: Create New Drive Volume and Assign Drive Letter
- Method 6: Use Another Device or USB Port
- Method 7: Troubleshoot the Drivers
- Method 8: Scan for Hardware Changes in Device Manager
- Method 9: Reinstall the USB Controllers
- Method 10: Disable USB Selective Suspend Feature
- How to Fix “iPhone USB Device Not Recognized” Error on Computer?
- Method 1: Follow Basic Techniques
- Method 1.1: Restart iPhone and Windows Computer
- Method 1.2: Check USB Port and USB Cable
- Method 1.3: Trust Your PC
- Method 2: Update Software
- Method 3: Update Device Drivers
- How to Fix When USB Device Not Recognized for Android?
Why Windows 10 Does Not Recognize USB Devices?
There can be several reasons that your Windows does not recognize USB devices. If your USB is damaged or dead entirely then you would not be able to view it on the computer. As a result, you encounter issues such as USB device not recognized on Windows 7 or 10.
Besides, there are other reasons that may be responsible for this error. For example, an incorrect file system, outdated software, incompatible drivers, device conflicts, and partition issues. Wrong hardware, USB ports, or dead system controller can also cause errors while plugging in the USB.
What do you do if your USB Device is not Recognized?
Due to certain technical problems, you might not be able to connect the USB successfully.
If you want to get rid of the USB device is not recognized error, you can perform basic techniques so that your USB stick can work again efficiently.
Although it is hard to pick out the actual cause of this error, some minors and technical glitches can be removed by performing simple methods.
Therefore, we are bringing you some effective solutions. These will help you to remove the error and transfer the media without any trouble. Let’s go through these methods one by one.
Method 1: Check Your USB
The first and foremost thing to do is to go for preliminary checks. If on Windows, USB device not recognized then you should ensure certain things which are as follows:
- USB Device Should Turn On: When you connect the USB to your PC, ideally it should turn on automatically. It should also blink with a flashlight (on the unit). However, some of the units have a dedicated button or power cable that you need to switch on manually. This will allow your computer to detect the USB.
- Check If USB Stick is Damaged: There are chances that your USB stick gets damaged. Therefore, you should check your USB physically for cracks or any other damage.
- Restart Your Device: In some cases, restarting the computer helps to fix the minor issues. If your computer not recognizing any USB devices then unplug your USB, shut down your device. Then, you can unplug the device from the main power. After a short while, you can restart your PC and try using the USB drive. If your windows system get stuck while restarting fix it with the guide.
- Allow the PC to Load Fully: Some PC is really slow and stuck when you perform multiple operations. In such a scenario, make sure that you let your computer load entirely and wait for the USB to be recognized.
These are the basic ways to scrutinize your USB drive. If these ways are followed properly, you might resolve your USB issues. Yet your Garmin USB device not recognized on Windows 10 then you need to implement other methods. Keep reading!
Method 2: Check Device Compatibility
Incompatible USB sticks can be the biggest reason that your system not recognizing USB devices. In most cases, the USB 3 devices can be connected easily with USB 2 ports. However, in some cases, the USB 3 device may require more compatible ports in terms of power.
Therefore, you should check the compatibility of your device. For that, you can read the device’s instructions and use the USB drive accordingly.
Method 3: Update Operating System
New updates contain important files that can support hardware and your device. If the Windows USB device not recognized, make sure your operating system is updated. Below are the following steps to check for new updates on the Windows computers.
- Open the “Settings” app.
- Go to “Update & Security”.
- Click on the ”Check for Updates” option.

This will start looking for new updates for your device. If there is any update available, you can download it immediately. Later, you can try using your USB with your Windows PC. This should fix your problem. In case, it does not then you need to check your disk. Know more in detail in the next method.
Method 4: Use Disk Management Tool
Using the Disk Management Tool, you can review all the hard disks that are connected to your computer. This will help you to know if your Windows PC can detect the USB stick. So let’s know how to run this Disk Management Tool in the following steps:
- Connect your USB stick to your computer.
- Click right on the “Start” menu.
- Go to “Disk Management”.
- Now, look for the USB under the “Primary” or “Secondary” disks. In case, it does not have partitions then you will see the “Removable” option.
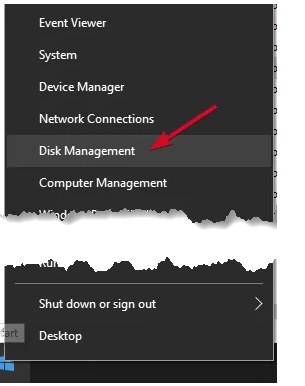
If you find your USB in the “Disk Management Utility” then you can create the new volume and allot the drive letter. This will help you to partition the flash drive so that it can be detected by your computer or other devices.
Method 5: Create New Drive Volume and Assign Drive Letter
The Disk Management tool helps you to fix the partitioning and file system issues with drivers. If your device is shown in the Disk Management then you can generate a new drive volume and then assign the drive letter.
While performing this step, the USB stick may display Unallocated space. However, you can build a new partition so that your Windows can use this.
To generate a new drive and assign a drive letter, you can follow these steps mentioned below:
- Right-click on the “Start” button.
- Go to the “Disk Management” option.
- Click right on the “Unallocated space”.
- Then, go to “New Simple Volume” and follow on-screen instructions.
After implementing these steps, if you cannot see the flash drive, you have to make sure that it has a driver letter. This should be done automatically. However, if you remove it manually then the drive will not be detected on Windows. Let’s know how to assign a drive letter in the following steps:
- Right-click on the drive’s partition and click on “Change Drive Letter and Paths”.
- Click on “Add” and choose a letter (if it does not have any drive letter assigned).
- If it already has a letter, click on the “Change” button. Then, pick a different letter and click “OK”.
This is how you can create and change the drive letter. Once the drive is partitioned there are chances that your USB issue gets resolved.
In case the USB device does not recognize on Windows 7 or 10 then there must be some issues with the port.
Method 6: Use Another Device or USB Port
If the USB device not recognized on Windows 10 and keeps popping up then you should try using some other device or USB port. If the USB works in another port or device, it indicates that your USB port is damaged due to which it is not showing up on your computer.
Furthermore, make sure that your USB port is clean and firm. If the port is loose then you would not be able to connect the USB effectively. In case you are a USB hub then unplug it from the hub and connect directly to your PC. Some of the hubs have not sufficient power for drives, hence, your computer fails to recognize the USB.
Method 7: Troubleshoot the Drivers
If the USB is detected on another device then there must be some issues with your drivers. Therefore, in this method, we will troubleshoot the drivers using the Device Manager. Let’s know how to get this done.
- Click right on the “Start” button.
- Select the “Device Manager” option.
- Click on the “Disk Driver” in order to expand it.
- Now, look for the Yellow exclamation mark next to the devices in the list. If you see the mark then the driver has an issue.
- Then, right-click on the device (with Yellow exclamation mark).
- Click on “Properties”.
Thereafter, you can fix the issue related to your drivers. There are other solutions that can be performed as well. These are as follows:
- Update the driver: For this, go to the “Device Manager” window and right-click on the driver. Then, click on “Update driver” and follow the on-screen instructions.
- Download new drivers: You can visit the manufacturer’s website and download the compatible device drivers on your computer.
- Rollback your driver: To get the recent driver update, you can roll back to the earlier update. This will restore your device to the state when it was working properly.
- Uninstall the device: After uninstalling the device, you can restart your PC. Then, let your computer reinstall the correct driver and its configuration.
Method 8: Scan for Hardware Changes in Device Manager
If Windows 10 or Windows 7 does not recognize USB device then you should scan for the hardware changes. For this, you can go to the Device Manager on Windows. Let’s understand better in the following steps:
- Open the “Device Manager” by clicking right on the “Start” button.
- Go to “Action”.
- Click on “Scan for hardware Changes”.
Once you are done performing these steps, your Windows computer will start finding the USB stick. This will allow you to access your USB data.
Method 9: Reinstall the USB Controllers
There are instances when the USB drivers are corrupted or unstable due to which Windows 10 or Windows 7 is not recognizing USB devices. In this scenario, you can reinstall the USB controllers. Here is what you need to do.
- Right-click on the “Start” button.
- Open “Device Manager”.
- Click on the “Universal Serial Bus controller” in order to expand the list.
- Click right on the device and click on “Uninstall”.
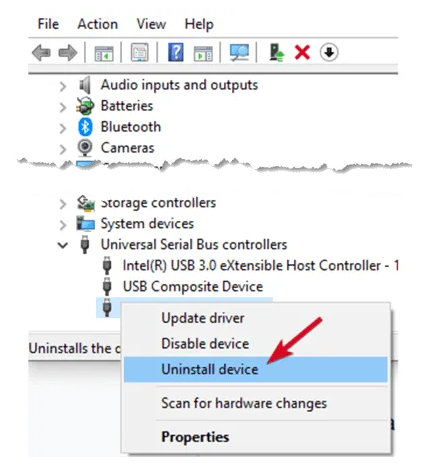
When you are done following these steps, you can restart your device. After this, your computer will start reinstalling the controllers automatically.
Method 10: Disable USB Selective Suspend Feature
This feature reduces battery usage by cutting down the USB stick power. This could also be the reason that the Garmin USB device not recognized on Windows 10 or Windows 7.
To deal with this error, you can simply disable the USB selective suspend feature. For that, you can follow these steps:
- Click on the “Start” button.
- Select the “Hardware and Sound”.
- Go to “Power Options”.
- Click on “Change plan settings.
- Go to “Change advanced power settings”.
- Now, click on “USB settings” in order to expand it.
- Click on “USB selecting suspend settings”.
- Click on the “Plugged in” drop-down to choose the “Disabled” option.
- Then, click on the “Apply” and “OK” button.
Once you are done, restart the computer. This will resolve USB errors such as “USB device not recognized on Windows 7 or 10”.
The aforementioned methods are specifically for Windows PC. In case, you are having trouble connecting the iPhone or Android USB then we have also got some solutions for that.
How to Fix “iPhone USB Device Not Recognized” Error on Computer?
If your iPhone USB device not recognized on a Windows computer, this can be due to software issues such as iOS version or Windows system. iTunes and USB driver issues can also cause your iPhone USB.
However, you can perform basic techniques to kick out this error. Below we will discuss different methods. You can go through them and follow steps carefully on iPhone and Windows PC.
Method 1: Follow Basic Techniques
The first method is to follow the basic techniques such as restarting the device, check the USB cable, USB port, etc. Let’s get into detail.
Method 1.1: Restart iPhone and Windows Computer
The first and foremost thing to do is to restart your device. But before moving forward, make sure you disconnect your phone from the PC then you can restart both the devices (iPhone and Windows PC). After this, you can try using the iPhone USB if it works.
Method 1.2: Check USB Port and USB Cable
If the USB device not recognized on Windows 10 and keeps popping up, you can check your USB cable and the port. Sometimes, your USB works fine but the USB port interrupts your phone from being connected. In this case, you can try using another USB to another port and check if it works properly.
Method 1.3: Trust Your PC
When you connect your iPhone USB to your Windows computer, it shows the prompt on the screen saying Trust or Don’t Trust on your phone. At this moment, you should always tap on the Trust option as it helps you to connect the USB to your computer successfully. Consequently, your data will be accessible from your computer.
Method 2: Update Software
Another method to fix this USB error is to upgrade your software such as iTunes and iOS versions.
Method 2.1: Update iOS Version
- Open the “Settings” app on your phone.
- Scroll down to the “General” tab.
- Tap on “Software Update”. This will start looking for the latest updates.
- Tap on “Download and Install” (if available).
Note: When you download the new updates, make sure you are connected to a strong internet and your phone has enough space. Otherwise, the installation will fail.
Method 2.2: Update iTunes
If your computer does not have iTunes installed, you can install it. If you already have it then check the version of your computer.
- Launch “iTunes” on your PC.
- Click on the “help” button.
- Go to the “Check for Updates” option.
After this, you can follow the on-screen instructions. If you find any new updates, you can download it. Thereafter, you can connect your iPhone to your computer.
Method 3: Update Device Drivers
Outdated or missing drivers such as Apple Mobile Device USB driver and Apple iPhone device driver can also cause problems. Due to this, you encounter a “Windows does not recognize USB device” error. Therefore, you should update your device drivers to make the system work effectively. This method will help your computer to recognize the iPhone USB.
How to Fix When USB Device Not Recognized for Android?
In case you are connecting your Android phone to your Windows computer and the USB device not recognized for Android then you can follow these solutions.
Method 1: Try Another Cable or Port
Before you jump to implement any high technical method, you should start with the basics. To recover your USB issues, you can try connecting it to another cable or port. It will clear the idea that the problem is occurring with your USB cable or port. Therefore, you should connect your Android to some other port. If it still does not work, you can move to the other methods.
Method 2: Choose Right Connection Settings
When you connect your phone to the computer, it shows a few options on the screen. At this stage, you should pick the right settings. Charging is the default setting, however, you can pick Transfer photos and Transfer files as well.
To show up your phone on a PC, you should select the Transfer files option. Below we will discuss those steps that you can perform when connecting Android to Windows or other computers.
- Unlock your Android phone.
- Open the notification bar by sliding down the screen.
- Tap on the “Android System” box.
- Choose “Transfer Files”.
Method 3: Enable USB Debugging Mode
If the USB device not recognized on Windows 7 or 10, you can fix it by enabling the USB Debugging mode. To do so, you can follow these steps:
- Make sure your Android phone is disconnected from your PC.
- Now, launch the “Settings” on your phone.
- Search for “Developer Options”.
- Under the “Debugging” section, enable the “USB debugging” option.
- Tap on “OK” when you see the prompt.
Method 4: Update Device Drivers
Corrupted drivers often create conflicts between devices. As a result, your computer is unable to recognize the USB. In this case, you can try updating or reinstalling the device drivers.
- Use the “Windows” + “X” key.
- Click on the “Device Manager” option.
- Go to the “Portable Device” section.
- Click on the device name.
- Select “Update Driver Software”.
- Click on the “Browse my computer for driver software”.
- Choose the “Let me pick…”
- Click on the “MTP USB Device” option.
- Hit the “Next” button.
Method 5: Uninstall Device Drivers
In case you are having the same issues then you can try uninstalling the device drivers. Do the following:
- Use the “Windows” + “X” key.
- Click on the “Device Manager” option.
- Go to the “Portable Device” section.
- Click on the device name.
- Select the “Uninstall” option.
- Click the “OK” button.
That’s it!
In a Nutshell
Solving the USB problems is easy. In this guide, we have talked about how we can find issues and fix them thoroughly. Hopefully, you find this guide useful.
To know how to boot Asus laptop from USB, check this guide!