The ASUS BIOS key you need depends on your device type. For ASUS laptops (ROG, TUF, VivoBook, ZenBook, and others), press F2 during startup to enter BIOS. For ASUS desktop motherboards, press Del (Delete) instead. These are the two keys you need to remember for any ASUS product.
Entering BIOS is necessary for changing the boot order, enabling virtualization, adjusting fan curves, enabling XMP for RAM, configuring Secure Boot, and diagnosing hardware issues. This guide shows you exactly how to access BIOS on every ASUS device, including troubleshooting steps when the standard keys do not work.
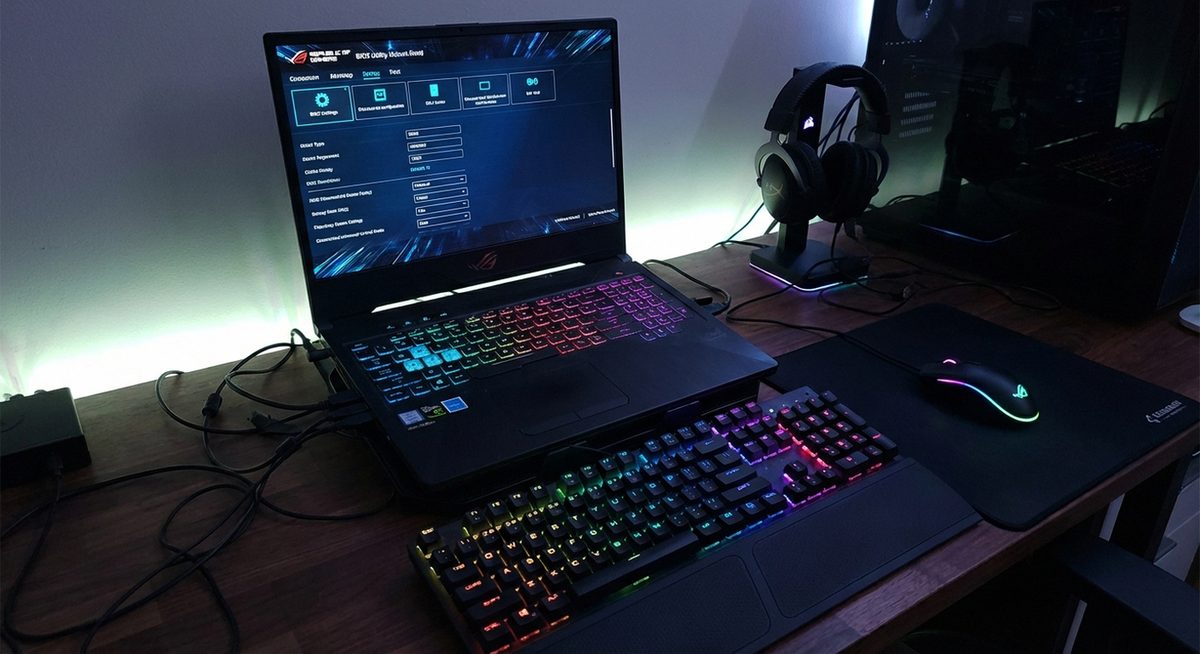
ASUS uses a UEFI BIOS interface on all modern devices, which provides both an EZ Mode (simple) and Advanced Mode for experienced users.
Power off your ASUS laptop, then press the power button and immediately tap F2 repeatedly until the BIOS screen appears. For ASUS desktops, use the Del key instead.
ASUS BIOS Keys: F2 (All Laptops) | Del (Desktop Motherboards) | Esc (Boot Menu)
Method 1: Enter ASUS Laptop BIOS with F2
The F2 key is universal across all ASUS laptop product lines. This method works for ROG, TUF Gaming, VivoBook, ZenBook, Chromebook, ExpertBook, and ProArt series laptops.
Shut Down Your ASUS Laptop Completely
Click Start > Power > Shut Down. Do not use restart, sleep, or hibernate — a full shutdown is required for the BIOS key to register.
Press Power and Immediately Tap F2
Press the power button, then immediately start tapping the F2 key about twice per second. Continue tapping until the BIOS interface appears on screen.
Navigate BIOS Using EZ or Advanced Mode
ASUS BIOS opens in EZ Mode by default, showing basic system info and boot priority. Press F7 to switch to Advanced Mode for detailed settings like CPU configuration, fan control, and security options.
Save and Exit When Done
Press F10 to save your changes and exit BIOS, or press Esc to exit without saving. The laptop will restart with your new settings applied.
Tip: If you see the ASUS logo but F2 does not work, try holding F2 before pressing the power button. On some ASUS models, holding the key before powering on is more reliable than tapping it afterward.
Method 2: Enter BIOS via Windows Advanced Startup
Modern ASUS laptops with fast-boot enabled may not give you enough time to press F2. Using the Windows Advanced Startup menu bypasses this limitation.
Open Settings
Press Windows + I to open Settings. Navigate to Update & Security > Recovery (Windows 10) or System > Recovery (Windows 11).
Click Restart Now
Under Advanced Startup, click Restart Now. Your laptop will restart to a blue options screen.
Navigate to UEFI Firmware Settings
Select Troubleshoot > Advanced Options > UEFI Firmware Settings > Restart. Your laptop will reboot directly into BIOS.
Method 3: Enter ASUS Desktop Motherboard BIOS with Del
ASUS desktop motherboards (ROG, TUF, Prime, ProArt, and others) use the Delete key instead of F2 to enter BIOS. The process is otherwise identical.
Power Off and Press Del During Startup
Shut down your PC, press the power button, and tap the Del key repeatedly until BIOS appears.
Use BIOS to Configure Your System
ASUS desktop BIOS typically offers more options than laptop BIOS, including XMP profiles for RAM overclocking, fan curve customization, and extensive boot configuration.
Apply Changes and Restart
Press F10 to save and exit. Your desktop will restart with the new configuration.
Warning: Be cautious when changing BIOS settings you do not fully understand, especially overclocking and voltage settings. Incorrect values can cause instability or hardware damage. Use the Load Optimized Defaults option (F5 in BIOS) to restore safe settings if anything goes wrong.
ASUS BIOS Key Reference by Product Line
ROG (Laptops): F2 | ROG (Desktops): Del | TUF Gaming (Laptops): F2
TUF Gaming (Desktops): Del | VivoBook: F2 | ZenBook: F2
ExpertBook: F2 | ProArt (Laptops): F2 | ProArt (Desktops): Del
ASUS Chromebook: Esc (Developer Mode) | Prime Motherboards: Del
Why Can You Not Enter ASUS BIOS?
If the F2 or Del key does not work, the most common causes are Fast Boot being enabled (which skips the key detection window), a wireless keyboard that is not active during POST, or a connected external monitor that delays the BIOS splash screen. Disable Fast Boot through Windows settings, use a wired USB keyboard, or try the Windows Advanced Startup method. On rare occasions, a BIOS update may be needed if the firmware is corrupted.
Frequently Asked Questions
The BIOS key for all ASUS ROG laptops is F2. Tap it repeatedly immediately after pressing the power button. For ROG desktop motherboards, use the Del key instead.
Press F2 during startup on any ASUS VivoBook model. If Fast Boot prevents this, use the Windows Advanced Startup method: Settings > Recovery > Advanced Startup > UEFI Firmware Settings.
UEFI is the modern replacement for traditional BIOS. All current ASUS devices use UEFI firmware, but it is commonly still called BIOS. UEFI offers a graphical interface, mouse support, Secure Boot, and support for drives larger than 2TB.
Yes, connect an external USB keyboard and use it to press F2 during startup. Make sure the keyboard is wired — wireless keyboards may not be detected during POST.
Press Esc during startup to access the Boot Menu, then select your USB drive. Alternatively, enter BIOS with F2, go to the Boot tab, and change the boot order to prioritize the USB device.
In ASUS BIOS, F9 restores default BIOS settings (Load Optimized Defaults). This is useful if you have made changes that cause instability. It does not reset your Windows installation or personal data.
Fast Boot is likely enabled, which skips the BIOS key detection window. Use the Windows Advanced Startup method or enter BIOS, disable Fast Boot under the Boot tab, and save the setting for next time.
Yes, ASUS provides EZ Flash Utility within BIOS (usually under the Tool tab). Download the BIOS update file from the ASUS support website, place it on a USB drive, and use EZ Flash to apply it.
Enter BIOS with F2, switch to Advanced Mode (F7), go to Advanced > CPU Configuration, and enable Intel Virtualization Technology (VT-x) or AMD SVM Mode. Save with F10.
Yes, loading optimized defaults (F9 in BIOS) is completely safe. It restores manufacturer-recommended settings without affecting your Windows installation, files, or programs.